There used to be a tiny, family-run pizzeria on the corner of Maple and 3rd Street called Luigi’s Lantern. Every October, they’d do a special “Spooky Supper” night, and the main attraction wasn’t pizza—it was their mummy hot dogs. I’m not kidding. The place was packed with kids in costumes, and the smell of toasted buns and hot dogs filled that little room like a warm hug. When they closed down three years ago—the owner retired to Florida, can you blame him?—I was genuinely heartbroken. My kids asked about “the mummy dogs from Luigi’s” for months. I mean, months. So I did what any slightly obsessed home cook would do: I set out to recreate them.
After seven tries—seven!—I finally nailed it. The first batch came out looking like sad, soggy bandages. The second batch fell apart in the oven. But that third batch? That was the turning point. I figured out the dough-to-dog ratio, the perfect bake time, and most importantly, the secret to getting those little mustard eyes to stay put. Honestly, I felt like a culinary detective. And when I finally set a plate of these down in front of my kids, their faces lit up like I’d handed them a winning lottery ticket. My youngest, who is usually a “just the noodles, please” kind of eater, ate three.
You know that feeling when you finally crack a recipe that means something to your family? It’s not just about the food. It’s about the memory you’re keeping alive. These mummy hot dogs aren’t just cute—they’re a little piece of our family’s history, all wrapped up in buttery, flaky dough. And now, I’m sharing the exact method with you, so you can start your own tradition, too. Let’s get wrapping!
Why You’ll Love This Recipe
Let me tell you, this recipe is a total game-changer for Halloween dinner. It is fun, fast, and uses ingredients you probably already have in your fridge and pantry. Here is why it works so well for busy families:
- Quick & Easy: From start to finish, these come together in about 20 minutes. Seriously. You can make a whole batch while the kids are still arguing over what costume to wear.
- Simple Ingredients: No fancy grocery trips needed. Hot dogs, crescent roll dough, and a little mustard. That is it. You might even have everything on hand right now.
- Perfect for Halloween: These are the star of any spooky dinner, classroom party, or pre-trick-or-treating fuel. They are festive without being too scary for little ones.
- Crowd-Pleaser: I have served these to picky eaters, hot dog connoisseurs, and even adults who claimed they were “too old for this.” Every single plate came back empty.
- Unbelievably Delicious: The salty hot dog wrapped in soft, buttery, flaky dough is a combination that just works. It is comfort food at its simplest and best.
What makes this version different from every other mummy dog recipe out there? It is the technique. I found that slicing the dough into thin strips, rather than thick ones, gives you a much better “mummy wrap” look. Plus, you get more crispy edges, which is honestly the best part. And the mustard eyes? I use a toothpick to apply them—it gives you way more control than a squeeze bottle, and they don’t slide off during baking. This is not just another version; it is the best version, tested by a mom who really, really wanted to get it right.
This recipe isn’t just good—it is the kind that makes you close your eyes after the first bite. It is Halloween fun reimagined: faster, easier, but with the same soul-soothing satisfaction of a family tradition. Perfect for impressing your kids without any stress, or turning a simple weeknight into something truly memorable.
What Ingredients You Will Need
This recipe uses simple, everyday ingredients to deliver maximum fun and flavor. You likely have most of these in your kitchen already, which is the whole point. Here is what you need to grab:
- Hot dogs: 8 standard-size hot dogs (about 6 inches long). I prefer all-beef hot dogs for better flavor, but any brand works. (I personally like Nathan’s or Hebrew National for that snap when you bite into them.)
- Crescent roll dough: 1 can (8 ounces) of refrigerated crescent roll dough. You can use the regular or the buttery flake style. (Pillsbury is my go-to brand because it is consistent and easy to work with.)
- Mustard: 2 tablespoons of yellow mustard, for the eyes. You can also use ketchup or sriracha for a spicier look. (French’s classic yellow is perfect here—it is bright and holds its shape well.)
- Optional – Egg wash: 1 large egg, beaten with 1 tablespoon of water. This gives the dough a beautiful golden-brown finish. (Skip this if you want a more matte, “bandage” look.)
- Optional – Everything Bagel Seasoning: A sprinkle adds a salty, savory crunch. (This is my secret trick—it makes them taste like a fancy pretzel dog.)
- Optional – Cheese: Thin strips of cheddar or mozzarella can be wrapped with the dough for a cheesy surprise inside. (Use a vegetable peeler to get super thin strips.)
Ingredient Tips & Sourcing:
- For the best texture, make sure your crescent dough is cold. If it gets too warm, it becomes sticky and hard to cut into strips. Pop it in the fridge for 5 minutes if your kitchen is warm.
- Look for hot dogs that are uniform in size so they cook evenly. Avoid the jumbo or bun-length ones for this recipe—they are too thick and the dough won’t wrap properly.
- If you want a gluten-free option, use gluten-free crescent roll dough. It works surprisingly well, though the strips may be a little more delicate to handle.
- For a dairy-free version, use dairy-free crescent dough and skip the optional cheese. Most standard hot dogs are dairy-free, but always check the label.
Equipment Needed
You do not need any fancy gadgets for this recipe, which is part of its beauty. Here is what you will need:
- Baking sheet: A standard half-sheet pan (18×13 inches) is perfect. Line it with parchment paper or a silicone baking mat for easy cleanup.
- Sharp knife or pizza cutter: You need something sharp to cut the crescent dough into thin strips. A pizza cutter works like a dream for this.
- Toothpick: For applying the mustard eyes. A small brush or the tip of a knife also works, but a toothpick gives you the most control.
- Small bowl: For the egg wash, if you are using it.
- Pastry brush: To apply the egg wash evenly. If you don’t have one, a paper towel works in a pinch.
- Cooling rack: Optional, but it helps the mummy dogs stay crispy after baking. If you don’t have one, just let them cool on the baking sheet for a minute before transferring.
Budget-Friendly Alternatives: If you don’t have a pizza cutter, a sharp knife is totally fine. No pastry brush? Use the back of a spoon to dab on the egg wash. And if you don’t have a cooling rack, a clean wire rack from your toaster oven works perfectly. Honestly, I’ve made these with just a knife and a baking sheet, and they turned out great.
Preparation Method
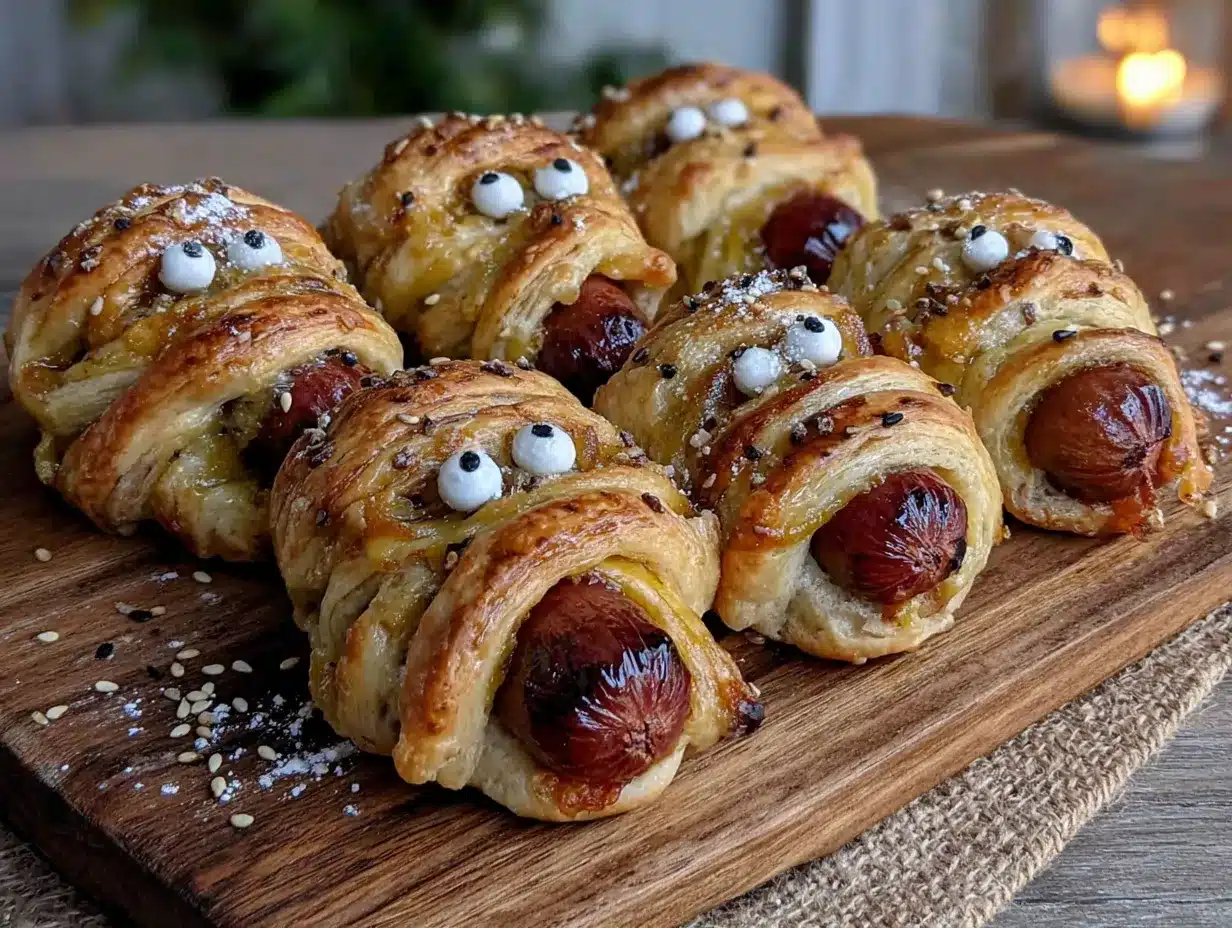
Alright, let’s get to the fun part. Follow these steps, and you will have a plate of adorable, delicious mummy hot dogs in no time. I’ve included all the little tricks I learned from my many attempts.
- Preheat your oven to 375°F (190°C). Line a baking sheet with parchment paper. This is important—the dough can stick to an unlined pan, and you want those mummies to come off cleanly.
- Prepare the crescent dough. Unroll the can of crescent roll dough onto a clean cutting board. Press the perforated seams together gently with your fingers to create one solid sheet of dough. Don’t worry if it’s not perfect—it will be covered by the hot dogs anyway.
- Cut the dough into thin strips. Using a sharp knife or pizza cutter, slice the dough lengthwise into 8 to 10 thin strips, each about 1/2-inch wide. (I found that thinner strips look more like mummy bandages and get crispier. Thick strips look like blobs.)
- Wrap the hot dogs. Take one hot dog and start wrapping a strip of dough around it, stretching the dough slightly as you go. Leave a small gap near the top for the “face.” The dough should overlap a little, but not be too tight—the hot dog needs room to expand as it cooks. (My first attempt was too tight, and the dough split open. Learn from my mistake!)
- Place on the baking sheet. Put each wrapped mummy dog on the prepared baking sheet, leaving about 1 inch of space between them. They don’t spread much, but a little breathing room helps them cook evenly.
- Apply the egg wash (optional). Brush the tops of the wrapped dough with the beaten egg wash. This gives them a beautiful golden-brown color. If you want a more “bandage” look, skip this step—the dough will stay paler.
- Bake for 12-15 minutes. Bake until the dough is golden brown and cooked through, and the hot dogs are heated. The exact time will depend on your oven. (My oven runs hot, so I check at 12 minutes. You want the dough to be set, not burnt.)
- Add the eyes. Let the mummy dogs cool on the baking sheet for 2 minutes. Then, using a toothpick, dip it into the yellow mustard and dot two small eyes onto the exposed hot dog area. (Don’t do this before baking—the mustard will melt and look like a sad yellow puddle. Trust me on this one.)
- Serve immediately. These are best served warm, right after baking. The dough is flaky, the hot dog is juicy, and the mustard eyes are still bright and perky.
Pro-Tip for Efficiency: While the first batch is baking, you can prep the second batch. Or, if you have little helpers, let them do the wrapping—it is a great fine-motor-skill activity, and they will be so proud to eat their creations!
Cooking Tips & Techniques
I have made these mummy hot dogs more times than I care to count, and I have learned a few things the hard way. Here are my best tips to ensure success every time:
- Don’t overwork the dough. Crescent roll dough is delicate. If you handle it too much, it becomes tough and doesn’t puff up as nicely. Just unroll it, cut it, and wrap it. Done.
- Stretch the dough gently. When wrapping, pull the dough strip just slightly. This creates tension, which helps the dough stay in place and gives you those nice, defined bandage lines.
- Leave a gap for the face. I know it is tempting to wrap the whole thing, but leave about 1/2 inch of the hot dog exposed at the top. That is where the eyes go. If you cover the whole thing, it is just a bread-wrapped hot dog—still tasty, but not a mummy.
- Use a toothpick for the eyes. I tried squeeze bottles, piping bags, and even a fork. Nothing works as well as a simple toothpick. Dip it in mustard, then dot it on. You can make the eyes as big or as small as you want.
- Watch the baking time. Ovens vary. Start checking at 12 minutes. The dough should be a light golden brown. If it gets too dark, the dough will be hard, not flaky.
- Let them rest. After baking, let them sit on the baking sheet for 2 minutes. This allows the dough to set and the hot dog to reabsorb any juices. If you move them too soon, they might fall apart.
Common Mistake to Avoid: My biggest failure was using too much dough. I thought, “More dough means more goodness, right?” Wrong. The dough-to-hot-dog ratio is crucial. Too much dough and it bakes up raw in the center. Stick to thin strips, and you will be golden.
Variations & Adaptations
One of the best things about this recipe is how easy it is to change it up. Here are some of my favorite variations:
- Cheesy Mummy Dogs: Before wrapping the hot dog, place a thin strip of cheddar or mozzarella cheese on top. Wrap the dough around both the hot dog and the cheese. The cheese melts into the dough and creates a gooey, delicious surprise.
- Spicy Mummy Dogs: Use spicy Italian sausages instead of regular hot dogs. Add a dot of sriracha or hot sauce to the mustard eyes for a fiery kick. My husband loves these.
- Pigs in a Blanket Style: Cut the hot dogs into thirds before wrapping. This creates mini mummy bites that are perfect for parties or lunchboxes. Reduce the baking time to 8-10 minutes.
- Veggie Mummy Dogs: Use vegetarian or vegan hot dogs. They work exactly the same way, though they may be a little softer. I like the Field Roast brand for this.
- Breakfast Mummy Dogs: Wrap the hot dogs in pancake batter instead of crescent dough. Cook them on a griddle until golden brown. Serve with maple syrup for dipping. This is a fun Halloween morning treat.
- Gluten-Free Adaptation: Use gluten-free crescent roll dough. It is a bit more fragile, so handle it gently. You might need to press the seams together more carefully.
Personal Variation I Love: I once made these with a sprinkle of everything bagel seasoning on top before baking. The sesame seeds, poppy seeds, and garlic flakes added an incredible savory crunch. My kids called them “fancy mummy dogs,” and they were gone in five minutes.
Serving & Storage Suggestions
These mummy hot dogs are best served warm, straight from the oven. But here is how to make the most of them, whether you are serving a crowd or saving leftovers.
Serving Suggestions: Arrange the mummy dogs on a platter with a side of ketchup, mustard, or ranch dressing for dipping. For a full Halloween dinner, serve them with a bowl of “witch’s brew” soup (green split pea or broccoli cheddar) and a side of “monster mash” (mashed potatoes with green food coloring). For dessert, try “ghost” meringues or “spider” cupcakes. It is all about the theme!
Storage Instructions: If you have leftovers (unlikely, but possible), let them cool completely. Store them in an airtight container in the refrigerator for up to 3 days. The dough will soften a bit, but they will still taste great.
Reheating Methods: The best way to reheat these is in the oven or an air fryer. Preheat your oven to 350°F (175°C) and bake for 5-7 minutes, until warmed through. The air fryer works even faster—3-4 minutes at 350°F. Avoid the microwave, as it makes the dough soggy and the hot dog rubbery.
Freezing Instructions: You can freeze the unbaked mummy dogs. Assemble them completely, but do not add the mustard eyes. Place them on a baking sheet and freeze until solid, then transfer to a freezer bag. They will keep for up to 2 months. To bake, place them directly from the freezer onto a lined baking sheet and add 3-5 minutes to the baking time. Add the mustard eyes after baking.
Flavor Development: Honestly, these are best fresh. The magic is in the contrast between the warm, flaky dough and the juicy hot dog. That said, leftovers are still pretty darn good for a lunch the next day.
Nutritional Information & Benefits
Let’s be real—these are a treat, not a health food. But here is the nutritional breakdown for one mummy dog (made with standard ingredients, no cheese or egg wash):
| Nutrient | Amount per Serving |
|---|---|
| Calories | 210 |
| Total Fat | 14g |
| Saturated Fat | 5g |
| Cholesterol | 25mg |
| Sodium | 680mg |
| Total Carbohydrates | 16g |
| Dietary Fiber | 0g |
| Sugars | 4g |
| Protein | 7g |
Health Benefits: Hot dogs are a source of protein, which is great for growing kids. The crescent dough provides carbohydrates for energy. If you want to make them a bit healthier, use turkey or chicken hot dogs, which are lower in fat and sodium. You can also serve them with a side of carrot sticks or apple slices to add some fiber and vitamins.
Dietary Considerations: This recipe is not gluten-free unless you use gluten-free dough. It contains dairy only if you add cheese or butter. It is not suitable for vegans, but vegetarian hot dogs work well. Always check the labels on your hot dogs and dough for specific allergen information.
My Personal Wellness Perspective: I believe in balance. We eat healthy meals most of the time, but Halloween is about fun and tradition. These mummy dogs are a once-a-year treat that brings so much joy to my kids. That joy is worth the extra calories. Plus, they are running around trick-or-treating anyway, so they will burn it off!
Conclusion
So there you have it—my tried-and-true recipe for kid-approved mummy hot dogs. They are fun, fast, and absolutely delicious. Whether you are recreating a memory from a beloved local spot, or starting a brand-new tradition with your family, these little guys are guaranteed to bring smiles to the table.
I love this recipe because it is more than just food. It is a way to make a regular Tuesday night in October feel special. It is a way to get my kids excited about dinner. And honestly, it is a way for me to feel like a superhero mom, even on the busiest of days. The look on my daughter’s face when she saw the finished mummy dogs? Priceless.
Now, I want to hear from you! Did you make these for your family? Did your kids love them? Did you try any fun variations? Drop a comment below and let me know. And if you have a special Halloween tradition of your own, I would love to hear about it. Let’s keep the conversation going!
Happy Halloween, and happy cooking. You have got this!
Frequently Asked Questions
Can I use homemade dough instead of crescent rolls?
Absolutely! You can use any pizza dough or puff pastry dough. Just roll it out thin and cut it into strips. The baking time may vary slightly, so keep an eye on it. Homemade dough will give a different texture, but it will still be delicious.
Can I make these ahead of time for a party?
Yes, you can assemble them up to 24 hours in advance. Keep them covered in the refrigerator, and bake them just before serving. Do not add the mustard eyes until after baking. This is a great time-saver for busy party hosts.
My dough keeps tearing. What am I doing wrong?
This usually happens if the dough is too warm. Pop it in the fridge for 5-10 minutes to firm up. Also, make sure you are using a sharp knife or pizza cutter. A dull blade will drag and tear the delicate dough.
Can I use an air fryer instead of an oven?
Yes! Preheat your air fryer to 350°F (175°C). Place the mummy dogs in the basket in a single layer, leaving a little space between them. Cook for 6-8 minutes, or until the dough is golden brown. The air fryer gives them an extra-crispy exterior.
What other toppings can I use for the eyes?
You can use ketchup, sriracha, or even small dots of cream cheese. For a sweeter version, use melted chocolate or frosting. For a savory twist, try a tiny dollop of pesto or tapenade. Get creative and have fun with it!
Pin This Recipe!
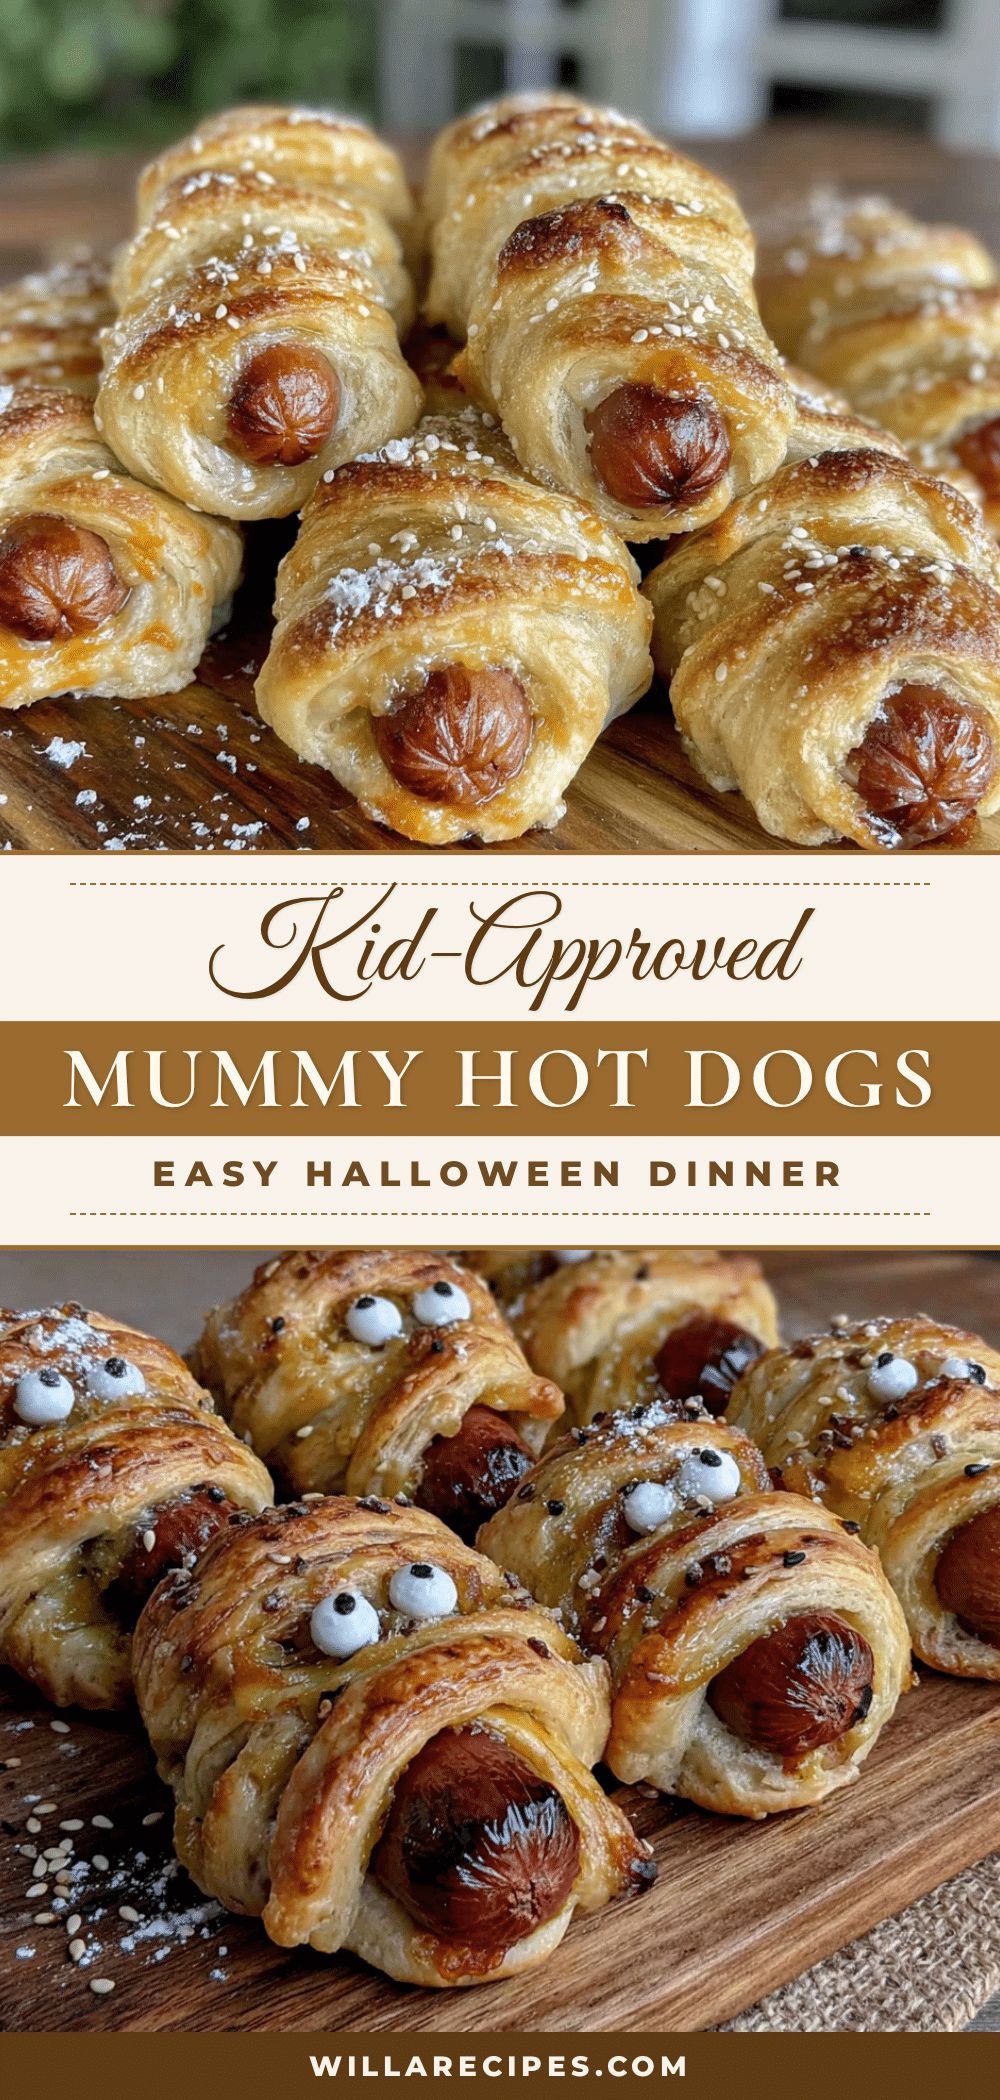
Easy Kid-Approved Mummy Hot Dogs – Perfect Halloween Dinner
These mummy hot dogs are a fun, fast, and delicious Halloween dinner that kids love. Made with simple ingredients like hot dogs and crescent roll dough, they come together in about 20 minutes and are perfect for a spooky supper or classroom party.
- Prep Time: 10 minutes
- Cook Time: 15 minutes
- Total Time: 25 minutes
- Yield: 8 servings 1x
- Category: Main Course
- Cuisine: American
Ingredients
- 8 standard-size hot dogs (about 6 inches long, preferably all-beef)
- 1 can (8 ounces) refrigerated crescent roll dough (regular or buttery flake style)
- 2 tablespoons yellow mustard (for the eyes)
- 1 large egg, beaten with 1 tablespoon water (optional, for egg wash)
- Everything bagel seasoning (optional, for topping)
- Thin strips of cheddar or mozzarella cheese (optional, for cheesy version)
Instructions
- Preheat your oven to 375°F (190°C). Line a baking sheet with parchment paper.
- Unroll the crescent roll dough onto a clean cutting board. Press the perforated seams together gently to create one solid sheet.
- Using a sharp knife or pizza cutter, slice the dough lengthwise into 8 to 10 thin strips, each about 1/2-inch wide.
- Take one hot dog and start wrapping a strip of dough around it, stretching the dough slightly as you go. Leave a small gap near the top for the ‘face.’ The dough should overlap a little but not be too tight.
- Place each wrapped mummy dog on the prepared baking sheet, leaving about 1 inch of space between them.
- If using, brush the tops of the wrapped dough with the beaten egg wash.
- Bake for 12-15 minutes, until the dough is golden brown and cooked through, and the hot dogs are heated.
- Let the mummy dogs cool on the baking sheet for 2 minutes. Then, using a toothpick, dip it into the yellow mustard and dot two small eyes onto the exposed hot dog area.
- Serve immediately.
Notes
For best results, keep crescent dough cold. If dough gets too warm, refrigerate for 5 minutes before cutting. Use a toothpick for mustard eyes to prevent them from sliding off. Do not add eyes before baking. For a gluten-free version, use gluten-free crescent roll dough. For a dairy-free version, use dairy-free crescent dough and skip cheese.
Nutrition
- Serving Size: 1 mummy dog
- Calories: 210
- Sugar: 4
- Sodium: 680
- Fat: 14
- Saturated Fat: 5
- Carbohydrates: 16
- Protein: 7
Keywords: mummy hot dogs, Halloween dinner, kid-friendly, easy recipe, crescent roll hot dogs, spooky supper