The neighborhood Halloween block party was in six hours and I had completely forgotten. Everyone else would be bringing elaborate themed desserts — I saw someone hauling a three-tiered cake shaped like a haunted house, for crying out loud. I had a box of chocolate chip cookie mix, a bag of marshmallows, and about forty-five minutes before I needed to head out the door. Let me tell you, I was ready to just grab a bag of chips and call it a day.
But then I spotted the jar of chocolate sauce hiding in the back of the pantry, and something clicked. A spider web. On a cookie bar. It sounded ridiculous, honestly, but I was desperate. I figured if it looked terrible, I’d just blame it on the kids and bring store-bought brownies instead. So I threw together a simple cookie bar base — nothing fancy, just the mix with a few extra eggs and butter to make it bar-friendly — and started brainstorming how to make a web pattern work without, you know, actual spider skills.
The first attempt was a mess. The chocolate sauce just pooled in the middle and looked like a sad puddle. But I scraped it off, tried again with a piping bag made from a zip-top bag, and suddenly — it worked. A neat little spiral of chocolate, then a toothpick dragged through it to create the web effect. I almost didn’t believe my eyes. I threw the pan in the oven, crossed my fingers, and ran to change out of my flour-covered shirt.
At the party, I set the pan down next to the haunted house cake and braced myself for polite smiles. But you know that feeling when something unexpectedly becomes the star of the show? Within twenty minutes, the pan was empty. People were asking for the recipe, and I had to admit I’d thrown it together in a panic. That’s how this recipe became my go-to for every fall gathering. It’s the kind of thing that looks like you spent hours on it, but really, it’s just a happy accident that worked out perfectly. Maybe you’ve been there — the thing you almost didn’t make ends up being the thing everyone remembers.
Why You’ll Love This Recipe
These Spider Web Chocolate Chip Cookie Bars aren’t just another dessert recipe. They’re the kind of thing that makes you look like a kitchen wizard without actually having to be one. I’ve tested this recipe about six times now (my neighbors are very happy about it), and I can tell you with confidence — it works every single time.
- Quick & Easy: From start to finish, you’re looking at about 35 minutes. That’s less time than it takes to watch a sitcom, and you end up with a pan of something that looks like it belongs on a bakery shelf.
- Simple Ingredients: Butter, sugar, eggs, flour, chocolate chips, and a little chocolate sauce. That’s it. No weird specialty items that you’ll use once and forget about until you move apartments.
- Perfect for Halloween Parties: The spider web design is an instant conversation starter. It’s festive without being over-the-top, and it works for both kid-friendly gatherings and adult get-togethers where people pretend they’re too sophisticated for themed desserts.
- Crowd-Pleaser: I’ve brought these to three different parties now, and every single time, someone asks for the recipe. Kids love the web design, adults love the classic cookie bar flavor, and everyone loves that they’re not too sweet.
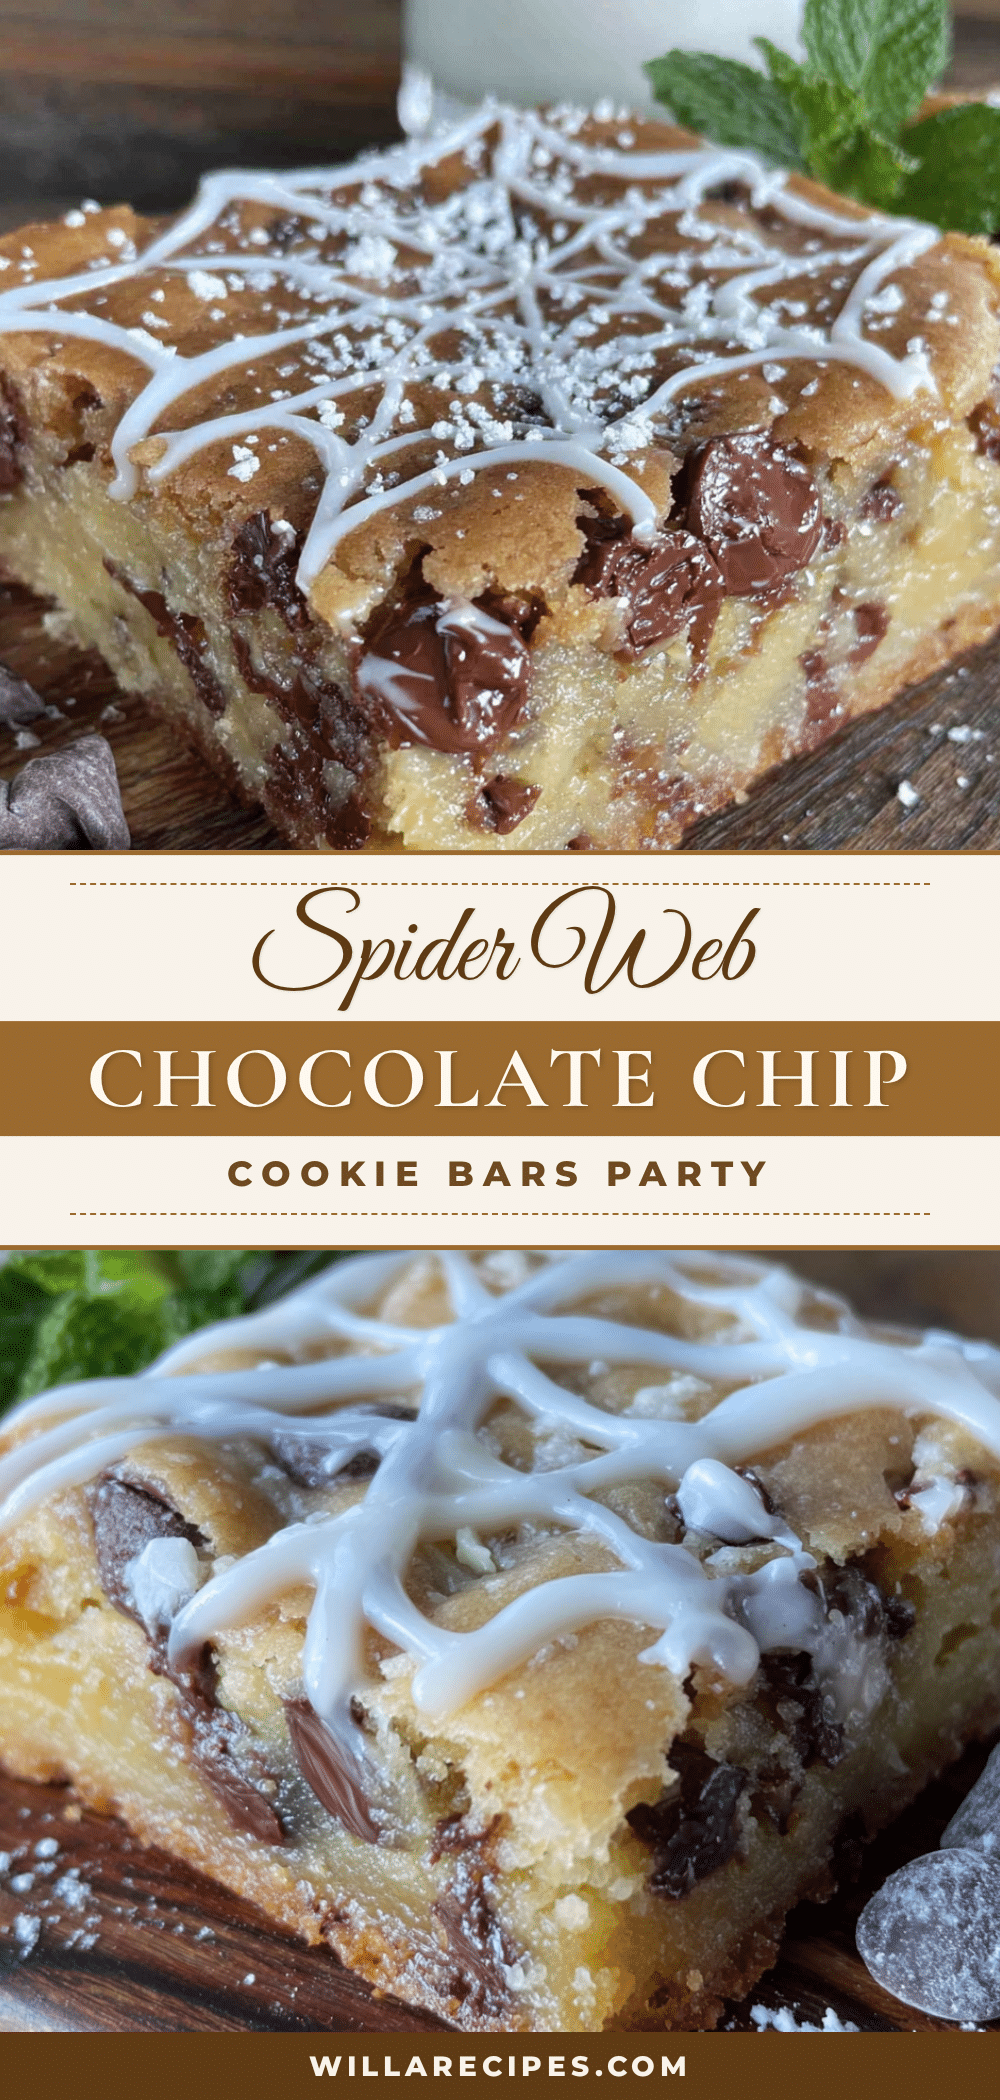
- Unbelievably Delicious: The texture is what gets me every time — soft and chewy in the middle, slightly crispy around the edges, with pools of melted chocolate chips in every bite. The chocolate web on top adds just a hint of extra richness without overwhelming the cookie flavor.
What makes these different from every other cookie bar recipe out there is the technique. Instead of just spreading dough in a pan and calling it done, you get to create something visually striking with almost zero extra effort. The spider web pattern looks complicated, but I promise you — if I can do it in a panic with a zip-top bag, you can do it too. It’s the kind of recipe that makes you feel like you’ve got a secret superpower in the kitchen.
What Ingredients You Will Need
This recipe uses simple, everyday ingredients that you probably already have in your kitchen. The magic happens in how they come together — and that little chocolate web on top, of course. Here’s what you’ll need:
For the Cookie Bar Base
- 1 cup (2 sticks) unsalted butter, softened — I prefer using Land O’Lakes for consistent results, but any brand works fine. Just make sure it’s truly softened, not melted.
- 1 cup packed light brown sugar — This gives the cookie bars that chewy texture and a hint of molasses flavor. Dark brown sugar works too, but the flavor will be a bit more intense.
- ½ cup granulated sugar — For sweetness and a little bit of that crispy edge.
- 2 large eggs, room temperature — If you forget to take them out ahead of time, just place them in a bowl of warm water for five minutes. Works like a charm.
- 2 teaspoons vanilla extract — Pure vanilla extract makes a difference here. I’ve tried imitation and it just doesn’t have the same warmth.
- 2 ¼ cups all-purpose flour — Spoon and level it into your measuring cup, don’t scoop directly from the bag. Scooping packs the flour down and you’ll end up with dry cookie bars.
- 1 teaspoon baking soda — Make sure it’s fresh. If it doesn’t fizz when you drop it in vinegar, toss it and get a new box.
- ½ teaspoon salt — I use fine sea salt, but regular table salt works perfectly.
- 2 cups semi-sweet chocolate chips — I’m partial to Ghirardelli for their meltability, but Nestlé Toll House is a solid choice too. Reserve about ¼ cup to press into the top before baking for that bakery-style look.
For the Spider Web Decoration

- ¼ cup chocolate sauce — Store-bought is fine, but if you want to get fancy, you can use melted chocolate chips mixed with a teaspoon of coconut oil for a thinner consistency. Hershey’s syrup works great in a pinch.
- Optional: 2 tablespoons white chocolate chips, melted — For a more visible web effect on darker cookie bars. I usually skip this unless I’m feeling extra.
Equipment Needed
You don’t need a fancy kitchen to make these cookie bars. Here’s what you’ll need:
- 9×13-inch baking pan — This is the sweet spot for cookie bars. A metal pan gives you crispier edges, while glass pans produce softer bars all around. I use a metal pan because I like those crunchy corner pieces.
- Parchment paper — Trust me on this. Line your pan with parchment paper, leaving some overhang on the sides. It makes lifting the finished cookie bars out so much easier, and cleanup is a breeze.
- Electric mixer (hand or stand) — You can mix by hand if you’re feeling strong, but an electric mixer makes creaming the butter and sugar much easier and gives you a fluffier texture.
- Large mixing bowl — Any bowl will do, but a wide one makes mixing easier.
- Toothpick or skewer — This is your spider web tool. A regular toothpick works perfectly for creating the web pattern.
- Small piping bag or zip-top bag — For drizzling the chocolate sauce. A zip-top bag with a tiny corner snipped off works just as well as a fancy piping bag.
- Cooling rack — Not strictly necessary, but it helps the cookie bars cool evenly and prevents soggy bottoms.
Preparation Method
- Preheat your oven to 350°F (175°C). Line your 9×13-inch baking pan with parchment paper, leaving about 2 inches of overhang on the long sides. This will be your handle for lifting the bars out later.
- Cream the butter and sugars together in a large mixing bowl. Beat on medium speed for about 3-4 minutes until the mixture looks light and fluffy. You’ll notice the color gets paler and the texture becomes almost cloud-like. Don’t rush this step — properly creamed butter and sugar is the secret to soft, tender cookie bars.
- Add the eggs one at a time, beating well after each addition. Scrape down the sides of the bowl with a spatula to make sure everything is incorporated. Add the vanilla extract and beat for another 30 seconds.
- In a separate bowl, whisk together the flour, baking soda, and salt. This ensures the leavening agent is evenly distributed so you don’t end up with one cookie bar that’s puffier than the others.
- Gradually add the dry ingredients to the wet mixture, mixing on low speed just until combined. You’ll see the dough come together — it should be soft but not sticky. If it feels too sticky, add a tablespoon of flour. If it’s too dry, add a tablespoon of milk.
- Fold in 1 ¾ cups of the chocolate chips using a spatula. Save the remaining ¼ cup to press into the top of the dough later. This little trick makes your cookie bars look like they came from a bakery.
- Press the dough evenly into the prepared pan. Use your hands or the back of a spatula to spread it out. Try to make it as even as possible so the bars bake uniformly. I usually wet my hands slightly to keep the dough from sticking.
- Press the reserved chocolate chips into the top of the dough, distributing them evenly. This gives you those beautiful pools of chocolate on top.
- Bake for 18-22 minutes, or until the edges are golden brown and the center looks set but still slightly soft. A toothpick inserted in the center should come out with a few moist crumbs, not wet batter. The bars will continue to cook as they cool in the pan.
- Let the cookie bars cool completely in the pan on a wire rack. This takes about 45 minutes to an hour. Don’t rush this — if you try to add the spider web design while the bars are still warm, the chocolate will just melt and slide off.
- Once cooled, create the spider web design. Fill a small piping bag or zip-top bag with the chocolate sauce. Snip off a tiny corner of the bag. Starting from the center of the cookie bars, pipe a spiral of chocolate sauce outward, leaving about ½ inch between each ring. Don’t worry if it’s not perfect — the web effect actually looks better when it’s a little irregular.
- Take a toothpick and drag it through the chocolate spiral from the center outward, creating lines that connect the rings. Then drag from the outside inward, alternating between the previous lines. This creates the classic spider web pattern. Wipe the toothpick clean between each drag for the cleanest lines.
- Let the chocolate set for about 15-20 minutes before cutting into bars. If you’re in a hurry, pop the pan in the refrigerator for 10 minutes.
- Lift the bars out using the parchment paper overhang and place on a cutting board. Use a sharp knife to cut into squares. I usually get 12-16 bars, depending on how generous I’m feeling.
Cooking Tips & Techniques
I’ve made these cookie bars enough times to know where things can go wrong. Here are the lessons I learned the hard way so you don’t have to:
Don’t overmix the dough. I know it’s tempting to keep beating until everything looks perfectly smooth, but overmixing develops the gluten too much and gives you tough, cakey cookie bars. You want them tender and chewy, so stop mixing as soon as the flour disappears into the dough.
Room temperature eggs matter more than you think. Cold eggs don’t incorporate as well into the butter-sugar mixture, which can leave you with a lumpy dough. I learned this the morning of a party when I had to microwave my eggs because I forgot to take them out. They worked, but the texture wasn’t as good.
The toothpick trick for the spider web — wipe it clean between each drag. The first time I tried this, I just kept dragging the same toothpick through the chocolate, and it turned into a muddy mess. A clean toothpick gives you those sharp, defined lines that make the web pattern pop.
If your chocolate sauce is too thick, microwave it for 10 seconds and stir. You want it to be drizzling consistency — thick enough to hold its shape but thin enough to flow smoothly from the bag. If it’s too thick, it’ll blob instead of drizzle.
Let the bars cool completely before adding the web. I know it’s hard to wait, but warm bars will turn your beautiful chocolate web into a sad, melty puddle. Patience pays off here.
Variations & Adaptations
One of the best things about this recipe is how easy it is to change up. Here are some variations I’ve tried and loved:
Peanut Butter Spider Web Bars: Swap ½ cup of the butter for creamy peanut butter. The peanut butter flavor pairs beautifully with the chocolate, and it adds a little protein boost. I made these for a friend’s Halloween party and they disappeared faster than the regular ones.
White Chocolate Web: Instead of chocolate sauce, use melted white chocolate chips for the web pattern. It shows up beautifully against the brown cookie bars and looks especially spooky. Add a drop of black food coloring to the white chocolate for a more dramatic effect.
Gluten-Free Version: Substitute the all-purpose flour with a 1:1 gluten-free baking flour blend. I’ve used Bob’s Red Mill with great results. Just make sure your blend contains xanthan gum for structure. The texture will be slightly more delicate, but the flavor is spot on.
Double Chocolate Bars: Add ¼ cup of cocoa powder to the flour mixture and reduce the flour by ¼ cup. You’ll get rich, chocolatey cookie bars with the chocolate web on top. It’s almost too much chocolate, but honestly, is there such a thing?
Nutty Web Variation: Sprinkle ½ cup of chopped pecans or walnuts over the dough before baking. The crunch adds a nice contrast to the soft cookie bars, and it looks great peeking through the chocolate web.
Serving & Storage Suggestions
These cookie bars are best served at room temperature, but I won’t judge you if you eat one straight from the refrigerator. The chocolate web stays firmer when chilled, so if you’re serving them at a party, keep them cool until just before serving.
What to serve alongside: A glass of cold milk is the classic pairing, but they’re also fantastic with a scoop of vanilla ice cream. For a Halloween party, serve them alongside a bowl of caramel apples or pumpkin spice cupcakes for a full dessert spread.
Storage instructions: Store leftover cookie bars in an airtight container at room temperature for up to 5 days. If you stack them, place a sheet of parchment paper between layers to keep the chocolate web from sticking to the bars below. They actually taste better on day two — the flavors meld together and the texture becomes even chewier.
Freezer instructions: These freeze beautifully. Place the cooled, undecorated bars in a freezer-safe container with parchment paper between layers. Freeze for up to 3 months. When you’re ready to serve, thaw at room temperature, then add the spider web design. The chocolate web is best added fresh.
Reheating tips: If you like warm cookie bars, pop one in the microwave for 10-15 seconds. The chocolate chips get melty and the bar becomes soft and gooey. Just be careful — the chocolate web can get a little messy when reheated.
Nutritional Information & Benefits
Let’s be real — these are cookie bars, not health food. But here’s the breakdown so you know what you’re working with:
Per serving (1 bar, based on 12 servings):
- Calories: 385
- Fat: 18g
- Carbohydrates: 52g
- Protein: 5g
- Sugar: 32g
- Fiber: 2g
Health highlights: The chocolate chips contain antioxidants from cocoa, and the butter provides a small amount of vitamin A. The eggs add protein and B vitamins. It’s not a health food, but it’s a treat made with real ingredients — no preservatives, no artificial flavors, just honest baking.
Dietary considerations: This recipe contains dairy, eggs, and gluten. For a dairy-free version, use plant-based butter and dairy-free chocolate chips. For a gluten-free version, use a 1:1 gluten-free flour blend. The recipe is not suitable for vegans as written, but you can experiment with flax eggs and vegan butter substitutes.
Potential allergens: Contains wheat, dairy, and eggs. May contain traces of nuts if using shared equipment. Always check your chocolate chip labels if you’re serving someone with allergies.
Conclusion
These Spider Web Chocolate Chip Cookie Bars have become my secret weapon for fall gatherings. They look impressive, taste incredible, and take almost no real effort to put together. Every time I make them, I think back to that panicked afternoon before the block party and laugh at how something so simple turned into such a hit.
The beauty of this recipe is that it’s flexible. You can make it your own — add nuts, switch up the chocolate, experiment with different web patterns. The spider web design is just the beginning. Once you get the hang of it, you’ll start seeing web patterns everywhere and wanting to put them on everything.
I’d love to hear how yours turn out! Did you try a variation? Did the spider web pattern come out perfectly? Drop a comment below and let me know. And if you’re looking for another crowd-pleasing dessert, check out my pumpkin spice bread for another fall favorite. Happy baking, and remember — even if it doesn’t look perfect, it’ll still taste amazing. That’s the beauty of homemade.
Frequently Asked Questions
Can I use a different pan size?
Yes, but the baking time will change. For an 8×8-inch pan, bake for 25-30 minutes. For a 9×9-inch pan, bake for 22-25 minutes. Just keep an eye on them and use the toothpick test to check for doneness.
Why did my cookie bars turn out dry?
This usually happens from overbaking or overmeasuring the flour. Make sure you’re spooning and leveling your flour, not scooping directly from the bag. And take the bars out when the center still looks slightly soft — they’ll continue cooking as they cool.
Can I make the spider web design ahead of time?
You can, but the chocolate web will soften over time. I recommend adding the web no more than 2 hours before serving for the best visual effect. If you’re making them a day ahead, leave the web off and add it fresh.
How do I get clean cuts on the cookie bars?
Use a sharp knife and wipe it clean between each cut. For the cleanest cuts, chill the bars in the refrigerator for 20 minutes before slicing. The chocolate web will be firmer and less likely to smudge.
Can I use chocolate chips instead of chocolate sauce for the web?
You can, but you’ll need to melt them first. Melt ½ cup of chocolate chips with 1 teaspoon of coconut oil in the microwave in 20-second intervals, stirring between each. Let it cool slightly before piping, as hot melted chocolate can melt the cookie bars underneath.
Pin This Recipe!
Perfect Spider Web Chocolate Chip Cookie Bars Recipe
These Spider Web Chocolate Chip Cookie Bars are a quick and easy Halloween dessert that looks impressive with a simple chocolate web design. Soft, chewy, and packed with chocolate chips, they’re a crowd-pleaser for any fall gathering.
- Prep Time: 15 minutes
- Cook Time: 20 minutes
- Total Time: 35 minutes
- Yield: 12-16 servings 1x
- Category: Dessert
- Cuisine: American
Ingredients
- 1 cup (2 sticks) unsalted butter, softened
- 1 cup packed light brown sugar
- ½ cup granulated sugar
- 2 large eggs, room temperature
- 2 teaspoons vanilla extract
- 2 ¼ cups all-purpose flour
- 1 teaspoon baking soda
- ½ teaspoon salt
- 2 cups semi-sweet chocolate chips (reserve ¼ cup for topping)
- ¼ cup chocolate sauce (for spider web decoration)
- Optional: 2 tablespoons white chocolate chips, melted (for more visible web)
Instructions
- Preheat your oven to 350°F (175°C). Line your 9×13-inch baking pan with parchment paper, leaving about 2 inches of overhang on the long sides.
- Cream the butter and sugars together in a large mixing bowl. Beat on medium speed for about 3-4 minutes until light and fluffy.
- Add the eggs one at a time, beating well after each addition. Scrape down the sides of the bowl. Add the vanilla extract and beat for another 30 seconds.
- In a separate bowl, whisk together the flour, baking soda, and salt.
- Gradually add the dry ingredients to the wet mixture, mixing on low speed just until combined.
- Fold in 1 ¾ cups of the chocolate chips using a spatula. Save the remaining ¼ cup to press into the top of the dough.
- Press the dough evenly into the prepared pan. Use your hands or the back of a spatula to spread it out.
- Press the reserved chocolate chips into the top of the dough, distributing them evenly.
- Bake for 18-22 minutes, or until the edges are golden brown and the center looks set but still slightly soft. A toothpick inserted in the center should come out with a few moist crumbs.
- Let the cookie bars cool completely in the pan on a wire rack (about 45 minutes to an hour).
- Once cooled, create the spider web design. Fill a small piping bag or zip-top bag with the chocolate sauce. Snip off a tiny corner. Starting from the center, pipe a spiral of chocolate sauce outward, leaving about ½ inch between each ring.
- Take a toothpick and drag it through the chocolate spiral from the center outward, creating lines that connect the rings. Then drag from the outside inward, alternating between the previous lines. Wipe the toothpick clean between each drag.
- Let the chocolate set for about 15-20 minutes before cutting into bars. If in a hurry, refrigerate for 10 minutes.
- Lift the bars out using the parchment paper overhang and place on a cutting board. Cut into squares with a sharp knife.
Notes
Don’t overmix the dough to avoid tough bars. Use room temperature eggs for better incorporation. Wipe toothpick clean between each drag for clean web lines. Let bars cool completely before adding web design. For clean cuts, chill bars for 20 minutes before slicing.
Nutrition
- Serving Size: 1 bar
- Calories: 385
- Sugar: 32
- Sodium: 200
- Fat: 18
- Saturated Fat: 10
- Carbohydrates: 52
- Fiber: 2
- Protein: 5
Keywords: spider web cookie bars, Halloween dessert, chocolate chip cookie bars, easy Halloween recipe, spider web design, cookie bars, fall dessert


