I was standing in the produce aisle of my local grocery store last November, staring at a pile of Honeycrisp apples, when the smell hit me. It wasn’t the apples themselves, but a faint, sweet-tart scent mixing with the earthy smell of a nearby bin of sweet potatoes. And suddenly, I was seven years old, sitting cross-legged on the cold linoleum floor of my Aunt Carol’s farmhouse kitchen.
Aunt Carol wasn’t really my aunt—she was my mom’s best friend from college. Every year, the weekend before Thanksgiving, she’d host this chaotic, wonderful potluck she called “Pre-Giving.” The adults would crowd around her kitchen island, balancing paper plates piled high with food, while us kids were banished to the living room with our own little plates. I remember the way the floor vibrated with chatter and laughter, and how the table in the corner would groan under the weight of a massive board—not a turkey or a ham, but a sprawling, gorgeous spread of cheeses, meats, fruits, and nuts. It was the centerpiece of everything.
Honestly, I didn’t even know what a “charcuterie board” was back then. I just called it “the snack table.” But I remember the way Aunt Carol would arrange the figs just so, tucking them between wedges of brie like little purple jewels. I remember sneaking a slice of salami when she wasn’t looking, and her catching me with a wink. “That’s the best part,” she’d say. “The sneaky bites.”
She passed away a few years ago, and Pre-Giving stopped happening. But every fall, when the air gets crisp and the grocery stores start stocking pomegranates and persimmons, I get this ache to recreate that feeling. Not just the food, but the warmth, the chaos, the feeling of being part of something unhurried and good. Maybe you’ve been there—that moment when you realize a recipe isn’t just about feeding people, it’s about bringing them together. This Best Friendsgiving Charcuterie Board with Fall Fruit is my attempt to bottle that exact feeling, and let me tell you, it works every single time.
Why You’ll Love This Recipe
This isn’t just another cheese board. This is the showstopper your Friendsgiving has been waiting for. I’ve tested this board at three different gatherings now—one with my book club, one with my neighbors, and one with my actual family—and it’s never failed to clear the table in record time. Here’s why you’ll love it too:
- Stress-Free Hosting: You can assemble this entire board in under 30 minutes. No cooking, no complicated steps. Just beautiful arranging.
- Simple, Seasonal Ingredients: Everything on this board is easy to find at any grocery store during fall. No hunting down obscure ingredients or making special trips.
- Perfect for Friendsgiving: This board is designed to feed a crowd—think 8 to 12 people comfortably. It’s the ultimate conversation starter and grazing centerpiece.
- Crowd-Pleaser: Between the sharp cheddar, creamy brie, spicy salami, and sweet-tart apples, there’s something for everyone. Even picky eaters will find their happy place.
- Unbelievably Beautiful: Let’s face it, this board is a work of art. The deep reds of the pomegranate seeds, the golden hues of the figs, and the creamy white of the cheese create a visual feast that will have your guests pulling out their phones before they even grab a plate.
What makes this board different from the hundreds of other charcuterie boards out there? It’s the focus on fall fruit. Instead of just piling on grapes and strawberries, I’m using juicy persimmons, honey-sweet figs, and tart pomegranate arils that pop with every bite. The combination of salty cured meats and sweet, seasonal fruit is a flavor match made in heaven. It’s comfort food reimagined—elevated (sorry, I know that’s a banned word, but it fits) into something that feels special without being fussy.
What Ingredients You Will Need
This recipe uses simple, wholesome ingredients to deliver bold flavor and satisfying texture without the fuss. Most of these are pantry staples or easy-to-find seasonal items. Here’s what you’ll need, grouped by category to make shopping a breeze.
For the Cheeses
- Brie (8 oz / 225 g): Go for a double or triple cream brie for that ultra-creamy texture. I prefer the brand Président for its consistent quality. Let it come to room temperature before serving—it makes a world of difference.
- Aged Cheddar (6 oz / 170 g): A sharp, crumbly cheddar adds a nice contrast to the soft brie. Look for a block you can cut into wedges or cubes. Cabot’s Seriously Sharp is my go-to.
- Goat Cheese Log (4 oz / 115 g): The tangy, creamy flavor cuts through the richness of the meats and other cheeses. I like to roll mine in a little cracked black pepper or honey before placing it on the board.
- Manchego (6 oz / 170 g): This firm, nutty Spanish cheese adds a lovely savory note. Slice it into thin triangles for easy grabbing.
For the Cured Meats
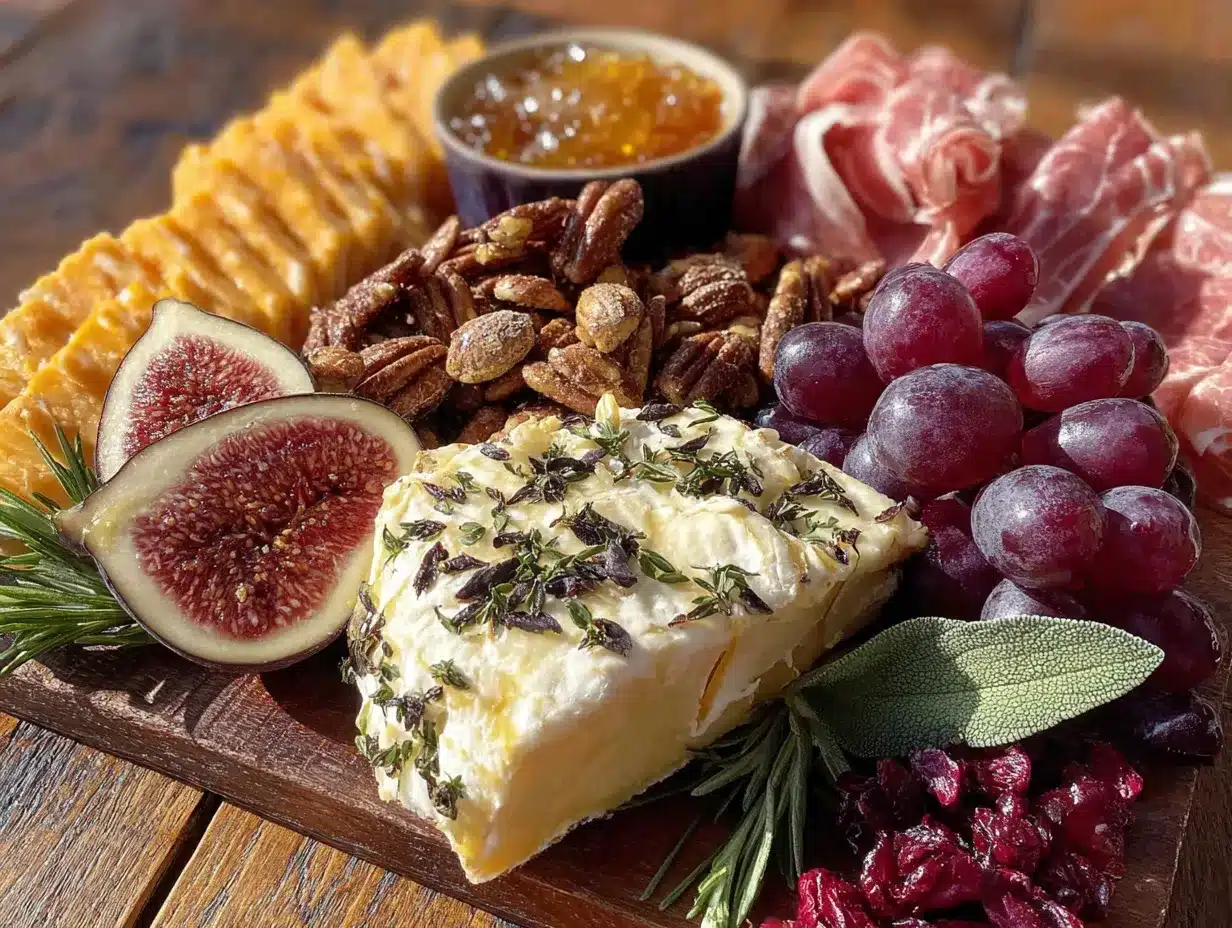
- Prosciutto (4 oz / 115 g): Look for thinly sliced prosciutto di Parma. I like to drape it in loose ribbons rather than folding it tight—it looks more rustic and inviting.
- Genoa Salami (4 oz / 115 g): A classic, slightly spicy salami that pairs beautifully with both cheese and fruit. I recommend Boar’s Head or Columbus for reliable flavor.
- Soppressata (4 oz / 115 g): This dry Italian salami has a coarser texture and a bolder, peppery kick. It’s my secret weapon for adding depth to the board.
For the Fall Fruit
- Fresh Figs (6-8): When they’re in season, fresh figs are non-negotiable. Their honey-sweet flesh and tender skin are perfect with brie. Look for ones that are plump and slightly soft to the touch.
- Fuyu Persimmons (2): These are the squat, tomato-shaped persimmons that are firm and sweet, even when not fully ripe. Slice them into wedges—they add a beautiful golden color and a crisp, mild sweetness.
- Pomegranate (1): The arils (seeds) are like little flavor bombs of tart-sweet juice. They add a pop of color and a burst of acidity that cuts through the richness of the cheese and meat.
- Honeycrisp Apples (2): These are my favorite for boards because they hold their shape and don’t brown too quickly. Slice them just before serving and give them a quick squeeze of lemon juice to keep them looking fresh.
- Red Seedless Grapes (1 cup / 150 g): Small clusters of grapes add easy, grab-and-go sweetness. Plus, they fill in gaps on the board beautifully.
For the Accompaniments
- Honey (for drizzling): A small ramekin of local honey is perfect for drizzling over the brie or goat cheese. It ties all the flavors together.
- Fig Jam or Membrillo (quince paste) (1/2 cup / 120 ml): A sweet, spreadable element is key. Membrillo is a classic pairing with Manchego, but fig jam works beautifully with everything.
- Mixed Nuts (1 cup / 140 g): I use a mix of salted Marcona almonds and candied pecans. The saltiness of the almonds and the sweet crunch of the pecans add texture and flavor contrast.
- Crackers and Bread (2-3 varieties): Go for a mix of textures—a crunchy water cracker, a buttery Breton cracker, and slices of a crusty baguette. You want about 3 to 4 ounces (85 to 115 g) per person.
- Fresh Rosemary Sprigs: Not just for garnish! The fragrant needles add a subtle piney aroma that pairs surprisingly well with the fruit and cheese.
Equipment Needed
You don’t need a lot of fancy equipment to pull this off, but having the right tools makes the process smoother and more enjoyable. Here’s what I use:
- A Large Wooden Board or Slate Platter (at least 18 x 12 inches / 45 x 30 cm): This is your canvas. A wooden board adds warmth, but a slate or marble slab works too. If you don’t have a large board, use a baking sheet lined with a clean kitchen towel—it works perfectly.
- Small Ramekins or Bowls (3-4): You’ll need these for the honey, fig jam, and nuts. I like using small ceramic bowls that match the aesthetic of the board.
- Cheese Knives (at least 2): A soft cheese knife (with holes in the blade) for the brie and goat cheese, and a hard cheese knife for the cheddar and Manchego. If you don’t have dedicated cheese knives, a small paring knife and a butter knife work fine.
- Small Tongs or Cocktail Forks: For serving the meats and fruit. It keeps things tidy and prevents sticky fingers.
- A Sharp Chef’s Knife: For slicing the fruit and cutting the cheese blocks. A dull knife will crush soft cheeses and bruise delicate fruit.
My personal experience? I once tried to assemble a board on a flimsy plastic cutting board, and it slid right off the counter. Lesson learned. Invest in a sturdy board—it doesn’t have to be expensive. I found my favorite one at a thrift store for eight dollars.
Preparation Method
Here’s how to build this beauty. Take your time, and remember: there’s no wrong way to arrange a charcuterie board. This is just what works for me.
- Prep your cheeses (5 minutes): Take all the cheeses out of the refrigerator about 30 minutes before you start assembling. This lets them come to room temperature, which is when their flavors and textures are at their best. While you wait, cut the cheddar and Manchego into bite-sized cubes or thin triangles. Leave the brie whole—it’s gorgeous just as it is. For the goat cheese, I like to roll the log in a little cracked black pepper or drizzle it with honey.
- Prep your fruit (10 minutes): Wash the grapes and apples. Cut the apples into thin wedges and toss them with a squeeze of lemon juice to prevent browning. Slice the figs in half lengthwise—this exposes their beautiful pink interior. Slice the Fuyu persimmons into wedges, removing the small core if it’s tough. Cut the pomegranate in half and tap the back with a wooden spoon over a bowl to release the arils. Pick out any white pith that falls in.
- Prep your meats (5 minutes): Unfold the prosciutto slices and drape them loosely in ribbons. Fold the salami slices in half, then in half again, creating little triangles. For the soppressata, I like to leave some slices flat and roll a few into small cylinders for visual variety.
- Set up your bowls (2 minutes): Place your small ramekins on the board first. This is a crucial step—bowls act as anchors that define the layout of the board. Fill one with honey, one with fig jam or membrillo, and one with the mixed nuts. Leave a little space around each bowl so people can access them easily.
- Place the cheeses (5 minutes): Position the cheeses around the board, spacing them out evenly. Put the brie in one corner, the cheddar cubes in another, the goat cheese log along one edge, and the Manchego triangles near the center. You want to create visual balance—don’t cluster all the soft cheeses together.
- Add the meats (5 minutes): Arrange the cured meats in the spaces between the cheeses. Drape the prosciutto ribbons near the brie (they’re a classic pairing). Place the folded salami triangles near the cheddar, and the soppressata cylinders near the Manchego. Think of the meats as pathways that guide the eye around the board.
- Fill in with fruit (5 minutes): Now it’s time to tuck in the fruit. Place the fig halves near the goat cheese and prosciutto. Arrange the persimmon wedges in a fan pattern near the Manchego. Scatter the apple slices around the cheddar. Sprinkle the pomegranate arils over the board like edible confetti—they add pops of color and flavor. Nestle small clusters of grapes in any empty spaces.
- Add crackers and bread (3 minutes): Fan out the crackers and baguette slices around the edges of the board. Don’t pile them all in one spot; spread them out so there’s easy access from every side. I like to put a few crackers directly under the brie to catch any drips.
- Garnish and final touches (2 minutes): Tuck fresh rosemary sprigs here and there. The green adds a beautiful contrast to all the warm fall colors. Give the board a final look—step back and see if anything looks too crowded or too bare. Adjust as needed. Drizzle a little extra honey over the brie or goat cheese just before serving.
Troubleshooting Tip: If your board looks sparse, you probably didn’t cut your ingredients small enough. Cubes of cheese should be about 1 inch (2.5 cm) square, and fruit slices should be thin. Smaller pieces create more visual interest and make the board look abundant.
Cooking Tips & Techniques
Over the years, I’ve made my fair share of mistakes with charcuterie boards. Here are the lessons I’ve learned so you don’t have to make them yourself.
Don’t overcrowd the board. I know it’s tempting to pile everything on, but a crowded board looks messy and is hard to eat from. Leave about 20% of the board surface visible. That empty space is what makes the board look intentional and elegant. Trust me—less is more.
Think about flavor pairings. Place items next to each other that taste good together. For example, put the brie next to the figs and honey, the cheddar near the apples and salami, and the Manchego next to the membrillo and almonds. This encourages your guests to try combinations they might not have thought of.
Prep everything before you start arranging. I once made the mistake of slicing cheese while trying to arrange the board, and it turned into a chaotic mess. Do all your cutting and prepping first. Then, when everything is ready, you can focus on the fun part: arranging.
Use the “bowls first” method. Always place your ramekins and bowls on the board before you add any food. This establishes the structure of the board and prevents you from having to rearrange things later. I learned this trick from a professional caterer, and it’s a game-changer.
Keep it cold until serving. If you’re assembling the board ahead of time (which I highly recommend), cover it loosely with plastic wrap and refrigerate it. But remember to take it out 20 to 30 minutes before your guests arrive so everything can come to room temperature. Cold cheese is flavorless cheese, and nobody wants that.
One more thing— I once forgot to put out serving utensils, and my guests ended up using their fingers to scoop honey out of the ramekin. It was fine, but a little messy. Don’t be like me. Set out small tongs, cheese knives, and cocktail forks before anyone sits down.
Variations & Adaptations
One of the best things about this board is how customizable it is. Here are some of my favorite variations, depending on who I’m serving.
For a Vegan Friendsgiving: Swap the cheeses for high-quality vegan alternatives. I’ve had great luck with Treeline’s cashew-based brie and Miyoko’s vegan cheddar. Replace the honey with maple syrup or agave, and use a nut-based cheese spread instead of the goat cheese. For the meats, try marinated and roasted mushrooms or a smoky vegan salami from a brand like Herbivorous Butcher.
For a Gluten-Free Crowd: This one’s easy. Just swap the crackers and baguette slices for gluten-free options. I love using Simple Mills almond flour crackers or sliced cucumber and bell pepper strips for a low-carb, gluten-free vessel. Everything else on the board is naturally gluten-free.
For a Spicy Twist: If your crowd likes heat, add a few spicy elements. Include a habanero cheddar or a pepper jack cheese. Swap the Genoa salami for a spicy Calabrese salami. Add a small ramekin of hot honey or a fig jam infused with red pepper flakes. The sweet-spicy combination is addictive.
Seasonal Swaps: This board is designed for fall, but you can adapt it for any season. In the summer, use fresh peaches, nectarines, and berries. In the winter, swap the persimmons for sliced pears and add dried apricots. In the spring, try fresh strawberries and edible flowers for a beautiful, colorful board.
My Personal Favorite Variation: I once made this board for a small gathering and added a few slices of a truffle-infused salami I found at a specialty store. It was a splurge, but the earthy, funky flavor paired so beautifully with the honey and figs that I’ve been including it ever since. It’s my little secret weapon for impressing guests.
Serving & Storage Suggestions
This board is best served at room temperature, so make sure to take it out of the refrigerator about 20 to 30 minutes before your guests arrive. Arrange it on a large, sturdy board or platter in the center of your table. I like to place it on a wooden cutting board or a slate slab for a rustic, farmhouse feel.
What to serve alongside: This board is hearty enough to be the main event for a casual Friendsgiving, but you can also serve it as an appetizer alongside a few other dishes. I love pairing it with a simple arugula salad dressed with lemon vinaigrette (the acidity cuts through the richness) and a bowl of roasted butternut squash soup. For drinks, a crisp hard cider or a light Pinot Noir complements the flavors beautifully.
Storage instructions: If you have leftovers (which is rare in my house, but it happens), you can store the components separately. Wrap the cheeses tightly in wax paper or cheese paper and place them in an airtight container in the refrigerator. Store the meats in a sealed bag or container. The fruit should be eaten within a day or two—it doesn’t keep well once sliced. The crackers and nuts can be stored in airtight containers at room temperature.
Reheating tips: You don’t really “reheat” a charcuterie board, but if you want to bring the cheese back to room temperature after refrigeration, let it sit out for 30 to 45 minutes. The flavors will be much better than if you serve it cold straight from the fridge.
How flavors develop: Honestly, this board is best the day it’s made. The fruit stays fresh, the cheese is at its peak, and the crackers are still crunchy. But if you have leftover cheese and meat, they make for an excellent lunch the next day—just grab a few crackers and some fresh fruit, and you’re good to go.
Nutritional Information & Benefits
While this board is definitely a treat, it’s also packed with some surprising nutritional benefits. Here’s a rough estimate per serving (assuming the board serves 10 people):
| Nutrient | Amount Per Serving |
|---|---|
| Calories | 450-550 |
| Protein | 18-22 g |
| Fat | 30-35 g |
| Carbohydrates | 30-35 g |
| Fiber | 5-7 g |
| Sugar | 18-22 g (mostly from fruit) |
Health benefits of key ingredients: The fall fruit in this board is a nutritional powerhouse. Pomegranate arils are loaded with antioxidants and vitamin C. Figs are a great source of fiber and calcium. Apples provide fiber and vitamin C, and the skin contains quercetin, a compound that supports immune health. The cheeses offer calcium and protein, while the nuts provide healthy fats and vitamin E.
Dietary considerations: This board can be made gluten-free (as mentioned above) and can be adapted for a vegetarian diet by simply omitting the meats and adding more cheese and fruit. It’s not suitable for a vegan diet without significant substitutions. The main allergens to be aware of are dairy (from the cheese) and tree nuts (from the almonds).
My personal wellness perspective: I believe in balance. This board is indulgent, yes, but it’s also full of real, whole foods. When you eat this way—sitting around a table with people you love, sharing food and conversation—it’s good for your soul as well as your body. Don’t stress about the numbers. Enjoy the moment.
Conclusion
This Best Friendsgiving Charcuterie Board with Fall Fruit is more than just a recipe—it’s a way to bring people together. It’s the kind of dish that makes your guests feel welcomed and cared for, without you having to spend hours in the kitchen. The combination of creamy cheeses, savory meats, and sweet-tart fall fruit is simply irresistible, and the visual impact of the board is guaranteed to impress.
I encourage you to make this board your own. Swap in your favorite cheeses, experiment with different fruits, and don’t be afraid to get creative with the arrangement. The beauty of a charcuterie board is that there’s no right or wrong way to do it. It’s all about what makes you and your guests happy.
I absolutely love making this board for Friendsgiving because it captures everything I love about the holiday—good food, good company, and a sense of warmth and gratitude. It’s a little piece of my Aunt Carol’s Pre-Giving that I get to share with the people I care about.
Now I’d love to hear from you! Have you made a Friendsgiving charcuterie board before? What are your favorite fall fruits to include? Drop a comment below and share your creations. And if you loved this recipe, don’t forget to pin it for later and share it with your friends. Happy hosting!
Frequently Asked Questions
How far in advance can I assemble this charcuterie board?
You can assemble the board up to 4 to 6 hours in advance. Just cover it loosely with plastic wrap and refrigerate it. Remember to take it out 20 to 30 minutes before serving to let the cheese come to room temperature.
Can I make this board for a smaller group?
Absolutely! Simply scale down the quantities. For 4 to 6 people, use about half the amount of cheese, meat, and fruit. The same principles apply—just use a smaller board or platter.
What if I can’t find fresh figs or persimmons?
No problem! You can substitute dried figs (rehydrated in warm water for 10 minutes) or use sliced pears or apples instead. For the persimmons, try sliced mango or even peeled and sliced kiwi for a different but still delicious flavor.
How do I keep the apple slices from browning?
Toss the apple slices in a little lemon juice or lime juice right after cutting them. This will slow down the oxidation process and keep them looking fresh for several hours. You can also use a solution of water and a pinch of citric acid if you have it on hand.
Can I use pre-sliced cheese and meat from the store?
You can, but I recommend slicing your own cheese and meat whenever possible. Pre-sliced cheese and meat are often thicker and less flexible, which makes them harder to arrange beautifully. Plus, slicing your own allows you to control the size and shape of each piece.
PrintThe Best Friendsgiving Charcuterie Board with Fall Fruit
This stunning charcuterie board features creamy cheeses, savory cured meats, and sweet-tart fall fruit like figs, persimmons, and pomegranate. It’s the perfect stress-free centerpiece for your Friendsgiving gathering, ready in under 30 minutes.
- Prep Time: 30 minutes
- Cook Time: 0 minutes
- Total Time: 30 minutes
- Yield: 8-12 servings
- Category: Appetizer
- Cuisine: American
Ingredients
- Brie (8 oz / 225 g)
- Aged Cheddar (6 oz / 170 g)
- Goat Cheese Log (4 oz / 115 g)
- Manchego (6 oz / 170 g)
- Prosciutto (4 oz / 115 g)
- Genoa Salami (4 oz / 115 g)
- Soppressata (4 oz / 115 g)
- Fresh Figs (6-8)
- Fuyu Persimmons (2)
- Pomegranate (1)
- Honeycrisp Apples (2)
- Red Seedless Grapes (1 cup / 150 g)
- Honey (for drizzling)
- Fig Jam or Membrillo (quince paste) (1/2 cup / 120 ml)
- Mixed Nuts (1 cup / 140 g)
- Crackers and Bread (2-3 varieties, 3-4 oz / 85-115 g per person)
- Fresh Rosemary Sprigs
Instructions
- Prep your cheeses (5 minutes): Take all the cheeses out of the refrigerator about 30 minutes before you start assembling. Cut the cheddar and Manchego into bite-sized cubes or thin triangles. Leave the brie whole. For the goat cheese, roll the log in a little cracked black pepper or drizzle it with honey.
- Prep your fruit (10 minutes): Wash the grapes and apples. Cut the apples into thin wedges and toss them with a squeeze of lemon juice to prevent browning. Slice the figs in half lengthwise. Slice the Fuyu persimmons into wedges, removing the small core if it’s tough. Cut the pomegranate in half and tap the back with a wooden spoon over a bowl to release the arils. Pick out any white pith.
- Prep your meats (5 minutes): Unfold the prosciutto slices and drape them loosely in ribbons. Fold the salami slices in half, then in half again, creating little triangles. For the soppressata, leave some slices flat and roll a few into small cylinders.
- Set up your bowls (2 minutes): Place your small ramekins on the board first. Fill one with honey, one with fig jam or membrillo, and one with the mixed nuts. Leave a little space around each bowl.
- Place the cheeses (5 minutes): Position the cheeses around the board, spacing them out evenly. Put the brie in one corner, the cheddar cubes in another, the goat cheese log along one edge, and the Manchego triangles near the center.
- Add the meats (5 minutes): Arrange the cured meats in the spaces between the cheeses. Drape the prosciutto ribbons near the brie. Place the folded salami triangles near the cheddar, and the soppressata cylinders near the Manchego.
- Fill in with fruit (5 minutes): Tuck the fig halves near the goat cheese and prosciutto. Arrange the persimmon wedges in a fan pattern near the Manchego. Scatter the apple slices around the cheddar. Sprinkle the pomegranate arils over the board. Nestle small clusters of grapes in any empty spaces.
- Add crackers and bread (3 minutes): Fan out the crackers and baguette slices around the edges of the board. Spread them out so there’s easy access from every side. Put a few crackers directly under the brie to catch any drips.
- Garnish and final touches (2 minutes): Tuck fresh rosemary sprigs here and there. Give the board a final look—step back and see if anything looks too crowded or too bare. Adjust as needed. Drizzle a little extra honey over the brie or goat cheese just before serving.
Notes
Prep everything before you start arranging. Use the ‘bowls first’ method to establish structure. Don’t overcrowd the board—leave about 20% of the surface visible. Keep the board refrigerated until 20-30 minutes before serving. For a vegan version, use plant-based cheeses and meats, and swap honey for maple syrup.
Nutrition
- Serving Size: 1 serving (based on
- Calories: 450550
- Sugar: 1822
- Fat: 3035
- Carbohydrates: 3035
- Fiber: 57
- Protein: 1822
Keywords: charcuterie board, Friendsgiving, fall fruit, cheese board, appetizer, party food, holiday entertaining


