There used to be this tiny bakery tucked between a laundromat and a vintage shop on Main Street in my old neighborhood that made the most incredible cranberry orange scones. When they closed their doors two summers ago—honestly, without so much as a goodbye sign in the window—I felt a little pang of loss that surprised me. I mean, it was just a bakery, right? But those scones. They were the reason I dragged myself out of bed on rainy Saturday mornings. After about seven tries—some crumbly disasters, a few that were more like hockey pucks—I finally cracked the code.
I’ll never forget the morning it all came together. The kitchen was a mess, flour dusted across every surface, and I was down to my last stick of butter. But when I pulled that tray out of the oven and the whole apartment smelled like butter, orange zest, and warm sugar, I knew I had it. The tops were golden, the edges were crisp, and when I drizzled that vanilla glaze over them, it pooled just right. I broke one open while it was still warm, and there they were—those perfect pockets of tart cranberry against the sweet, tender crumb. I may or may not have stood over the counter eating three of them before they even cooled.
Maybe you’ve been there, chasing a flavor memory that feels just out of reach. That’s exactly what this recipe is for. It’s not just a scone—it’s that cozy, bakery-style experience you thought you’d lost. And honestly, I think these are even better than the original.
Why You’ll Love This Recipe
These cranberry orange scones are the kind of thing that makes you slow down and actually enjoy your morning coffee. They’re not fussy or complicated, but they taste like you spent hours in the kitchen. Here’s why they’ve become a staple in my house:
- Quick & Easy: From start to finish, you’re looking at about 35 minutes. That’s faster than a trip to the bakery—and way more satisfying.
- Simple Ingredients: Nothing fancy here. Butter, flour, sugar, eggs, cream, fresh cranberries, and an orange. You probably have most of this already.
- Perfect for Cozy Mornings: These scones were made for chilly fall mornings, holiday brunches, or any day you need a little warmth and sweetness.
- Crowd-Pleaser: I’ve brought these to potlucks, book club meetings, and family breakfasts. They disappear every single time.
- Unbelievably Delicious: The combination of tart cranberries, bright orange zest, and sweet vanilla glaze is just next-level comfort food. It hits every note.
What makes this recipe different from all the others? It’s the technique. I use cold butter grated right into the flour mixture—no cutting in, no fussing. It creates the flakiest, most tender layers without any special equipment. And that vanilla glaze? It’s not too thick or too thin. It sets up perfectly, so you get that crackly top with every bite.
This recipe isn’t just good—it’s the kind that makes you close your eyes after the first bite. It’s comfort food reimagined: bakery-quality, faster, and made in your own kitchen. Perfect for impressing weekend guests without stress, or turning a quiet morning into something memorable.
What Ingredients You Will Need
This recipe uses simple, wholesome ingredients to deliver that bakery-style flavor and texture without any complicated steps. Most of these are pantry staples, and the fresh ingredients are easy to find at any grocery store.
- All-purpose flour (2 ½ cups, 315g) – The base of the scones. I use Gold Medal for consistent results, but any brand works fine.
- Granulated sugar (½ cup, 100g) – Adds just the right amount of sweetness without overpowering the tart cranberries.
- Baking powder (2 ½ teaspoons) – Make sure it’s fresh for the best rise. If it’s been sitting in your pantry for over a year, get a new can.
- Salt (½ teaspoon) – Balances the sweetness and enhances all the flavors.
- Unsalted butter (½ cup, 113g, very cold) – This is the most important ingredient. Keep it in the freezer for 15 minutes before grating. I use Kerrygold for the rich flavor.
- Heavy cream (½ cup, 120ml, plus more for brushing) – Adds richness and tenderness. Half-and-half works in a pinch, but the scones won’t be quite as flaky.
- Large egg (1) – Binds everything together and gives structure.
- Fresh cranberries (1 cup, 100g) – Look for firm, bright red berries. Frozen cranberries work too—just don’t thaw them first, or they’ll turn the dough purple.
- Orange zest (2 tablespoons, from about 2 large oranges) – Go for organic oranges if you can, since you’re using the peel. The zest provides that bright, aromatic flavor.
- Vanilla extract (1 teaspoon) – Pure vanilla, not imitation. It makes a real difference in the final flavor.
For the Vanilla Glaze:
- Powdered sugar (1 cup, 120g)
- Heavy cream (2-3 tablespoons, 30-45ml)
- Vanilla extract (½ teaspoon)
Substitution Notes: If you’re dairy-free, you can use cold coconut oil instead of butter and full-fat coconut cream instead of heavy cream. The texture will be slightly different—a bit more dense—but still delicious. For a gluten-free version, use a 1:1 gluten-free flour blend that contains xanthan gum. I’ve had good luck with King Arthur’s measure-for-measure blend.
Equipment Needed
You don’t need a lot of fancy tools for these scones, which is part of why I love making them. Here’s what you’ll need:
- Large mixing bowl – Any bowl big enough to get your hands in there.
- Box grater – This is my secret weapon for cold butter. A cheese grater works perfectly for grating frozen butter into the flour.
- Pastry cutter or fork – If you don’t want to grate the butter, you can cut it in with a pastry cutter. I’ve done both, and grating is way easier.
- Baking sheet – Line it with parchment paper for easy cleanup.
- Parchment paper – Non-negotiable. It prevents sticking and makes transferring the scones a breeze.
- Measuring cups and spoons – For accuracy. I prefer metal measuring cups for dry ingredients.
- Kitchen scale (optional but recommended) – Weighing your flour ensures consistent results every time.
- Pastry brush – For brushing cream on top before baking. A silicone one works great.
- Wire cooling rack – Letting the scones cool properly helps the glaze set up perfectly.
If you don’t have a box grater, you can cube the cold butter and use a pastry cutter. It takes a little more elbow grease, but it works. And honestly, I’ve used a butter knife to cut in butter in a pinch—it’s not pretty, but it gets the job done.
Preparation Method
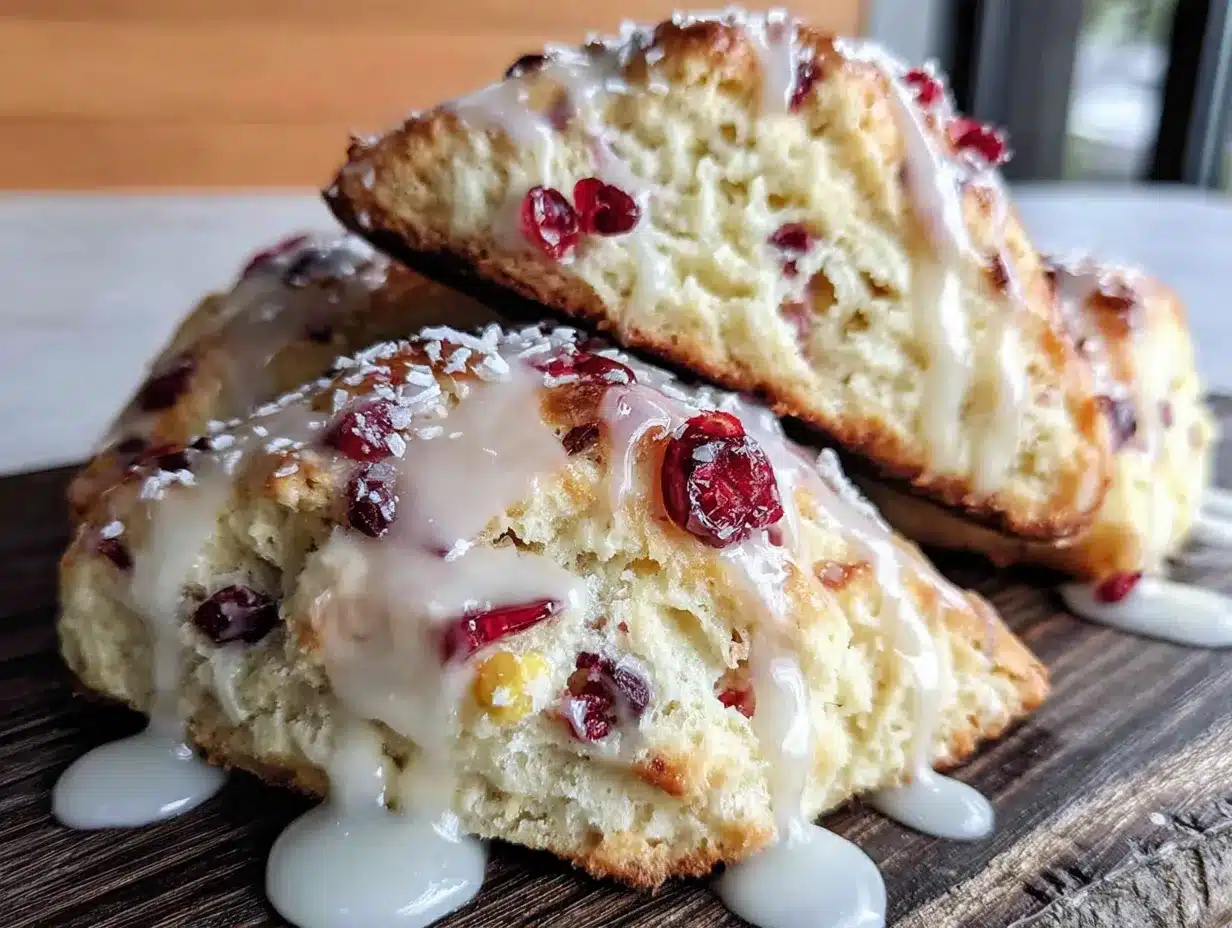
Let me walk you through this step by step. I’ve made these scones so many times that I’ve got it down to a rhythm, and I’ll share all the little tricks I’ve picked up along the way.
- Preheat your oven to 400°F (200°C). Line a baking sheet with parchment paper. I always do this first so the oven is hot and ready when the scones are shaped.
- Grate your cold butter. Take your stick of unsalted butter straight from the freezer and grate it on the large holes of a box grater. Toss the grated butter with about a tablespoon of the flour from your measured amount to keep it from clumping. Pop it back in the freezer while you mix the dry ingredients. This is the trick that changed my scone game completely.
- Mix the dry ingredients. In a large bowl, whisk together the 2 ½ cups (315g) all-purpose flour, ½ cup (100g) granulated sugar, 2 ½ teaspoons baking powder, and ½ teaspoon salt. Make sure everything is evenly distributed.
- Add the grated butter. Take the frozen grated butter out of the freezer and add it to the flour mixture. Use your fingers or a fork to toss the butter pieces into the flour until they’re all coated. You want the mixture to look like coarse meal with some pea-sized butter pieces still visible. Don’t overwork it—you want those little pockets of butter to create flaky layers.
- Add the cranberries and zest. Toss in the 1 cup (100g) fresh cranberries and 2 tablespoons orange zest. Gently stir them through the flour mixture so they’re evenly distributed. The cranberries should be coated in flour, which helps prevent them from sinking to the bottom.
- Mix the wet ingredients. In a small bowl or liquid measuring cup, whisk together the ½ cup (120ml) heavy cream, 1 large egg, and 1 teaspoon vanilla extract. I use a fork for this—it breaks up the egg quickly and evenly.
- Combine wet and dry. Make a well in the center of the flour mixture and pour in the cream mixture. Use a fork or your hands to gently mix everything together until it just comes together. Stop as soon as you don’t see any more dry flour. The dough will look a little shaggy—that’s exactly what you want. Overmixing leads to tough scones.
- Shape the dough. Turn the dough out onto a lightly floured surface. Gently bring it together with your hands, patting it into a circle about ¾-inch thick. Don’t use a rolling pin—it compresses the layers too much. If the dough feels sticky, dust your hands with a little flour.
- Cut the scones. Use a sharp knife or bench scraper to cut the circle into 8 wedges, like you’re cutting a pizza. I prefer wedges over round scones because they have more of those craggy edges that get beautifully golden. Place the wedges on the prepared baking sheet, spacing them about 2 inches apart. They’ll spread a little, but not too much.
- Brush with cream. Brush the tops of the scones with a little extra heavy cream. This gives them that gorgeous golden-brown crust. Sprinkle a tiny bit of coarse sugar on top if you want extra crunch—I do this when I’m feeling fancy.
- Bake. Bake for 15-18 minutes, until the scones are golden brown on the bottom and the edges look crisp. The tops should be lightly golden. I always check at the 15-minute mark because ovens vary so much. Let them cool on the baking sheet for 5 minutes, then transfer to a wire rack.
- Make the glaze. While the scones are cooling, whisk together 1 cup (120g) powdered sugar, 2 tablespoons heavy cream, and ½ teaspoon vanilla extract. Add another tablespoon of cream if you want a thinner glaze. You want it thick enough to drizzle but thin enough to flow off a spoon.
- Glaze the scones. Once the scones are completely cool, drizzle the glaze over the tops. I use a spoon and just let it fall in uneven lines—it looks more rustic and homemade that way. Let the glaze set for about 10 minutes before serving.
Cooking Tips & Techniques
I’ve learned a few things the hard way so you don’t have to. Here are the tips that make all the difference:
Keep everything cold. This is the golden rule of scone-making. Cold butter creates steam as it melts in the oven, which creates those flaky layers. If your hands are warm, run them under cold water before handling the dough. I once made the mistake of letting my butter sit out while I answered the phone, and those scones came out flat and dense. Never again.
Don’t overwork the dough. I know it’s tempting to keep kneading until it’s smooth, but stop as soon as it comes together. Overworking develops the gluten, and that’s what makes scones tough. Your dough should look a little rough and shaggy. That’s the look of tender scones in the making.
Use fresh baking powder. This is one of those things nobody tells you. Baking powder loses its potency over time. If yours has been sitting in the cabinet for more than six months, it might not give you the rise you need. Test it by dropping a teaspoon into hot water—if it fizzes vigorously, you’re good.
Let them cool before glazing. I know it’s hard to wait, but if you glaze warm scones, the glaze will just melt and soak in. You’ll lose that beautiful white drizzle. Give them at least 20 minutes on the cooling rack. Trust me on this one—I ruined a whole batch learning this lesson.
Freeze the cranberries. If you’re using fresh cranberries, pop them in the freezer for 10 minutes before adding them to the dough. Frozen cranberries hold their shape better during baking and don’t bleed as much color into the dough. It’s a small step that makes a big visual difference.
Variations & Adaptations
One of the best things about this recipe is how adaptable it is. Here are some variations I’ve tried and loved:
White Chocolate Cranberry Scones. Add ½ cup white chocolate chips along with the cranberries. The sweet white chocolate pairs beautifully with the tart cranberries and bright orange. I made these for a Christmas brunch and they were gone in five minutes.
Gluten-Free Version. Substitute the all-purpose flour with a 1:1 gluten-free baking flour blend. I’ve used Bob’s Red Mill and King Arthur with great results. The texture is slightly more delicate, so handle the dough gently. Add an extra tablespoon of cream if the dough seems too dry.
Vegan Scones. Replace the butter with cold coconut oil (grated the same way), use full-fat coconut cream instead of heavy cream, and substitute the egg with a flax egg (1 tablespoon ground flaxseed mixed with 3 tablespoons water, let sit for 5 minutes). The texture is a bit more dense but still deliciously tender.
Dried Cranberry Option. If fresh cranberries aren’t in season, dried cranberries work wonderfully. Use ¾ cup dried cranberries and reduce the sugar in the dough to ⅓ cup since dried cranberries are sweeter. Rehydrate them in warm orange juice for 10 minutes before adding to the dough for extra flavor.
Lemon Blueberry Twist. Swap the orange zest for lemon zest and replace the cranberries with fresh blueberries. The lemon-blueberry combination is bright and perfect for spring. Use a lemon glaze instead of vanilla—just replace the vanilla extract with lemon juice in the glaze recipe.
Serving & Storage Suggestions
These scones are best served warm, but they’re pretty amazing at room temperature too. Here’s how I like to serve them:
Serving Temperature: I prefer them slightly warm. Pop a scone in the microwave for 10-15 seconds if it’s been sitting out for a while. The glaze stays intact, but the inside gets that just-baked softness. Serve them on a pretty plate with a side of fresh fruit and a cup of coffee or tea.
What to Serve With Them: These scones are wonderful on their own, but a little clotted cream or butter makes them even more indulgent. For a brunch spread, pair them with scrambled eggs, fresh fruit salad, and mimosas. They also freeze beautifully, so you can make a double batch and save some for later.
Storage Instructions: Store leftover scones in an airtight container at room temperature for up to 3 days. If you stack them, put a piece of parchment paper between layers to prevent the glaze from sticking. Don’t refrigerate them—the fridge dries them out and makes them stale faster.
Freezing: You can freeze unbaked scones for up to 3 months. Shape the scones, place them on a baking sheet, and freeze until solid. Transfer to a freezer bag. Bake from frozen, adding 2-3 minutes to the baking time. Baked scones also freeze well—wrap them individually in plastic wrap and store in a freezer bag. Thaw at room temperature and reheat in a 300°F oven for 5 minutes.
Flavor Development: Here’s a little secret—these scones are actually better the next day. The flavors meld together overnight, and the texture softens just a bit. If you can resist eating them all on day one, you’re in for a treat on day two.
Nutritional Information & Benefits
While these scones are definitely a treat, they do have some redeeming qualities. Here’s the estimated nutritional breakdown per scone (with glaze):
- Calories: 385
- Total Fat: 18g
- Saturated Fat: 11g
- Carbohydrates: 52g
- Sugar: 28g
- Protein: 5g
- Fiber: 2g
- Sodium: 280mg
Health Benefits: Cranberries are packed with antioxidants and vitamin C, which support immune health. Oranges provide a good dose of vitamin C and flavonoids that help reduce inflammation. The butter and cream, while indulgent, provide fat-soluble vitamins A, D, E, and K. Of course, these scones are a treat, not a health food, but it’s nice to know there’s some nutritional value in every bite.
Dietary Considerations: This recipe contains gluten, dairy, and eggs. For gluten-free and vegan alternatives, see the variations section above. These scones are nut-free, making them safe for school events or parties where nut allergies are a concern.
Conclusion
There’s something special about a recipe that starts as a craving and becomes a tradition. These cranberry orange scones have become that for me. They’re the recipe I turn to when I need a little comfort, when I want to impress someone without stress, or when I just want my kitchen to smell amazing. The tart cranberries, the bright orange zest, the sweet vanilla glaze—it all comes together in a way that feels both familiar and special.
I hope you give these a try. Don’t be afraid to make them your own—add more zest, use different berries, or skip the glaze if you prefer a less sweet scone. The beauty of baking is that you can tweak and adjust until it’s exactly what you want. And honestly, even a “messy” batch of these scones is still pretty wonderful.
If you make these, I’d love to hear about it. Drop a comment below and let me know how they turned out, or share your own twist on the recipe. And if you’re looking for more cozy breakfast ideas, you might also enjoy my cinnamon roll baked oatmeal or these pumpkin chocolate chip muffins for another morning treat. Happy baking, friends!
Frequently Asked Questions
Can I use frozen cranberries instead of fresh?
Absolutely. Use frozen cranberries straight from the freezer—don’t thaw them first. Thawed cranberries will bleed into the dough and turn it purple. Frozen cranberries hold their shape better and give you those beautiful red pockets throughout the scone.
Why did my scones turn out dry and crumbly?
This usually happens for one of two reasons: too much flour or overbaking. Make sure you measure your flour correctly—spoon it into the measuring cup and level it off, don’t scoop directly from the bag. Also, check your scones at the 15-minute mark. Every oven runs differently, and even one extra minute can dry them out.
Can I make the dough ahead of time?
Yes! You can prepare the dough, shape the scones, and refrigerate them on the baking sheet for up to 24 hours before baking. Just cover them loosely with plastic wrap. You can also freeze unbaked scones for up to 3 months. Bake from frozen, adding a couple of minutes to the baking time.
How do I get my glaze to set properly?
Make sure your scones are completely cool before glazing. Warm scones will cause the glaze to melt and soak in. Also, use the right consistency—your glaze should be thick enough to coat the back of a spoon but thin enough to drizzle. If it’s too thin, add more powdered sugar. If it’s too thick, add a splash more cream.
Can I use orange juice instead of orange zest?
I don’t recommend it. Orange zest provides concentrated flavor without adding extra liquid, which would throw off the dough’s moisture balance. Orange juice would make the dough too wet and could affect the texture. Stick with zest for the best results. If you really want orange flavor in the dough, use both zest and a tablespoon of orange juice, but reduce the cream by a tablespoon to compensate.
Pin This Recipe!

Cozy Cranberry Orange Scones Recipe: Easy & Delicious
These cranberry orange scones are the kind of thing that makes you slow down and actually enjoy your morning coffee. They’re not fussy or complicated, but they taste like you spent hours in the kitchen.
- Prep Time: 15 minutes
- Cook Time: 18 minutes
- Total Time: 35 minutes
- Yield: 8 servings 1x
- Category: Breakfast
- Cuisine: American
Ingredients
- 2 ½ cups (315g) all-purpose flour
- ½ cup (100g) granulated sugar
- 2 ½ teaspoons baking powder
- ½ teaspoon salt
- ½ cup (113g) unsalted butter, very cold
- ½ cup (120ml) heavy cream, plus more for brushing
- 1 large egg
- 1 cup (100g) fresh cranberries
- 2 tablespoons orange zest (from about 2 large oranges)
- 1 teaspoon vanilla extract
- 1 cup (120g) powdered sugar
- 2–3 tablespoons (30-45ml) heavy cream (for glaze)
- ½ teaspoon vanilla extract (for glaze)
Instructions
- Preheat your oven to 400°F (200°C). Line a baking sheet with parchment paper.
- Grate your cold butter on the large holes of a box grater. Toss the grated butter with about a tablespoon of flour to keep it from clumping. Pop it back in the freezer while you mix the dry ingredients.
- In a large bowl, whisk together the 2 ½ cups (315g) all-purpose flour, ½ cup (100g) granulated sugar, 2 ½ teaspoons baking powder, and ½ teaspoon salt.
- Add the frozen grated butter to the flour mixture. Use your fingers or a fork to toss the butter pieces into the flour until they’re all coated. The mixture should look like coarse meal with some pea-sized butter pieces still visible.
- Toss in the 1 cup (100g) fresh cranberries and 2 tablespoons orange zest. Gently stir them through the flour mixture so they’re evenly distributed.
- In a small bowl or liquid measuring cup, whisk together the ½ cup (120ml) heavy cream, 1 large egg, and 1 teaspoon vanilla extract.
- Make a well in the center of the flour mixture and pour in the cream mixture. Use a fork or your hands to gently mix everything together until it just comes together. The dough will look a little shaggy.
- Turn the dough out onto a lightly floured surface. Gently bring it together with your hands, patting it into a circle about ¾-inch thick.
- Use a sharp knife or bench scraper to cut the circle into 8 wedges. Place the wedges on the prepared baking sheet, spacing them about 2 inches apart.
- Brush the tops of the scones with a little extra heavy cream.
- Bake for 15-18 minutes, until the scones are golden brown on the bottom and the edges look crisp. Let them cool on the baking sheet for 5 minutes, then transfer to a wire rack.
- While the scones are cooling, whisk together 1 cup (120g) powdered sugar, 2 tablespoons heavy cream, and ½ teaspoon vanilla extract. Add another tablespoon of cream if you want a thinner glaze.
- Once the scones are completely cool, drizzle the glaze over the tops. Let the glaze set for about 10 minutes before serving.
Notes
Keep everything cold for flaky layers. Don’t overwork the dough. Use fresh baking powder. Let scones cool completely before glazing. Freeze cranberries for 10 minutes before adding to prevent color bleeding.
Nutrition
- Serving Size: 1 scone
- Calories: 385
- Sugar: 28
- Sodium: 280
- Fat: 18
- Saturated Fat: 11
- Carbohydrates: 52
- Fiber: 2
- Protein: 5
Keywords: cranberry orange scones, easy scone recipe, bakery-style scones, fall breakfast, holiday brunch


