It was 11:47 PM on a random Tuesday in early November, and I had a very specific, almost irrational craving for a sugar cookie. Not just any sugar cookie, mind you, but one that was thick, soft, and absolutely buried under a layer of hard, crackly icing. The problem? I didn’t have the energy for the usual fancy royal icing piping that I’d normally do for a holiday. I didn’t have meringue powder, and honestly, I didn’t have the patience. But I did have a half-used bag of powdered sugar, a splash of milk, and a weird idea that just hit me. What if I just made a super simple, glossy glaze and dunked the cookies face-down into it? The result was so unexpectedly perfect—a smooth, shiny top with no piping bags or tips—that I immediately grabbed my turkey and leaf cookie cutters. I mean, it was almost midnight, and I was grinning like a maniac at a tray of lopsided, beautifully iced Thanksgiving cookies. That late-night, slightly chaotic experiment turned into the only recipe I use now for the holidays. It’s the one that makes people at the party stop, take a bite, and then ask, “Wait, you made these? Can I have the recipe?”
Why You’ll Love This Recipe
Let me tell you, after years of testing (and failing with sticky doughs and runny icings), this recipe is my absolute non-negotiable for Thanksgiving. It’s the one I bring to every Friendsgiving and family dinner because it just works.
- Foolproof Dough: This dough doesn’t spread. I’ve tested it a dozen times. Your turkey shapes will actually look like turkeys, not blobs.
- Simple Icing: No royal icing drama here. This is a simple glaze that hardens with a beautiful crackly sheen. It’s forgiving and easy.
- Perfect for Hosting: You can make the dough days ahead and bake the cookies the night before. Just ice them a few hours before your guests arrive for a stunning, stress-free dessert table.
- Total Crowd-Pleaser: Kids love decorating them, and adults love eating them. They disappear faster than the pumpkin pie, I swear.
- Make-Ahead Magic: These cookies actually taste better the next day. The flavors meld, and the icing sets perfectly, making them ideal for a busy host’s schedule.
This isn’t just another cutout cookie recipe. The secret is a tiny bit of cream cheese in the dough, which gives it a tender, almost melt-in-your-mouth texture without being cakey. It’s the kind of cookie that makes you close your eyes after the first bite. It’s comfort food reimagined—familiar, festive, and completely unforgettable.
What Ingredients You Will Need
This recipe uses simple, wholesome ingredients to deliver that perfect balance of buttery flavor and soft texture. Most of these are probably already in your pantry, which is exactly how I like it.
For the Cookies:
- Unsalted butter, softened: 1 cup (2 sticks / 226g). Make sure it’s truly soft, not melted. This is key for creaming.
- Cream cheese, softened: 2 oz (60g). This is my secret ingredient. It adds a subtle tang and makes the dough incredibly tender. Don’t skip it!
- Granulated sugar: 1 cup (200g). Standard white sugar for sweetness and structure.
- Large egg: 1, at room temperature. A cold egg can shock the butter, so let it sit out for 30 minutes.
- Vanilla extract: 1 teaspoon. I always use pure vanilla extract for the best flavor.
- All-purpose flour: 2 ½ cups (312g). Spoon and level it into your measuring cup—don’t scoop directly or you’ll pack it in and get dry cookies.
- Baking powder: ½ teaspoon. Helps them puff up just a tiny bit.
- Salt: ½ teaspoon. Balances the sweetness.
For the Glaze Icing:

- Powdered sugar: 2 cups (240g), sifted if it’s lumpy.
- Milk: 3-4 tablespoons (45-60ml). Whole milk gives the best creamy texture, but 2% works too.
- Light corn syrup: 2 tablespoons (30ml). This is the secret to that glossy, crackly finish. It prevents the icing from getting too matte or chalky.
- Vanilla extract: ½ teaspoon.
- Food coloring: Gel or liquid. I use orange, yellow, and brown for Thanksgiving. (I personally like the Wilton gel colors for vibrant shades without thinning the icing.)
For a dairy-free option, you can substitute the butter with a high-quality vegan butter stick and use a dairy-free cream cheese. The texture will be slightly different, but still delicious.
Equipment Needed
You don’t need a fancy bakery setup for these. Here is what you’ll need:
- Electric mixer: A stand mixer with a paddle attachment is easiest, but a hand mixer works perfectly. I’ve used both.
- Rolling pin: I prefer a French rolling pin (the one without handles), but any rolling pin will do. If you have a dowel, that works too.
- Cookie cutters: Thanksgiving-themed ones! Turkey, leaf, acorn, and pumpkin are my favorites. (I found a great set at a local craft store for under $10).
- Baking sheets: 2 large, light-colored baking sheets. Dark pans can make the bottoms burn.
- Parchment paper: Non-negotiable. It prevents sticking and makes cleanup a breeze.
- Wire cooling rack: Essential for letting the cookies cool completely before icing.
- Small bowls: For mixing your icing colors.
- Spoon or offset spatula: For spreading the glaze. I actually just use the back of a spoon for a rustic look.
Preparation Method
- Cream the butter and cream cheese: In a large bowl, beat the softened butter and cream cheese together on medium speed until smooth and fluffy, about 2 minutes. Scrape down the sides of the bowl.
- Add sugar and egg: Add the granulated sugar and beat until light and airy, about 3 minutes. Add the egg and vanilla extract, and mix until just combined. Don’t overmix here.
- Combine dry ingredients: In a separate bowl, whisk together the flour, baking powder, and salt. Gradually add this dry mixture to the wet mixture, mixing on low speed until a soft dough forms. It will look a little shaggy, but that’s okay.
- Chill the dough: Divide the dough into two discs, wrap them tightly in plastic wrap, and refrigerate for at least 1 hour (or up to 3 days). This is a crucial step. Chilling prevents the cookies from spreading and makes the dough easy to roll. (I once tried to skip this, and my turkey cookies looked like sad, flat pancakes. Don’t be like me.)
- Preheat and roll: Preheat your oven to 350°F (175°C). Lightly flour your work surface and rolling pin. Roll one disc of dough to about ¼-inch (6mm) thickness. If it sticks, dust a little more flour underneath.
- Cut the shapes: Cut out your shapes and place them on a parchment-lined baking sheet, spacing them about 1 inch apart. For even baking, keep all the cookies roughly the same size.
- Bake: Bake for 8-10 minutes, or until the edges are just barely golden brown. The centers should look set but not browned. Let them cool on the baking sheet for 5 minutes, then transfer to a wire rack to cool completely.
- Make the glaze: While the cookies cool, make the icing. In a medium bowl, whisk together the powdered sugar, 3 tablespoons of milk, corn syrup, and vanilla extract. It should be thick but slightly runny—like honey. If it’s too thick, add another tablespoon of milk. If it’s too thin, add a little more powdered sugar.
- Ice the cookies: Divide the glaze into small bowls and tint with food coloring. To ice, simply hold a cookie by the edge and spoon a small amount of glaze onto the center. Gently tilt the cookie or use the back of the spoon to spread it to the edges. Place it back on the wire rack to set. The glaze will harden into a shiny, crackly shell in about 1-2 hours.
Cooking Tips & Techniques
I’ve messed up this recipe more times than I care to admit, so let me save you the trouble. First, the biggest mistake is overworking the dough. When you add the flour, mix just until it comes together. If you keep mixing, you’ll develop gluten, and your cookies will be tough, not tender.
Another thing I learned the hard way: don’t skip the chilling. I know, you’re in a rush, but warm dough is sticky dough. It will cling to your rolling pin and spread into a mess in the oven. If your dough gets too soft while you’re working with it, just pop it back in the fridge for 10 minutes.
For the glaze, the corn syrup is your best friend. I tried making this icing without it once, and it turned out dull and chalky. The corn syrup gives it that beautiful, professional-looking sheen. Also, don’t rush the drying process. If you stack the cookies before the icing is fully set, you’ll ruin all your hard work. Let them sit out for at least an hour, ideally two.
Finally, for perfect shapes, dip your cookie cutter in flour before each cut. It prevents the dough from sticking to the cutter and mangling your turkey’s tail feathers.
Variations & Adaptations
This recipe is super flexible. Here are a few ways to change it up:
- Spiced Version: Add 1 teaspoon of cinnamon, ½ teaspoon of nutmeg, and ¼ teaspoon of cloves to the flour mixture. It gives the cookies a warm, chai-like flavor that screams “fall.”
- Gluten-Free: Swap the all-purpose flour for a 1-to-1 gluten-free baking flour blend. I’ve used Bob’s Red Mill with great results. Just make sure the dough is well-chilled.
- Chocolate Dip: Instead of the glaze, melt some semi-sweet chocolate with a teaspoon of coconut oil and dip half of each cookie into it. It’s decadent and gorgeous.
- Citrus Zest: Add the zest of one orange to the dough and a splash of orange juice to the glaze. It brightens up the whole cookie.
- Nutty Crunch: Before the glaze sets, sprinkle finely chopped pecans or walnuts on top. It adds a lovely texture and a nod to the Thanksgiving table.
Serving & Storage Suggestions
These cookies are best served at room temperature, which makes them perfect for a buffet table. Arrange them on a large platter or tiered stand for a stunning centerpiece. They pair beautifully with a hot cup of spiced apple cider or a strong black coffee.
For storage, place the fully set cookies in an airtight container at room temperature. They will stay fresh for up to a week. In fact, I think they taste even better on day two or three—the texture softens slightly, and the flavors meld together.
You can also freeze the baked, un-iced cookies for up to 3 months. Just wrap them tightly in plastic wrap and then foil. When you’re ready to serve, thaw them at room temperature and ice them fresh. This is a lifesaver for a busy host! The iced cookies can also be frozen, but the icing might get a little sticky when thawed, so I prefer to freeze them plain.
Nutritional Information & Benefits
Let’s be real—these are a treat, not a health food. But here’s the breakdown per cookie (based on a standard 2-inch cutter, yields about 30 cookies):
| Nutrient | Amount per Cookie |
|---|---|
| Calories | ~140 |
| Fat | 7g |
| Carbohydrates | 19g |
| Sugar | 12g |
| Protein | 2g |
On the bright side, the cream cheese adds a small amount of calcium and protein. The butter, in moderation, provides vitamin A. And honestly, the joy of sharing a homemade cookie with loved ones has its own mental health benefits. Everything in moderation, right?
Conclusion
These iced Thanksgiving cookie cutouts are more than just a dessert—they are a tradition waiting to happen. They are the thing that makes your guests feel special, the project that gets the kids excited, and the treat that you can feel proud to share. I love this recipe because it’s forgiving, beautiful, and absolutely delicious. It lets me be creative without the stress.
Now, I want to see your creations! Tag me in your photos, leave a comment below telling me what shapes you chose, or share your own twist on the recipe. Did you add cinnamon? Did you try the chocolate dip? Let me know! Happy baking, and have a wonderful Thanksgiving.
Frequently Asked Questions
Can I use margarine instead of butter?
I don’t recommend it. Margarine has a higher water content, which can cause the cookies to spread too much and become greasy. Stick with real butter for the best texture and flavor.
My dough is too sticky. What do I do?
Don’t add more flour! Just wrap it up and chill it for an extra 30 minutes. The cold will firm up the butter and make the dough much easier to handle.
Can I make these cookies ahead of time?
Absolutely. You can make the dough up to 3 days in advance and keep it in the fridge. You can also bake the cookies and freeze them (un-iced) for up to 3 months.
Why did my icing turn out matte?
You likely forgot the corn syrup. That’s the magic ingredient for the glossy, crackly finish. If you don’t have corn syrup, you can try using a tiny bit of light agave nectar instead.
How do I get clean, sharp edges on my cookies?
Make sure your dough is well-chilled. When you cut the shapes, press straight down and lift up without twisting. Twisting can distort the edges of the cookie.
Pin This Recipe!
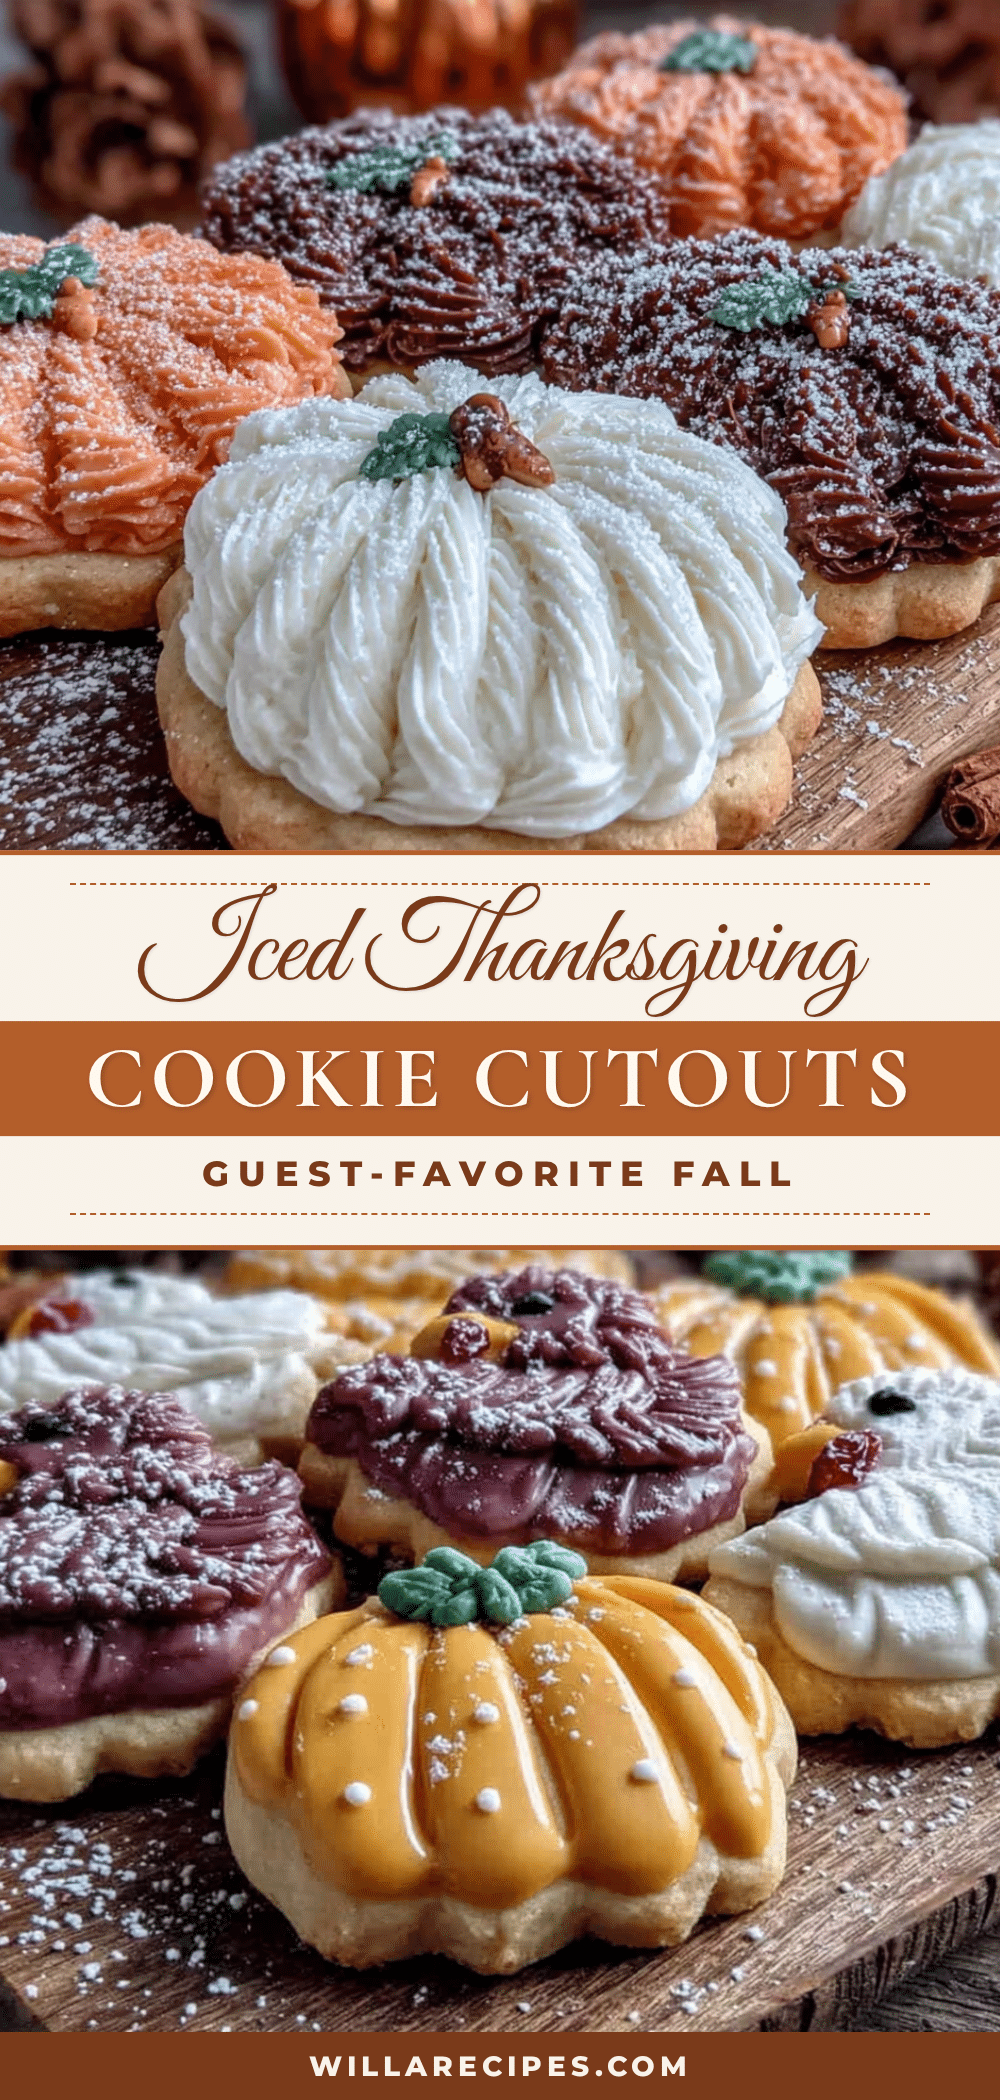
Best Easy Iced Thanksgiving Cookie Cutouts
These thick, soft sugar cookies are topped with a simple, glossy glaze that hardens with a beautiful crackly sheen. Perfect for Thanksgiving, they are foolproof, make-ahead friendly, and a total crowd-pleaser.
- Prep Time: 20 minutes
- Cook Time: 10 minutes
- Total Time: 1 hour 30 minutes (includes 1 hour chilling)
- Yield: 30 cookies 1x
- Category: Dessert
- Cuisine: American
Ingredients
- 1 cup (2 sticks / 226g) unsalted butter, softened
- 2 oz (60g) cream cheese, softened
- 1 cup (200g) granulated sugar
- 1 large egg, at room temperature
- 1 teaspoon vanilla extract
- 2 ½ cups (312g) all-purpose flour
- ½ teaspoon baking powder
- ½ teaspoon salt
- 2 cups (240g) powdered sugar, sifted if lumpy
- 3–4 tablespoons (45-60ml) milk (whole milk preferred)
- 2 tablespoons (30ml) light corn syrup
- ½ teaspoon vanilla extract
- Food coloring (gel or liquid, e.g., orange, yellow, brown)
Instructions
- Cream the butter and cream cheese: In a large bowl, beat the softened butter and cream cheese together on medium speed until smooth and fluffy, about 2 minutes. Scrape down the sides of the bowl.
- Add sugar and egg: Add the granulated sugar and beat until light and airy, about 3 minutes. Add the egg and vanilla extract, and mix until just combined. Don’t overmix.
- Combine dry ingredients: In a separate bowl, whisk together the flour, baking powder, and salt. Gradually add this dry mixture to the wet mixture, mixing on low speed until a soft dough forms. It will look a little shaggy.
- Chill the dough: Divide the dough into two discs, wrap them tightly in plastic wrap, and refrigerate for at least 1 hour (or up to 3 days).
- Preheat and roll: Preheat your oven to 350°F (175°C). Lightly flour your work surface and rolling pin. Roll one disc of dough to about ¼-inch (6mm) thickness.
- Cut the shapes: Cut out your shapes and place them on a parchment-lined baking sheet, spacing them about 1 inch apart.
- Bake: Bake for 8-10 minutes, or until the edges are just barely golden brown. Let them cool on the baking sheet for 5 minutes, then transfer to a wire rack to cool completely.
- Make the glaze: In a medium bowl, whisk together the powdered sugar, 3 tablespoons of milk, corn syrup, and vanilla extract. It should be thick but slightly runny—like honey. Adjust consistency with additional milk or powdered sugar as needed.
- Ice the cookies: Divide the glaze into small bowls and tint with food coloring. Hold a cookie by the edge and spoon a small amount of glaze onto the center. Gently tilt the cookie or use the back of a spoon to spread it to the edges. Place on a wire rack to set for 1-2 hours until the glaze hardens into a shiny, crackly shell.
Notes
The dough can be made up to 3 days ahead and refrigerated. Baked, un-iced cookies can be frozen for up to 3 months. For best results, do not skip chilling the dough. The corn syrup is essential for a glossy, crackly icing finish.
Nutrition
- Serving Size: 1 cookie
- Calories: 140
- Sugar: 12
- Sodium: 80
- Fat: 7
- Saturated Fat: 4
- Carbohydrates: 19
- Protein: 2
Keywords: Thanksgiving cookies, sugar cookies, iced cookies, cutout cookies, holiday cookies, easy cookie recipe


