It was 11:47 PM on a random Wednesday in October, and I was hit with a craving so specific it almost felt like a fever dream. I wanted something warm, something cold, something crunchy, something creamy—basically, I wanted everything all at once. The thing is, my fridge was in that sad, end-of-week state. A half-empty bag of tortilla chips sat on the counter like a sad little ghost. I didn’t have the ground beef for a proper taco dip, but I had a can of pumpkin puree leftover from a baking project that never happened. And then it hit me—what if I just… made it work? Honestly, that night, the usual rules of cooking felt like they didn’t apply. I was tired, the house was quiet, and my brain was doing that weird thing where it connects dots that don’t normally go together. Pumpkin and taco seasoning? It sounded crazy. But something about the late hour made me bold, you know?
I grabbed a mixing bowl, a can of refried beans, and that lonely pumpkin puree. The first spoonful of the mixture looked wrong—like a sunset that got confused—but I kept going. I layered in sour cream, cheese, and some diced tomatoes I found hiding in the back. When I finally scooped up a chip and took a bite, I actually laughed out loud. It was good. Like, really good. The pumpkin added this subtle sweetness and a velvety texture that made the whole thing feel more like a cozy hug than a party snack. I mean, let’s be real—I was standing in my kitchen in pajamas at midnight, eating taco dip off a paper plate. But that moment? It was pure magic. Maybe you’ve been there—when a weird kitchen experiment turns into something you can’t stop thinking about. That’s how this recipe was born. And honestly, I haven’t made regular taco dip since.
Why You’ll Love This Recipe
This isn’t just another dip to throw together for game day. It’s a conversation starter, a cozy comfort food, and a sneaky way to get some veggies in without anyone noticing. Let me break down why this one’s different—and why it’ll become your new fall favorite.
- Quick & Easy: You can have this layered dip ready in under 20 minutes. No oven required, no complicated steps. Just mix, layer, and dig in.
- Simple Ingredients: Everything here is stuff you probably already have in your pantry or fridge. No fancy grocery runs needed—just good, honest staples.
- Perfect for Fall Gatherings: Whether it’s a Halloween party, a Thanksgiving appetizer, or just a cozy night in with the family, this dip screams autumn without being too on-the-nose.
- Crowd-Pleaser: I’ve served this at three different gatherings now, and every single time, someone asks for the recipe. Kids love it, adults love it—it’s a universal win.
- Unbelievably Delicious: The combo of creamy pumpkin, zesty taco seasoning, and cool sour cream is next-level comfort food. You’ll close your eyes after the first bite. I promise.
What makes this recipe stand out from every other taco dip out there is that pumpkin twist. It’s not gimmicky—it actually works. The pumpkin adds a richness that balances the heat from the taco seasoning and makes the whole thing feel more substantial. I’ve tested this with half a dozen different spice blends and ratios, and this version is the one that hits every note perfectly. It’s comfort food reimagined—healthier, faster, but with the same soul-soothing satisfaction. Perfect for impressing guests without stress, or turning a simple Tuesday night into something memorable.
What Ingredients You Will Need
This recipe uses simple, wholesome ingredients to deliver bold flavor and satisfying texture without the fuss. Most of these are pantry staples, so you can whip this up whenever the craving hits—no special trip to the store required.
For the Pumpkin-Taco Layer
- 1 can (15 oz) pumpkin puree (not pumpkin pie filling—make sure it’s 100% pure pumpkin)
- 1 packet (1 oz) taco seasoning (I prefer the Ortega or homemade blend for less sodium)
- 1/2 cup water
- 1 can (16 oz) refried beans (traditional or vegetarian, your call)
For the Creamy Layers
- 1 cup sour cream (full-fat works best for texture, but light works in a pinch)
- 1/2 cup cream cheese, softened (this adds that ultra-creamy richness)
- 1 tablespoon lime juice (fresh is better, but bottled works too)
For the Toppings
- 1 1/2 cups shredded Mexican blend cheese (or cheddar if that’s what you have)
- 1 cup diced tomatoes (drain them first so the dip doesn’t get watery)
- 1/2 cup sliced black olives (optional, but I love the briny pop they add)
- 1/4 cup chopped green onions (for freshness and color)
- 1/4 cup chopped fresh cilantro (if you’re one of those people—I am)
For Serving
- 1 large bag of tortilla chips (go for the sturdy ones—you’ll need them for scooping)
- Optional: sliced jalapeños for extra heat
When picking your pumpkin puree, I recommend Libby’s—it’s consistently thick and not watery, which is key here. If you’re using a store brand, just give it a quick stir and check the consistency. It should be smooth, not runny. For the refried beans, I like the ones with a little fat in them—they spread easier and taste richer. But if you’re watching your diet, the fat-free versions work fine; just add a splash of water to loosen them up. Oh, and one more thing—if you’re making this for a crowd, double the recipe. Trust me on that one.
Equipment Needed
You don’t need a fancy kitchen to pull this together. Here’s what you’ll need:
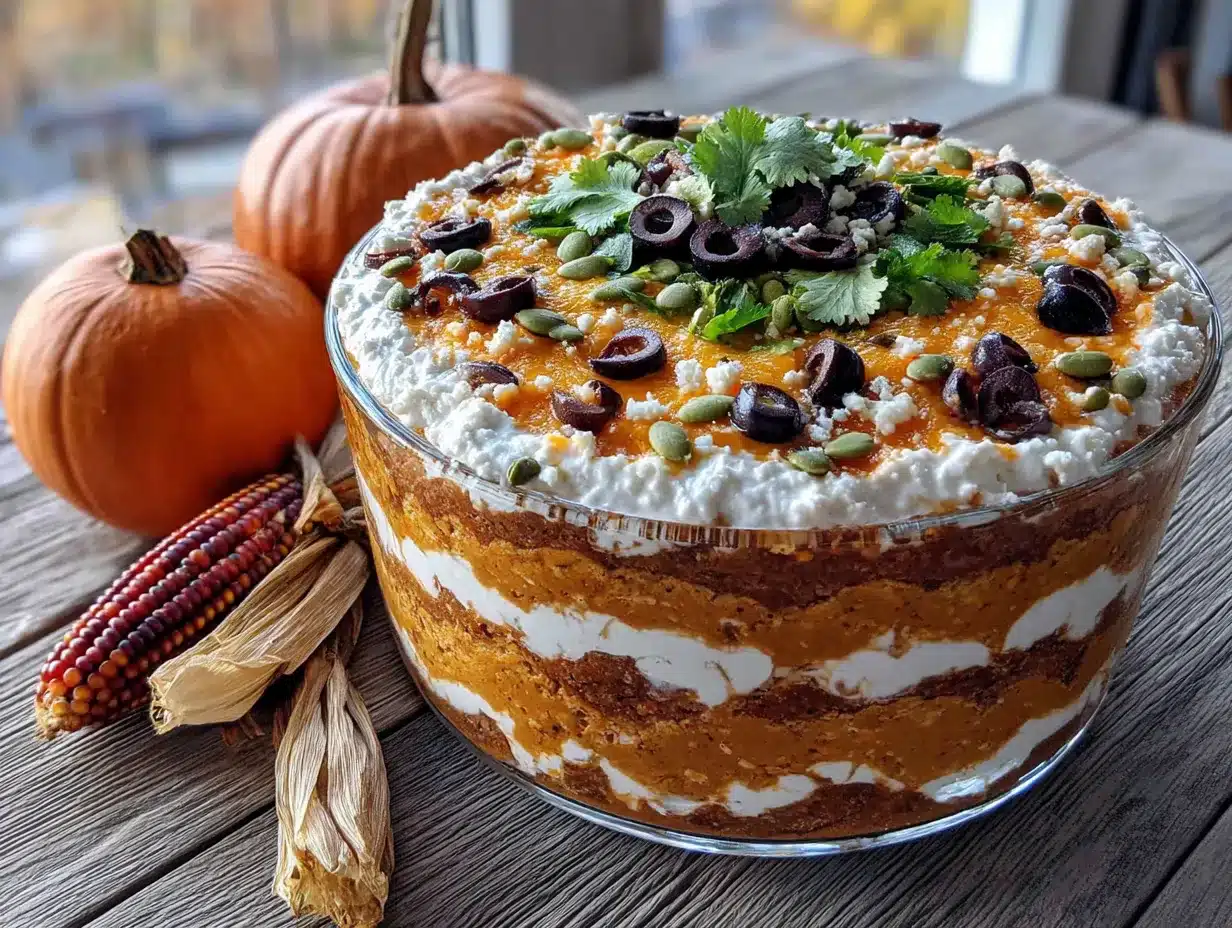
- One 9-inch pie dish or a shallow serving bowl: I use a glass pie dish because I like seeing all the layers. A ceramic dish works too, just make sure it’s wide enough for chips to reach all the good stuff.
- A medium skillet or saucepan: For cooking the pumpkin-taco mixture. Non-stick makes cleanup a breeze.
- A rubber spatula: For scraping every last bit of that pumpkin goodness out of the can and into the skillet.
- A small mixing bowl: For blending the sour cream and cream cheese. I use a whisk if I’m feeling fancy, but a fork works just fine.
- A cutting board and knife: For dicing tomatoes, slicing olives, and chopping green onions.
- A can opener: Obvious, but don’t forget it.
If you don’t have a pie dish, no worries. A square baking dish or even a large dinner plate with a rim will work. The key is having something with edges so the layers don’t spill out. I’ve used a cast iron skillet before too—it gives the dip a nice rustic look. Just make sure it’s clean and dry before you start layering. And if you’re using a metal dish, be aware that the acidity from the tomatoes and lime can react over time, so serve it within a few hours of making it.
Preparation Method
Alright, let’s get to the good part. Follow these steps, and you’ll have a dip that’ll make everyone ask for the recipe.
- Start with the pumpkin-taco mixture. In a medium skillet over medium heat, combine the pumpkin puree, taco seasoning, and water. Stir it all together until it’s smooth and well-combined. Let it simmer for about 3-4 minutes, stirring occasionally, until it thickens up a bit. You’ll know it’s ready when it coats the back of a spoon and smells like a taco stand in autumn. Remove from heat and set aside to cool slightly.
- Warm up the refried beans. In a small microwave-safe bowl, heat the refried beans for about 30 seconds, just to make them easier to spread. If they’re too thick, stir in a tablespoon of water. You want them to be spreadable but not runny. Using a rubber spatula, spread the beans in an even layer on the bottom of your pie dish or serving bowl. This is your foundation—make it count.
- Layer on the pumpkin mixture. Once the pumpkin-taco mixture has cooled a bit (you don’t want it hot, or it’ll melt the other layers), spoon it over the refried beans. Spread it gently so you don’t disturb the bean layer. Try to get it as even as possible—this is where patience pays off. I use the back of a spoon to smooth it out.
- Make the creamy layer. In a small mixing bowl, combine the softened cream cheese and sour cream. Add the lime juice and stir until smooth. If the cream cheese is still a little lumpy, microwave it for 10 seconds and stir again. Spread this mixture over the pumpkin layer. Take your time here—you want a nice, even blanket of creamy goodness.
- Add the cheese and toppings. Sprinkle the shredded Mexican blend cheese evenly over the sour cream layer. Then add the diced tomatoes (make sure they’re well-drained), black olives, green onions, and cilantro. If you’re using jalapeños, scatter them on top now. The key is to distribute everything so every scoop gets a little bit of everything.
- Chill and serve. Cover the dish with plastic wrap and pop it in the fridge for at least 30 minutes. This helps the layers set and makes it easier to scoop. When you’re ready to serve, take it out, let it sit at room temperature for about 10 minutes, and then surround it with tortilla chips. Watch it disappear.
A few things to keep in mind as you go: if your pumpkin mixture seems too thick, add a tablespoon of water at a time until it’s spreadable. If it’s too thin, let it simmer a little longer. And don’t skip the chilling step—I know it’s tempting to dig in right away, but that rest time makes a real difference in how the flavors meld together. Trust the process.
Cooking Tips & Techniques
After making this dip about a dozen times (no exaggeration), I’ve picked up a few tricks that make it even better. Here’s what I’ve learned the hard way so you don’t have to.
Don’t overcook the pumpkin mixture. I made this mistake the first time—I let it simmer too long, and it turned into this thick, pasty mess. The goal is to cook it just until it thickens slightly, like a loose tomato sauce. If it gets too thick, just add a splash of water and stir it back to life.
Softening cream cheese is not optional. I’ve tried using cold cream cheese straight from the fridge, and it’s a disaster. You get lumps, and it won’t spread evenly. Leave it out on the counter for 30 minutes, or microwave it in 10-second bursts until it’s soft but not melted. Your creamy layer will thank you.
Drain your tomatoes. This is huge. If you dump undrained diced tomatoes on top, they’ll release liquid as the dip sits, and you’ll end up with a watery mess. I put mine in a fine-mesh strainer and press gently with a paper towel. It takes 30 seconds and makes all the difference.
Layer in the right order. I know it seems obvious, but the order matters. Beans on the bottom creates a sturdy base. The pumpkin layer goes next so it can meld with the beans. The creamy layer acts as a barrier between the warm flavors and the cold toppings. If you swap things around, the dip can get soggy or the layers can slide apart.
Make it ahead of time. This dip actually gets better after a few hours in the fridge. The flavors have time to get friendly with each other. I often make it the morning of a party and just pull it out 20 minutes before serving. It’s a lifesaver when you’re juggling multiple dishes.
Use sturdy chips. Thin, flimsy chips will break under the weight of all those layers. Go for the thick, restaurant-style tortilla chips. They can handle the scooping without snapping in half. I like the ones from On the Border or the store-brand “extra thick” versions.
Variations & Adaptations
One of the best things about this dip is how easy it is to tweak. Here are some ways to make it your own.
Make it vegetarian or vegan. The base recipe is already vegetarian if you use vegetarian refried beans (most are, but check the label). For a vegan version, swap the sour cream and cream cheese for plant-based alternatives—I’ve used Tofutti sour cream and Violife cream cheese with great results. Use a vegan shredded cheese on top, or just skip the cheese altogether and add extra olives and tomatoes for texture.
Add some heat. If you like things spicy, stir a diced jalapeño into the pumpkin mixture while it cooks, or add a teaspoon of chipotle powder to the taco seasoning. You can also top the finished dip with sliced fresh jalapeños or a drizzle of hot sauce. My personal favorite is Cholula—the vinegariness cuts through the richness perfectly.
Make it a meal. This dip is hearty enough to be a light dinner. Serve it with a side salad or some black beans and rice. You can also spoon it over nachos for a more substantial meal—just spread tortilla chips on a baking sheet, top with the dip, and broil for a minute or two until the cheese melts.
Try different beans. If you’re not a fan of refried beans, use black beans instead. Just drain and rinse a can, then mash them lightly with a fork. Spread them in the bottom of the dish the same way. They’ll give the dip a slightly different texture, but it’s still delicious.
Seasonal swaps. In the summer, swap the pumpkin for roasted butternut squash puree—it has a similar sweetness and texture. In the winter, add a layer of roasted corn or pico de gallo on top for freshness. The base recipe is flexible enough to handle whatever you throw at it.
I once made this for a friend’s Halloween party and swapped the black olives for chopped pickled jalapeños because that’s all I had. It was a happy accident—the pickled heat was amazing with the creamy pumpkin. Sometimes the best variations come from a pantry shortage.
Serving & Storage Suggestions
This dip is best served cold or at room temperature—don’t heat it up, or the creamy layers will get runny. Pull it out of the fridge about 15-20 minutes before serving to take the chill off. I like to serve it on a large platter surrounded by chips, with a few extra bowls of toppings on the side so people can customize their scoops.
For presentation, I sometimes sprinkle a little smoked paprika or chili powder on top for color. A few pumpkin seeds (pepitas) scattered over the top add a nice crunch and lean into the fall theme. If you’re serving it at a party, write the name on a little chalkboard sign—people get a kick out of “Pumpkin Patch Taco Dip.”
As for what to serve alongside, this dip pairs beautifully with a crisp margarita or a cold beer. For a non-alcoholic option, try a sparkling water with lime. If you’re making it part of a bigger spread, it goes great with guacamole, salsa, and a bowl of seasoned black beans.
Storage: Cover the dish tightly with plastic wrap or transfer leftovers to an airtight container. It’ll keep in the fridge for up to 3 days. The texture changes a little as it sits—the chips will get soft if you store them together—so I recommend storing the dip and chips separately. When you’re ready for leftovers, just scoop and eat. I’ve been known to eat it cold straight from the container at 2 AM. No judgment here.
Reheating: I don’t recommend reheating the whole dip—the creamy layer can separate and get grainy. But if you want to warm it up, spoon individual portions into a small bowl and microwave for 15-20 seconds. It’ll be warm but not hot, and the texture will be okay. Honestly, I prefer it cold or at room temperature even the next day.
One thing I’ve noticed—the flavors actually get better after a day in the fridge. The pumpkin and taco seasoning meld together, and the cream cheese layer firms up nicely. So don’t be afraid to make it a day ahead. It’s one of those rare dishes that improves with a little patience.
Nutritional Information & Benefits
Let’s be real—this is a dip, not a health food. But it’s not as bad as you might think, especially if you make a few smart swaps. Here’s a rough breakdown per serving (about 1/8 of the recipe, not counting chips):
| Nutrient | Amount |
|---|---|
| Calories | ~220 |
| Protein | 8g |
| Fat | 14g |
| Carbohydrates | 16g |
| Fiber | 4g |
| Sugar | 5g |
| Sodium | 480mg |
The real star here is the pumpkin. It’s packed with vitamin A (over 200% of your daily needs per serving), fiber, and antioxidants. It’s also low in calories and adds that creamy texture without needing a ton of fat. The refried beans bring protein and fiber, which help keep you full. And the tomatoes add a dose of vitamin C and lycopene.
If you’re watching your sodium, use a low-sodium taco seasoning or make your own blend (I do a mix of chili powder, cumin, garlic powder, onion powder, and a little salt). You can also use reduced-fat sour cream and cheese to cut the fat and calories. For a gluten-free version, just check your taco seasoning label—most are gluten-free, but some contain wheat starch.
Potential allergens: dairy (from sour cream, cream cheese, and shredded cheese). If you’re lactose intolerant, use lactose-free versions or plant-based alternatives. The recipe is naturally gluten-free and nut-free.
Conclusion
Look, I know it sounds a little weird at first—pumpkin in a taco dip? But trust me, it works. That late-night experiment in my kitchen turned into one of my most-requested recipes, and every time I make it, I remember that quiet Wednesday night when I just went for it. This dip is proof that sometimes the best recipes come from a place of “what if” and a fridge full of odds and ends.
I’d love for you to try this and make it your own. Swap in your favorite beans, add extra heat, or throw on whatever toppings you have lying around. The beauty of this recipe is how forgiving it is. And when you take that first bite—the one where the creamy pumpkin hits the crunchy chip and the cool sour cream balances everything out—you’ll understand why I couldn’t stop thinking about it.
If you make this, drop a comment below and let me know how it turned out. Did you add something unexpected? Did your family love it? I read every single comment, and honestly, hearing about your kitchen experiments makes my day. And if you’re looking for more cozy fall recipes, check out my easy pumpkin soup or these loaded nachos for another crowd-pleaser. Now go make some dip—you deserve it.
Frequently Asked Questions
Can I use pumpkin pie filling instead of pumpkin puree?
No, please don’t. Pumpkin pie filling has added sugar and spices like cinnamon and nutmeg, which will make your dip taste like dessert. Stick with 100% pure pumpkin puree for the right savory-sweet balance.
How far in advance can I make this dip?
You can make it up to 24 hours ahead of time. Just cover it tightly and keep it in the fridge. I actually think it tastes better the next day—the flavors have time to meld together. Just add the fresh toppings like cilantro and green onions right before serving.
Can I freeze this dip?
I wouldn’t recommend it. The dairy-based layers (sour cream and cream cheese) don’t freeze well—they’ll separate and get grainy when thawed. This is one of those dishes that’s best made fresh or within a day or two.
What if I don’t like refried beans?
No problem! You can skip the bean layer entirely and just start with the pumpkin mixture. Or use mashed black beans, pinto beans, or even a layer of guacamole instead. The dip will still be delicious—it’ll just be a little different.
Is this dip spicy?
It has a mild kick from the taco seasoning, but it’s not what I’d call spicy. Kids and spice-averse adults will be fine. If you want more heat, add diced jalapeños, a dash of cayenne, or use a hot taco seasoning blend. You can always adjust the heat to your liking.
Pin This Recipe!

Best Easy Pumpkin Patch Taco Dip Recipe

A quick and easy layered taco dip with a surprising pumpkin twist. Perfect for fall gatherings, this creamy, crunchy, and flavorful dip is a crowd-pleaser that comes together in under 20 minutes.
- Prep Time: 15 minutes
- Cook Time: 5 minutes
- Total Time: 20 minutes (plus 30 minutes chilling)
- Yield: 8 servings 1x
- Category: Appetizer
- Cuisine: Mexican-American
Ingredients
- 1 can (15 oz) pumpkin puree (not pumpkin pie filling)
- 1 packet (1 oz) taco seasoning
- 1/2 cup water
- 1 can (16 oz) refried beans
- 1 cup sour cream
- 1/2 cup cream cheese, softened
- 1 tablespoon lime juice
- 1 1/2 cups shredded Mexican blend cheese
- 1 cup diced tomatoes, drained
- 1/2 cup sliced black olives (optional)
- 1/4 cup chopped green onions
- 1/4 cup chopped fresh cilantro
- 1 large bag tortilla chips (sturdy, restaurant-style)
- Optional: sliced jalapeños for extra heat
Instructions
- In a medium skillet over medium heat, combine pumpkin puree, taco seasoning, and water. Stir until smooth and simmer for 3-4 minutes until thickened. Remove from heat and set aside to cool slightly.
- In a small microwave-safe bowl, heat refried beans for 30 seconds to make them spreadable. Stir in a tablespoon of water if too thick. Spread beans in an even layer on the bottom of a 9-inch pie dish or shallow serving bowl.
- Spoon the cooled pumpkin-taco mixture over the refried beans and spread gently into an even layer.
- In a small mixing bowl, combine softened cream cheese, sour cream, and lime juice. Stir until smooth. Spread this mixture over the pumpkin layer.
- Sprinkle shredded Mexican blend cheese evenly over the sour cream layer. Top with diced tomatoes, black olives, green onions, and cilantro. Add jalapeños if desired.
- Cover with plastic wrap and refrigerate for at least 30 minutes to set. Before serving, let sit at room temperature for 10 minutes. Serve with tortilla chips.
Notes
Don’t overcook the pumpkin mixture; it should be like a loose tomato sauce. Soften cream cheese before mixing to avoid lumps. Drain tomatoes well to prevent watery dip. Layer in the order given for best texture. The dip can be made up to 24 hours ahead and actually tastes better the next day. Store leftovers in an airtight container in the fridge for up to 3 days. Reheating is not recommended; enjoy cold or at room temperature.
Nutrition
- Serving Size: 1/8 of recipe (witho
- Calories: 220
- Sugar: 5
- Sodium: 480
- Fat: 14
- Saturated Fat: 8
- Carbohydrates: 16
- Fiber: 4
- Protein: 8
Keywords: pumpkin taco dip, easy taco dip, fall appetizer, pumpkin recipe, game day dip, vegetarian taco dip


