It was 11:47 PM on a random Tuesday in October, and I was wide awake with a very specific craving. Not for cookies—that’s too broad. I wanted something that looked like it came from a fancy bakery window, but tasted like the kind of thing you sneak from the cooling rack when no one’s watching. I didn’t have any Halloween cookie cutters beyond a basic circle, but I had a bottle of black food coloring, a bag of powdered sugar, and this weird idea that wouldn’t let me sleep. What if I just… made ghost shapes by hand? With a knife and a steady (okay, slightly caffeinated) hand?
Honestly, that late-night impulse turned into one of my favorite baking memories. I stood there in my pajamas, piping royal icing onto misshapen little blobs that somehow looked exactly like friendly ghosts. My dog watched from the kitchen doorway like I’d finally lost it. But let me tell you—when I bit into one at 1 AM, still warm, the icing just barely set? I knew I was onto something. Maybe you’ve been there, standing in your kitchen at an ungodly hour, wondering if this is genius or just sleep deprivation. Spoiler: it was genius.
These ghost sugar cookies have become my go-to for every Halloween gathering, potluck, and spooky-themed dinner party I’ve hosted since. They’re the kind of cookie that makes people stop mid-conversation and say, “Wait, you made these?” And the best part? They’re actually simple to pull off. No fancy equipment, no bakery-level piping skills required. Just a solid sugar cookie recipe, a foolproof royal icing, and a little bit of late-night creativity that somehow works every single time.
Why You’ll Love This Recipe
I’ve tested this recipe more times than I care to admit—through six batches of overly sticky dough, two icing disasters, and one memorable incident where I forgot the vanilla entirely. Trust me when I say this version is the one. It’s the kind of cookie that makes you look like a baking pro without the stress.
- Perfect for Halloween Gatherings: These little ghosts steal the show at every party I bring them to. They’re cute without being fussy, spooky without being scary, and they vanish faster than any other treat on the table.
- Simple Ingredients: You probably have 90% of these in your pantry right now. No weird extracts, no specialty flours—just butter, sugar, eggs, and a few basics.
- Foolproof Royal Icing: I’ve figured out the exact consistency that pipes smoothly, sets firmly, and doesn’t turn into a sticky mess. No more runny ghosts or clogged piping tips.
- Make-Ahead Friendly: The dough freezes beautifully, and the baked cookies keep for days. You can prep everything before your guests arrive and focus on the fun part—decorating.
- Crowd-Pleasing Visuals: Let’s face it, people eat with their eyes first. These cookies deliver that “wow” factor without requiring hours of detailed piping work.
- Family-Approved: My niece, who claims she “doesn’t like cookies” (I know, I don’t understand either), ate four of these last Halloween. That’s the kind of endorsement that matters.
What makes this recipe different from every other ghost cookie out there? It’s the texture. The cookies are soft in the center with a slight crisp edge—the perfect canvas for royal icing that doesn’t crack or slide off. And the icing itself? It’s thick enough to hold a clean ghost shape but thin enough to spread smoothly. I’ve dialed in the exact ratios so you don’t have to guess.
This isn’t just another sugar cookie recipe. It’s the one that’ll have your friends asking for the recipe before the party’s even over. And honestly? That’s the best compliment a home baker can get.
What Ingredients You Will Need
This recipe uses simple, everyday ingredients that work together to create a soft, buttery cookie with a perfectly smooth royal icing finish. Nothing fancy, just smart choices that deliver consistent results every time.
For the Sugar Cookies
- Unsalted butter, softened (1 cup / 226g) — I always use unsalted so I can control the salt level. Let it sit out for about an hour until it’s soft but not melty.
- Granulated sugar (1 cup / 200g) — Regular white sugar gives these cookies that classic sweetness and helps them spread just enough.
- Large egg (1, room temperature) — Cold eggs can make the dough seize up. Pop it in warm water for 5 minutes if you forgot to take it out.
- Vanilla extract (2 teaspoons) — Pure vanilla makes a difference here. I’ve tried imitation and it’s just not the same.
- All-purpose flour (2 ½ cups / 312g) — Spoon and level your flour, don’t scoop directly from the bag. Too much flour makes tough cookies.
- Baking powder (1 teaspoon) — This gives the cookies a little lift without making them puffy.
- Salt (½ teaspoon) — Balances the sweetness and brings out the buttery flavor.
For the Royal Icing
- Powdered sugar (3 cups / 360g) — Sift it first unless you want lumpy icing. Trust me on this one.
- Meringue powder (2 tablespoons) — This is the secret to royal icing that sets hard and doesn’t get sticky. I prefer Wilton brand for consistent results.
- Warm water (4-5 tablespoons) — Start with 4 and add more if needed. The consistency should be thick but flowy, like honey.
- Vanilla extract (½ teaspoon) — Adds a subtle flavor to the icing without overpowering the cookie.
- Black food coloring gel (for the ghost eyes and mouth) — Gel works way better than liquid. Americolor Super Black is my go-to.
Ingredient Tips from My Kitchen
I’ve learned a few things the hard way. Like the time I used margarine instead of butter and ended up with cookies that spread into one giant ghost blob. Butter is non-negotiable here. Also, don’t skip the meringue powder in the icing—it’s what gives you that satisfying snap when you bite into the cookie. If you can’t find it, you can use pasteurized egg whites, but the texture won’t be quite as stable.
For the food coloring, gel is absolutely the way to go. Liquid coloring will thin out your icing and make it runny. I learned that lesson when my first batch of ghosts looked more like sad, melting snowmen.
Equipment Needed
You don’t need a professional bakery setup for these cookies, but a few key tools make the process much smoother.
- Stand mixer or hand mixer — I use my KitchenAid for the cookie dough and icing, but a hand mixer works just fine. You’ll be mixing for a while, so your arms will thank you.
- Rolling pin — A standard rolling pin works, but I love my adjustable one for getting even thickness every time.
- Parchment paper — Non-negotiable for easy cleanup and preventing stuck cookies. I buy the pre-cut sheets for convenience.
- Baking sheets — Any rimmed baking sheet works. I use Nordic Ware because they don’t warp in the oven.
- Ghost cookie cutter — You can find these at any craft store or online. I got mine at Michaels for about $4. If you don’t have one, you can freehand cut shapes with a knife—I’ve done it, and it works!
- Piping bags or zip-top bags — Piping bags give more control, but a zip-top bag with the corner snipped off works in a pinch. I’ve used both and honestly, the zip-top bag method is totally fine for this.
- Small round piping tip (like Wilton #2 or #3) — For the ghost eyes and mouth. A #2 tip gives you more precision.
- Cooling rack — Essential for letting the royal icing set properly. Cookies cool faster and more evenly on a rack.
If you’re just starting out, don’t feel like you need to buy everything at once. I made my first batch of these with a hand mixer, a butter knife, and a lot of patience. They still turned out adorable.
Preparation Method
Let’s get into the actual process. I’ve broken this down step by step so you don’t miss anything. Take your time—rushing is the enemy of good sugar cookies.
Step 1: Make the Cookie Dough
In your stand mixer bowl, beat the softened butter and granulated sugar together on medium speed until light and fluffy. This takes about 3 minutes. You want it to look pale and almost creamy. Scrape down the sides of the bowl halfway through. Add the egg and vanilla extract, then beat until just combined. Don’t overmix here—you’re not trying to incorporate air, just combine everything.
In a separate bowl, whisk together the flour, baking powder, and salt. With the mixer on low, gradually add the dry ingredients to the wet mixture. Mix until the dough just comes together. It should look crumbly at first, then form a soft, cohesive dough. If it seems too sticky, add a tablespoon more flour. If it’s too dry, add a teaspoon of milk.
Step 2: Chill the Dough
Divide the dough into two discs, wrap each in plastic wrap, and refrigerate for at least 2 hours. I know, waiting is hard. But this step is crucial—chilled dough is much easier to roll out and holds its shape better when baking. You can chill it overnight if you’re planning ahead.
Step 3: Roll and Cut the Cookies
Preheat your oven to 350°F (175°C) and line two baking sheets with parchment paper. Lightly flour your work surface and rolling pin. Roll one disc of dough to about ¼-inch thickness. I use two wooden dowels as guides to keep it even—works like a charm. Cut out ghost shapes with your cookie cutter and place them about 2 inches apart on the prepared baking sheets.
Here’s a tip I learned after my first batch spread into amorphous blobs: if the dough starts getting soft and sticky while you’re cutting, pop it back in the fridge for 10 minutes. Cold dough cuts cleaner and holds shape better.
Step 4: Bake the Cookies
Bake for 8-10 minutes, or until the edges are just barely golden. The centers should look set but not brown. I rotate my baking sheets halfway through for even baking. Let the cookies cool on the baking sheet for 5 minutes, then transfer to a wire rack to cool completely. Do not—I repeat, do not—try to ice them while they’re still warm. The royal icing will melt right off.
Step 5: Make the Royal Icing
In your mixer bowl, combine the powdered sugar and meringue powder. Add 4 tablespoons of warm water and the vanilla extract. Beat on low until combined, then increase to medium-high and beat for about 5 minutes. The icing should be thick, glossy, and hold a ribbon trail when you lift the beater. If it’s too thick, add water a teaspoon at a time. If it’s too thin, add more powdered sugar.
Step 6: Decorate the Ghosts
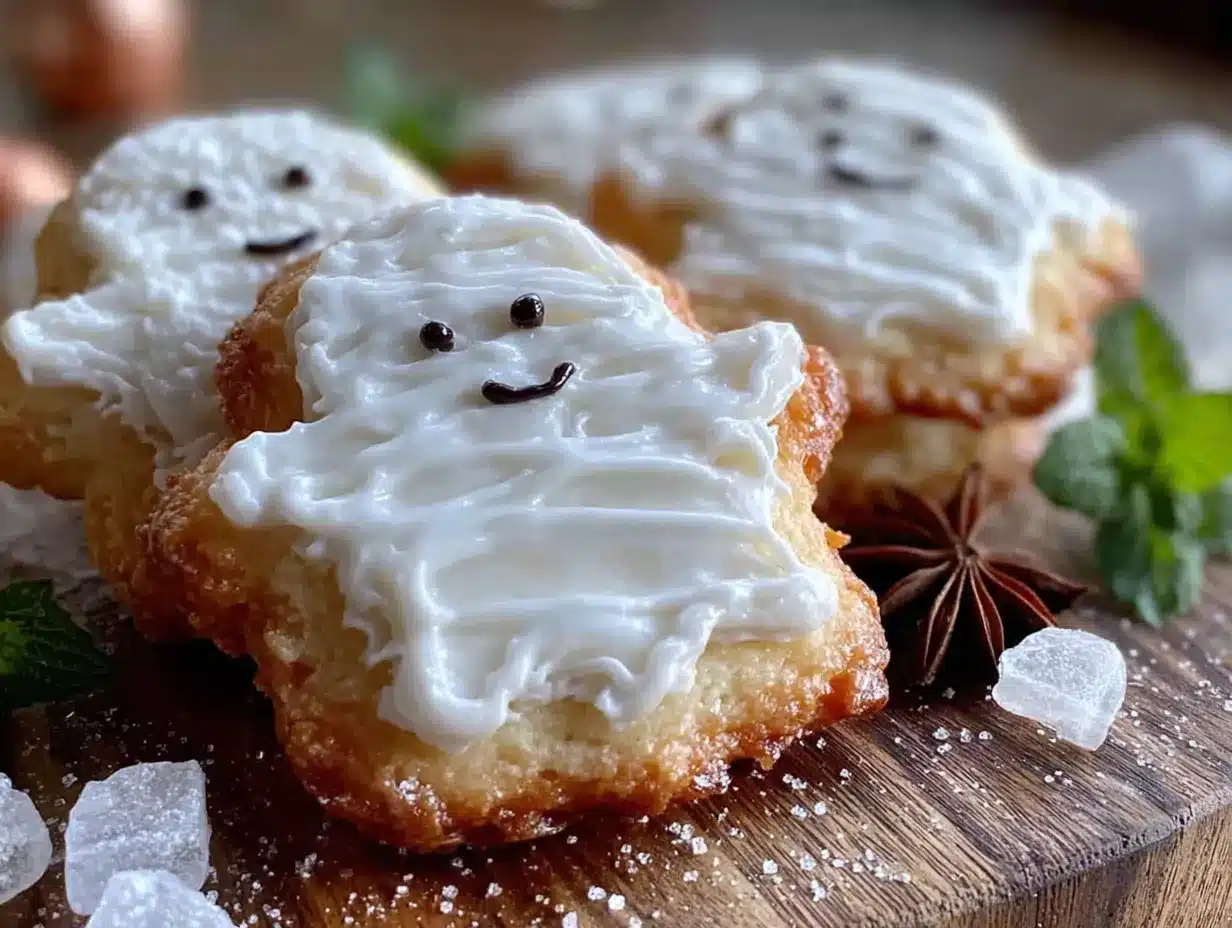
Spoon about ⅓ cup of the white icing into a piping bag fitted with a #2 tip. Pipe the outline of each ghost—just follow the cookie shape. Then, thin the remaining white icing with a few drops of water until it’s the consistency of honey. This is your flood icing. Use a spoon to fill in the outlines, spreading the icing gently to the edges. Let the cookies sit for 30 minutes until the white icing is set.
Once the white icing is dry, divide about 2 tablespoons of the remaining white icing into a small bowl and add black gel food coloring until it’s a deep, dark black. Transfer to a piping bag with a #1 or #2 tip. Pipe two small dots for eyes and a little open mouth—think classic ghost face. Let everything set for at least 2 hours before stacking or serving.
Cooking Tips & Techniques
I’ve made plenty of mistakes with these cookies so you don’t have to. Here’s what I’ve learned the hard way.
Don’t skip the chill time. I know it’s tempting to rush, but warm dough spreads into sad, shapeless blobs. I once tried to speed things up by only chilling for 30 minutes, and my ghosts looked like puddles. Not cute.
Watch your oven temperature. Every oven runs differently. My old oven ran hot and I burned two batches before I figured it out. Use an oven thermometer if you’re unsure. Cookies that are slightly underbaked are better than overbaked—they’ll stay soft and tender.
Royal icing consistency is everything. If your outline icing is too thin, it’ll run off the cookie. If it’s too thick, it’ll be hard to pipe. The perfect consistency is like toothpaste—thick enough to hold a line but soft enough to pipe smoothly. For the flood icing, aim for honey consistency. It should settle into an even layer within a few seconds.
Work in batches. Don’t try to ice all the cookies at once if you’re new to this. I do 4-5 at a time, outlining and flooding each one before moving on. This keeps the icing from drying out in the piping bag and gives you a rhythm.
Use a toothpick for details. If your ghost eyes come out uneven, use a toothpick to gently drag the icing into place. This trick has saved me more times than I can count.
Variations & Adaptations
One of the best things about this recipe is how easy it is to customize. Here are some variations I’ve tried and loved.
Gluten-Free Ghosts: Substitute the all-purpose flour with a 1:1 gluten-free baking flour. I’ve used Bob’s Red Mill with great results. The texture is slightly more tender, but the flavor is spot-on.
Vegan Royal Icing: Replace the meringue powder with aquafaba (the liquid from a can of chickpeas). Use 3 tablespoons of aquafaba instead of the meringue powder and water. It sets just as hard and tastes neutral.
Flavor Twists: Add ½ teaspoon of almond extract to the cookie dough for a subtle marzipan-like flavor. Or swap the vanilla in the icing for peppermint extract for a holiday twist. I made a batch with orange zest last year and they were incredible.
Different Shapes: Don’t limit yourself to ghosts. This recipe works with any Halloween cutter—pumpkins, bats, cats. Just adjust the decorating accordingly. For pumpkins, I use orange icing and a green stem.
Colorful Ghosts: Divide the flood icing into separate bowls and tint them different pastel colors. I did a batch of pink and purple ghosts last year and they were adorable. My niece called them “friendly Halloween ghosts.”
Mini Ghosts: Use a smaller cutter for bite-sized cookies. They’re perfect for party platters and take less time to decorate. Just reduce the baking time by 2 minutes.
Serving & Storage Suggestions
These cookies are designed to be the star of your Halloween spread. Here’s how to serve and store them like a pro.
Serving Temperature: Serve at room temperature. The royal icing is firm and the cookie is soft—that contrast is part of the magic. If you’ve refrigerated them, let them sit out for 15 minutes before serving.
Presentation Ideas: Arrange the ghosts on a white platter for maximum spooky contrast. I like to add a few fake spider webs and plastic spiders around the plate for a fun touch. For a dinner party, place one cookie on each dessert plate as a sweet surprise after the main course.
What to Serve Alongside: These pair beautifully with hot apple cider, pumpkin spice lattes, or a glass of cold milk. For a full Halloween dessert table, serve them alongside chocolate cupcakes with orange frosting and caramel popcorn balls.
Storage: Store the decorated cookies in an airtight container at room temperature for up to 5 days. Layer them between sheets of parchment paper to prevent the icing from sticking. Do not refrigerate—the moisture will make the icing sticky and the cookies soft.
Freezing: You can freeze the undecorated baked cookies for up to 3 months. Wrap them tightly in plastic wrap and then foil. Thaw at room temperature before decorating. I’ve also frozen the raw dough discs for up to 2 months—just thaw overnight in the fridge before rolling and cutting.
Flavor Development: Here’s something I discovered by accident—these cookies actually taste better the day after baking. The flavors meld together and the texture softens slightly. So don’t stress about making them fresh the day of your party. Bake a day ahead and decorate the morning of.
Nutritional Information & Benefits
Let’s be real—these are cookies, not health food. But here’s the breakdown if you’re curious.
Per cookie (based on 24 cookies):
- Calories: 185
- Fat: 8g
- Carbohydrates: 27g
- Protein: 2g
- Sugar: 18g
- Sodium: 65mg
Health Highlights: The butter provides vitamin A and healthy fats, and the egg adds a small amount of protein. The royal icing contains meringue powder, which is made from egg whites—a good source of protein. But honestly, these are a treat, and that’s okay. Baking and sharing cookies is good for the soul, even if it’s not a superfood.
Dietary Considerations: This recipe contains dairy (butter), eggs, and gluten (flour). For a dairy-free version, use vegan butter sticks. For gluten-free, use the flour substitution mentioned above. The royal icing is naturally dairy-free and can be made vegan with aquafaba.
Allergen Note: The cookies contain wheat, dairy, and eggs. If you’re serving at a party where allergies might be a concern, make a small batch of the gluten-free version separately and label them clearly.
My personal take? I’d rather enjoy one perfectly decorated ghost cookie than stress about the numbers. Life’s too short for boring desserts.
Conclusion
These ghost sugar cookies have become a Halloween tradition in my house, and I have a feeling they’ll become one in yours too. They’re the perfect blend of buttery, tender cookie and crisp, sweet icing—with a little bit of spooky charm thrown in. Whether you’re hosting a costume party, bringing treats to a potluck, or just want to make something fun with the kids, these cookies deliver every single time.
What I love most about this recipe is how forgiving it is. You don’t need to be a professional baker to make ghosts that look adorable. The first time I made these, my ghosts had uneven eyes and lopsided mouths, and you know what? Everyone still gobbled them up. That’s the beauty of homemade—it doesn’t have to be perfect to be loved.
So go ahead and give these a try. Make a mess in your kitchen, laugh at your lopsided ghosts, and enjoy the look on your friends’ faces when they see what you made. And when you do, come back and tell me about it. I’d love to hear how your ghost cookies turned out—share your photos, your questions, and your own creative twists in the comments below. Happy Halloween baking!
Frequently Asked Questions
Can I use a different cookie cutter shape?
Absolutely! This recipe works with any Halloween-themed cutter. Just adjust the decorating to match the shape. For pumpkins, use orange icing and a green stem. For bats, use black icing and add little wing details.
My royal icing is too runny. How do I fix it?
Add more powdered sugar, one tablespoon at a time, until it reaches the right consistency. The icing should be thick enough to hold a shape but soft enough to pipe smoothly. If it’s too thick, add water a drop at a time.
Can I make the dough ahead of time?
Yes! You can refrigerate the dough discs for up to 3 days or freeze them for up to 2 months. Just wrap them tightly in plastic wrap and then foil. Thaw overnight in the fridge before rolling out.
How do I get the ghost faces to look even?
Use a toothpick to gently adjust the icing dots before they dry. If you’re nervous, practice on a piece of parchment paper first. And remember—imperfect ghosts have character. My lopsided ones are always the favorites.
Can I use liquid food coloring instead of gel?
I don’t recommend it. Liquid food coloring will thin out your royal icing and make it runny. Gel coloring gives you vibrant color without changing the consistency. Americolor and Wilton brands work great.
PrintBest Ghost Sugar Cookies with Royal Icing Recipe
Soft, buttery sugar cookies shaped like friendly ghosts and decorated with a foolproof royal icing. Perfect for Halloween gatherings, these cookies are simple to make and deliver a professional-looking finish without any fancy equipment.
- Prep Time: 30 minutes
- Cook Time: 10 minutes
- Total Time: 2 hours 40 minutes (includes chilling and setting time)
- Yield: 24 cookies 1x
- Category: Dessert
- Cuisine: American
Ingredients
- 1 cup (226g) unsalted butter, softened
- 1 cup (200g) granulated sugar
- 1 large egg, room temperature
- 2 teaspoons vanilla extract
- 2 ½ cups (312g) all-purpose flour
- 1 teaspoon baking powder
- ½ teaspoon salt
- 3 cups (360g) powdered sugar
- 2 tablespoons meringue powder
- 4–5 tablespoons warm water
- ½ teaspoon vanilla extract
- Black food coloring gel
Instructions
- In a stand mixer bowl, beat the softened butter and granulated sugar together on medium speed until light and fluffy, about 3 minutes. Scrape down the sides halfway through.
- Add the egg and vanilla extract, then beat until just combined. Do not overmix.
- In a separate bowl, whisk together the flour, baking powder, and salt.
- With the mixer on low, gradually add the dry ingredients to the wet mixture. Mix until the dough just comes together. If too sticky, add a tablespoon more flour; if too dry, add a teaspoon of milk.
- Divide the dough into two discs, wrap each in plastic wrap, and refrigerate for at least 2 hours (or overnight).
- Preheat oven to 350°F (175°C) and line two baking sheets with parchment paper.
- Lightly flour your work surface and rolling pin. Roll one disc of dough to about ¼-inch thickness.
- Cut out ghost shapes with a cookie cutter and place them about 2 inches apart on the prepared baking sheets.
- Bake for 8-10 minutes, or until the edges are just barely golden. Rotate baking sheets halfway through.
- Let cookies cool on the baking sheet for 5 minutes, then transfer to a wire rack to cool completely.
- In a mixer bowl, combine the powdered sugar and meringue powder. Add 4 tablespoons of warm water and ½ teaspoon vanilla extract. Beat on low until combined, then increase to medium-high and beat for about 5 minutes until thick, glossy, and holds a ribbon trail.
- Spoon about ⅓ cup of the white icing into a piping bag fitted with a #2 tip. Pipe the outline of each ghost.
- Thin the remaining white icing with a few drops of water until honey consistency. Use a spoon to fill in the outlines (flood icing). Let sit for 30 minutes until set.
- Divide about 2 tablespoons of remaining white icing into a small bowl and add black gel food coloring until deep black. Transfer to a piping bag with a #1 or #2 tip.
- Pipe two small dots for eyes and a little open mouth on each ghost. Let set for at least 2 hours before stacking or serving.
Notes
Chill the dough for at least 2 hours to prevent spreading. Use gel food coloring for the black icing to avoid thinning. The cookies taste even better the day after baking. Store in an airtight container at room temperature for up to 5 days.
Nutrition
- Serving Size: 1 cookie
- Calories: 185
- Sugar: 18
- Sodium: 65
- Fat: 8
- Saturated Fat: 5
- Carbohydrates: 27
- Protein: 2
Keywords: ghost cookies, sugar cookies, Halloween cookies, royal icing, ghost sugar cookies, Halloween dessert, decorated cookies


