The office cookie swap was in three hours and I’d completely forgotten. Everyone else would be bringing those intricate little masterpieces — you know the ones. Perfectly piped royal icing snowflakes on sugar cookies that looked like they belonged in a bakery window. Little shortbread trees dusted with edible glitter. My coworker Karen had been talking about her grandmother’s Danish butter cookie recipe for weeks, and she’d taken two days off to prepare. I had a box of brownie mix, a bag of candy canes I’d bought for my hot cocoa, and approximately zero time.
Honestly, I almost just stopped at the store and grabbed a tin of those Danish ones myself. But something made me hesitate. Maybe it was the way the snow was falling outside my kitchen window, all soft and quiet. Or maybe I just really wanted chocolate. I grabbed that brownie mix, crushed up the candy canes with the bottom of a measuring cup — which, let me tell you, went everywhere — and threw it all together in a slightly panicked haze. I didn’t even have time to let them cool properly before I was wrapping them up and running out the door.
And here’s the thing. Those cozy Christmas peppermint brownies with crushed candy cane on top? They won. Not just a polite “oh, how nice” win. I mean people were actually asking me for the recipe. Karen’s Danish cookies got eaten, sure. But my brownies got talked about for the rest of the week. I stood there by the punch bowl, still in my coat, watching people go back for thirds, and I couldn’t help but laugh at myself. All that panic for nothing. Maybe you’ve been there — the one who shows up with the simplest thing and somehow walks away with the trophy. That’s the night this recipe became my holiday secret weapon.
Why You’ll Love This Recipe
These aren’t just any brownies. They’re the kind that make people close their eyes after the first bite, and I’m not exaggerating. Here’s what makes them so special:
- Quick & Easy: From start to finish, you’re looking at about 45 minutes. Most of that is baking time, so you can wrap presents or binge-watch a Christmas movie while they’re in the oven.
- Simple Ingredients: No weird extracts or specialty flours here. You probably have most of this stuff in your pantry already, minus the candy canes.
- Perfect for Holiday Gatherings: Cookie swaps, office parties, family dinners — these brownies fit right in. They look festive without being fussy.
- Crowd-Pleaser: Kids love the crunchy candy cane topping. Adults love the rich, fudgy chocolate base. Everyone wins.
- Unbelievably Delicious: The combination of warm, fudgy brownie with cool, minty crunch is basically what comfort food dreams are made of.
What makes this recipe different from every other peppermint brownie out there? It’s the texture. Most recipes either have the candy cane pieces sink into the batter and disappear, or they end up with a soggy topping. I figured out a trick — you’ll see it in the method — that keeps that candy cane layer perfectly crunchy and bright. Plus, I use a brownie base that’s extra fudgy, so the minty crunch has something soft and rich to play off of. It’s not just another version. It’s the version.
This recipe is comfort food reimagined. It’s faster than a fancy holiday dessert, but it has the same soul-soothing satisfaction. Perfect for when you want to impress people without spending all day in the kitchen, or when you just need something warm and chocolatey on a cold December night.
What Ingredients You Will Need
This recipe uses simple, wholesome ingredients to deliver that perfect balance of rich chocolate and cool peppermint. Most of these are pantry staples, which makes it even better for those last-minute holiday emergencies.
- For the Brownie Base:
- 1 cup (226g) unsalted butter, melted and slightly cooled
- 2 cups (400g) granulated sugar
- 4 large eggs, room temperature
- 1 tablespoon vanilla extract
- 3/4 cup (90g) unsweetened cocoa powder (I recommend Ghirardelli for that deep, dark flavor)
- 1 cup (125g) all-purpose flour
- 1/2 teaspoon salt
- 1/2 teaspoon baking powder
- For the Peppermint Layer:
- 1 cup (about 12-15) candy canes, crushed into small pieces and dust (set aside 1/4 cup for the very top)
- 1/2 cup (100g) white chocolate chips or melting wafers (adds a creamy sweetness that ties everything together)
- 1 tablespoon coconut oil or vegetable oil (helps the white chocolate melt smoothly)
Ingredient Tips & Substitutions:
For the candy canes, look for the classic red-and-white striped ones. The colored ones work too, but they sometimes have a slightly different texture when crushed. If you’re in a pinch, you can buy pre-crushed candy cane pieces at most craft stores during the holiday season, but honestly, crushing them yourself is more satisfying and gives you better control over the texture.
For a gluten-free version, swap the all-purpose flour with a 1:1 gluten-free baking blend. I’ve used Bob’s Red Mill with great results — just don’t overmix the batter. If you’re dairy-free, use a plant-based butter stick (not the spreadable kind) and dairy-free white chocolate. The coconut oil in the peppermint layer is already dairy-free, so that part’s covered.
The white chocolate chips are optional, but I really recommend them. They add a creamy sweetness that mellows out the sharpness of the peppermint and keeps the brownies from tasting like toothpaste. Trust me on this one.
Equipment Needed
You don’t need a fancy kitchen to pull these off. Here’s what you’ll need:
- 9×13-inch baking pan (glass or metal both work fine)
- Parchment paper (absolute lifesaver for easy removal)
- Large mixing bowl
- Whisk and rubber spatula
- Measuring cups and spoons
- Ziploc bag or kitchen towel (for crushing candy canes)
- Rolling pin or heavy-bottomed pan (or a measuring cup, in my case)
- Small microwave-safe bowl for melting white chocolate
If you don’t have a 9×13 pan, you can use two 8×8 pans instead — just reduce the baking time by about 5-7 minutes and check for doneness earlier. I’ve also used a disposable foil pan in a pinch, and it worked fine, though the brownies were slightly thinner.
For crushing the candy canes, I’ve tried a food processor, and honestly, it creates too much fine dust and not enough chunks. The ziploc bag and rolling pin method gives you that perfect mix of crunchy pieces and powdery bits that looks so pretty on top. Plus, it’s a great way to work out any holiday stress.
One tip: line your pan with parchment paper, leaving some overhang on the sides. This makes lifting the entire block of brownies out so much easier, and you get cleaner cuts. I learned this the hard way after a few brownie extraction disasters.
Preparation Method
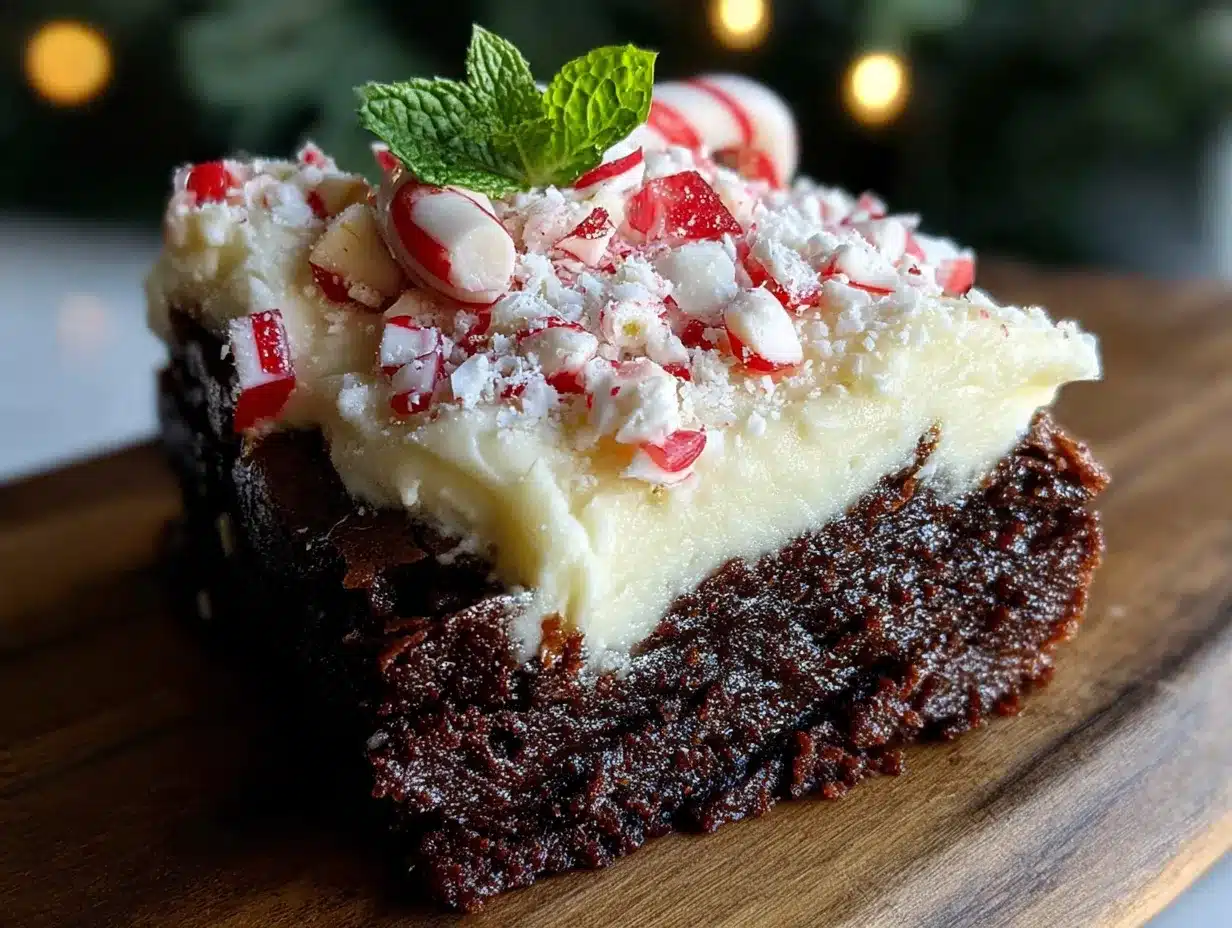
Alright, let’s make these cozy Christmas peppermint brownies. Preheat your oven to 350°F (175°C) and line your 9×13 pan with parchment paper.
- Melt the butter. In a large microwave-safe bowl, melt the butter completely. Let it cool for about 2-3 minutes — you don’t want it hot enough to cook the eggs when you add them, but warm enough to dissolve the sugar. I usually stick my finger in it, and if it feels like a warm bath, it’s ready.
- Mix the sugar and butter. Add the granulated sugar to the melted butter and whisk until combined. It’ll look a little grainy — that’s normal. You’re not trying to dissolve the sugar completely here, just get it evenly distributed.
- Add the eggs and vanilla. Crack the eggs into the bowl one at a time, whisking well after each one. The batter should look smooth and glossy at this point. Add the vanilla extract and give it one more whisk. If you’re using room-temperature eggs (which I highly recommend), everything comes together much more smoothly.
- Combine the dry ingredients. In a separate bowl, whisk together the cocoa powder, flour, salt, and baking powder. This helps distribute the leavening agents evenly and breaks up any cocoa clumps. Sifting is optional, but if your cocoa powder is particularly lumpy, go ahead and sift it.
- Fold the dry into the wet. Add the dry ingredients to the wet mixture and fold gently with a rubber spatula. Stop as soon as you don’t see any more streaks of flour. Overmixing at this stage will give you cakey brownies instead of fudgy ones, and we want fudgy. The batter will be thick and gorgeous — like melted chocolate pudding.
- Pour and spread. Pour the batter into your prepared pan and spread it evenly. The batter is thick, so take your time. An offset spatula works great here, but the back of a spoon will do just fine.
- Bake the brownies. Bake for 25-30 minutes, or until a toothpick inserted into the center comes out with a few moist crumbs attached. You don’t want it completely clean — that means they’re overbaked. The edges should look set and slightly pulled away from the sides of the pan.
- Prepare the peppermint layer while the brownies bake. Place the candy canes in a ziploc bag, seal it, and wrap it in a kitchen towel (this prevents punctures). Smash them with a rolling pin until you have a mix of fine dust and small chunks. You want some texture, not just powder. In a small microwave-safe bowl, melt the white chocolate chips with the coconut oil in 30-second intervals, stirring between each, until smooth.
- Add the peppermint layer. As soon as the brownies come out of the oven, drizzle the melted white chocolate over the top. Sprinkle the crushed candy cane pieces evenly over the white chocolate while it’s still warm. The heat will help everything set together. Here’s the trick — don’t press the candy cane pieces in. Let them sit on top of the white chocolate layer. This keeps them crunchy instead of melting into the brownie.
- Cool completely. This is the hardest part. Let the brownies cool in the pan for at least 2 hours before cutting. The white chocolate needs time to set, and the brownies need to firm up for clean slices. If you’re impatient like me, pop them in the fridge for about 45 minutes. Just make sure they’re completely cool before you cut them.
- Cut and serve. Use the parchment overhang to lift the entire block of brownies out of the pan. Use a sharp knife to cut into squares, wiping the blade clean between cuts for the neatest edges. Sprinkle the reserved 1/4 cup of crushed candy cane over the top right before serving.
Cooking Tips & Techniques
I’ve made these cozy Christmas peppermint brownies more times than I can count, and I’ve definitely learned a few things along the way. Let me save you some trouble.
The biggest mistake people make is overbaking. Brownies continue to cook from residual heat after they come out of the oven, so pull them when that toothpick still has a few moist crumbs. If you wait until the toothpick comes out clean, you’ll end up with dry, cakey brownies. And nobody wants that.
Another common issue is the candy cane pieces sinking into the batter. That’s why we add them as a topping after baking, not mixed into the batter. The white chocolate layer creates a barrier that keeps the candy cane pieces on top, where they stay crunchy and bright. I tried mixing them into the batter once, and they just dissolved into the chocolate, leaving behind a faint minty flavor and no texture at all. Total waste of candy canes.
Timing tip: Crush your candy canes before you start mixing the batter. That way, you can add the topping as soon as the brownies come out of the oven, while they’re still hot enough to help the white chocolate melt and adhere. If you wait too long, the brownies cool down and the topping doesn’t stick as well.
For the cleanest cuts, use a plastic knife instead of a metal one. I know it sounds weird, but plastic knives glide through brownies without dragging the topping. If you don’t have a plastic knife, run your metal knife under hot water and dry it off before each cut. Wipe the blade clean between cuts. This makes a huge difference in presentation.
One more thing — don’t skip the parchment paper. I know it’s an extra step, but it makes removal and cleanup so much easier. Plus, you get those perfect edges without having to dig brownies out of the pan corners.
Variations & Adaptations
This recipe is pretty forgiving, so feel free to make it your own. Here are some variations I’ve tried and loved:
- Dark Chocolate Mint: Swap the white chocolate for dark chocolate chips in the topping layer. The bitterness of dark chocolate plays beautifully with the mint, giving it a more grown-up flavor. Use about 70% cacao for the best balance.
- Gluten-Free Version: As I mentioned earlier, a 1:1 gluten-free flour blend works perfectly here. I’ve also used almond flour, but the texture comes out denser and more fudge-like. Still delicious, just different. If you go the almond flour route, add an extra egg to help with structure.
- Extra Minty: Add 1/2 teaspoon of peppermint extract to the brownie batter along with the vanilla. This gives the brownies themselves a subtle minty undertone, so you get mint in every bite, not just the topping. Just don’t go overboard — peppermint extract is potent, and you don’t want these to taste like mouthwash.
- Vegan Adaptation: Use a flax egg (1 tablespoon ground flaxseed mixed with 3 tablespoons water per egg) and vegan butter. For the white chocolate, there are some good dairy-free options out there now. The texture will be slightly less fudgy, but still really good.
- Peppermint Bark Brownies: Instead of just white chocolate and candy canes, layer crushed Oreos or chocolate wafer cookies on top before adding the candy cane pieces. It adds another layer of crunch and makes them look extra fancy for holiday parties.
My personal favorite variation is the dark chocolate mint version. I made it for a Christmas Eve gathering last year, and my cousin — who claims to not like sweets — ate three of them. That’s when I knew it was a winner.
Serving & Storage Suggestions
These brownies are best served at room temperature, but they’re also amazing slightly warm. If you want to reheat them, pop a brownie in the microwave for about 10-15 seconds. The chocolate gets all melty and the candy cane stays crunchy. It’s pure heaven.
For presentation, I like to arrange them on a white platter with a few extra candy canes scattered around. A dusting of powdered sugar on top makes them look even more festive. You can also cut them into smaller squares and serve them in mini cupcake liners for a party — they look adorable and are easier to grab.
Storage: Keep these in an airtight container at room temperature for up to 5 days. I layer them with parchment paper between each layer so the candy cane topping doesn’t get smudged. Do not refrigerate them — the fridge dries out brownies and makes the candy cane topping lose its crunch.
Freezing: These freeze beautifully. Wrap individual brownies tightly in plastic wrap, then place them in a freezer-safe bag or container. They’ll keep for up to 3 months. To thaw, just leave them at room temperature for about an hour. The candy cane topping might soften slightly, but they still taste amazing. I always make a double batch and stash some in the freezer for those random December cravings.
One thing I’ve noticed — these brownies actually get better after a day or two. The flavors meld together, and the brownie gets even fudgier. So if you can resist eating them all on day one, you’re in for a treat on day two.
Nutritional Information & Benefits
Let’s be real — these are a treat, not a health food. But here’s the approximate nutritional breakdown per brownie (based on 24 servings):
- Calories: 245
- Total Fat: 12g
- Saturated Fat: 7g
- Carbohydrates: 34g
- Sugar: 26g
- Protein: 3g
- Sodium: 95mg
That said, there are a few redeeming qualities. Cocoa powder is actually rich in antioxidants, particularly flavonoids, which can help reduce inflammation and improve heart health. Dark chocolate has been linked to better mood and cognitive function — and let’s be honest, a little mood boost during the holiday season never hurt anyone.
The peppermint in the candy canes isn’t just for flavor. Peppermint has been used for centuries to aid digestion and relieve headaches. So in a way, these brownies are practically medicinal. (I’m only half joking.)
If you’re watching your sugar intake, you can reduce the sugar in the brownie batter by 1/4 cup without sacrificing too much texture. You can also use sugar-free candy canes, though they don’t crush quite as nicely. For a lower-fat option, substitute half the butter with unsweetened applesauce — the brownies will be slightly less fudgy but still delicious.
These brownies contain dairy, eggs, and gluten. If you have allergies, check the variations section for suitable substitutions.
Conclusion
These cozy Christmas peppermint brownies with crushed candy cane have become my go-to holiday dessert for a reason. They’re simple enough to throw together on a busy December weekday, but impressive enough to steal the show at any gathering. The combination of rich, fudgy chocolate and cool, crunchy peppermint is just unbeatable — it’s comfort food that feels like a warm hug on a cold winter night.
I love this recipe because it reminds me that you don’t need fancy techniques or complicated ingredients to create something memorable. Sometimes the best things come from a little bit of panic, a box of brownie mix, and a bag of candy canes. It’s proof that holiday magic doesn’t have to be complicated — it just has to come from the heart.
I’d love to hear how yours turn out! Did you try any of the variations? Did you come up with your own twist? Drop a comment below and let me know. And if you share them on social media, tag me — I want to see your beautiful creations. Happy baking, and may your holidays be filled with chocolate, peppermint, and plenty of cozy moments.
Frequently Asked Questions
Can I use pre-crushed candy cane pieces?
Absolutely! Pre-crushed candy cane pieces work just fine. They’re usually a bit more uniform in size, which can actually be nice for presentation. Just make sure you’re getting the kind that’s meant for baking, not the super fine dust that’s sometimes sold as sprinkles.
Why did my candy cane topping get sticky?
This usually happens if the brownies are stored in a humid environment or if the candy cane pieces were pressed into the white chocolate while it was too warm. Let the white chocolate cool slightly before adding the candy cane pieces, and store the brownies in a cool, dry place. If they do get sticky, a quick 10-second zap in the microwave helps restore some crunch.
Can I make these brownies ahead of time?
Yes! These are actually perfect for making a day ahead. The flavors meld together beautifully, and the brownies get even fudgier. Just wait to add the final sprinkle of reserved candy cane pieces until right before serving for the freshest crunch. Store them in an airtight container at room temperature.
How do I get clean cuts without the topping falling off?
Use a sharp knife and wipe it clean between each cut. For the cleanest cuts, chill the brownies in the fridge for about 30 minutes before slicing. The white chocolate layer firms up, so it cuts more cleanly. And remember — a plastic knife works surprisingly well for this!
Can I double this recipe?
Absolutely! This recipe doubles beautifully. Use a half-sheet pan (about 13×18 inches) and increase the baking time by about 5-8 minutes. Just keep an eye on them and use the toothpick test to determine doneness. You might need to double the topping ingredients too, depending on how generous you want to be with the candy cane layer.
Pin This Recipe!

Cozy Christmas Peppermint Brownies

Rich, fudgy brownies topped with a crunchy peppermint and white chocolate layer. This easy holiday recipe is perfect for cookie swaps, office parties, or any festive gathering, and comes together in about 45 minutes.
- Prep Time: 15 minutes
- Cook Time: 30 minutes
- Total Time: 45 minutes
- Yield: 24 servings 1x
- Category: Dessert
- Cuisine: American
Ingredients
- 1 cup (226g) unsalted butter, melted and slightly cooled
- 2 cups (400g) granulated sugar
- 4 large eggs, room temperature
- 1 tablespoon vanilla extract
- 3/4 cup (90g) unsweetened cocoa powder
- 1 cup (125g) all-purpose flour
- 1/2 teaspoon salt
- 1/2 teaspoon baking powder
- 1 cup (about 12-15) candy canes, crushed into small pieces and dust (reserve 1/4 cup for topping)
- 1/2 cup (100g) white chocolate chips or melting wafers
- 1 tablespoon coconut oil or vegetable oil
Instructions
- Preheat oven to 350°F (175°C). Line a 9×13-inch baking pan with parchment paper, leaving overhang on the sides.
- In a large microwave-safe bowl, melt the butter completely. Let cool for 2-3 minutes until warm but not hot.
- Add granulated sugar to melted butter and whisk until combined. The mixture will look grainy.
- Add eggs one at a time, whisking well after each addition, until batter is smooth and glossy. Stir in vanilla extract.
- In a separate bowl, whisk together cocoa powder, flour, salt, and baking powder.
- Add dry ingredients to wet mixture and fold gently with a rubber spatula until just combined. Do not overmix.
- Pour batter into prepared pan and spread evenly.
- Bake for 25-30 minutes, until a toothpick inserted in the center comes out with a few moist crumbs. Do not overbake.
- While brownies bake, prepare peppermint layer: Place candy canes in a ziploc bag, wrap in a kitchen towel, and crush with a rolling pin until you have a mix of fine dust and small chunks.
- In a small microwave-safe bowl, melt white chocolate chips with coconut oil in 30-second intervals, stirring between each, until smooth.
- As soon as brownies come out of the oven, drizzle melted white chocolate over the top. Sprinkle crushed candy cane pieces evenly over the white chocolate while still warm. Do not press them in.
- Cool completely in the pan for at least 2 hours (or 45 minutes in the fridge) before cutting.
- Use parchment overhang to lift brownies out of the pan. Cut into squares with a sharp knife, wiping blade clean between cuts. Sprinkle reserved 1/4 cup crushed candy cane over the top before serving.
Notes
For cleanest cuts, use a plastic knife or run a metal knife under hot water and dry before each cut. Brownies keep in an airtight container at room temperature for up to 5 days. Do not refrigerate. Freeze individual brownies wrapped in plastic wrap for up to 3 months. For gluten-free version, use a 1:1 gluten-free baking blend. For dairy-free, use plant-based butter and dairy-free white chocolate.
Nutrition
- Serving Size: 1 brownie
- Calories: 245
- Sugar: 26
- Sodium: 95
- Fat: 12
- Saturated Fat: 7
- Carbohydrates: 34
- Fiber: 2
- Protein: 3
Keywords: peppermint brownies, Christmas brownies, holiday dessert, fudgy brownies, candy cane brownies, easy holiday recipe


