My neighbor, a retired florist named Clara, watched me wrestle with a carving knife and a very stubborn pumpkin one October afternoon. She didn’t say anything at first. Then she just shook her head, smiled, and said, “You’re working too hard, honey. Come here.” I thought I was getting a lesson in pumpkin carving technique. Instead, she pulled out a platter, a head of cauliflower, and a bunch of baby carrots. She showed me how to make a pumpkin that didn’t require a single cut from a sharp knife—just a little patience and a lot of veggies. I felt a bit silly, honestly. Here I was, covered in pumpkin guts, and she was making a centerpiece that looked way better and didn’t leave a mess on my kitchen floor. I mean, let me tell you, that moment changed my whole approach to Halloween hosting.
The idea stuck with me for days. You know that feeling when you see something so simple it feels like a secret? That was this veggie tray pumpkin. It’s not just about the food; it’s about the conversation that comes with it. Clara told me she used to make these for kids who were too young for candy, or for neighbors with dietary restrictions. It was her way of making sure everyone felt included at the party. I tweaked her method a little—added a few of my favorite dips, swapped out some veggies for ones that hold up better on a buffet table—but the heart of it is all her. It’s the kind of recipe that makes you look like a genius without any of the stress, and that’s why I keep coming back to it year after year.
This fresh Halloween veggie tray pumpkin is the ultimate party trick. It’s a showstopper that takes less than 20 minutes to assemble, and it’s perfect for anyone who wants a healthy option at a candy-filled celebration. Maybe you’ve been there, standing in the snack aisle wondering if you should bring another bag of chips to the potluck. Trust me on this one—bring this veggie tray pumpkin instead. It’s the dish that gets photographed before anyone takes a bite.
Why You’ll Love This Recipe
Let’s be real for a second. Halloween parties are usually a sugar bomb, and while I love a good candy corn moment, my body sometimes begs for a break. This veggie tray pumpkin is my secret weapon for feeling good while still joining the fun. It’s not a sad, healthy alternative—it’s the star of the snack table. Here’s why you’re going to absolutely love it:
- Quick & Easy: This comes together in under 20 minutes. No baking, no boiling, no complicated steps. Just chop, arrange, and serve.
- Simple Ingredients: You don’t need a specialty grocery store for this. Everything is a standard produce aisle find, and you probably already have most of it in your fridge.
- Perfect for Halloween Parties: It’s a festive centerpiece that doubles as a healthy snack. Great for school parties, office potlucks, or a pre-trick-or-treat dinner.
- Crowd-Pleaser: Honestly, even the picky eaters go for it. The dip is the magic hook, and the colorful veggies are just fun to grab.
- Unbelievably Delicious: The contrast of crunchy vegetables with a creamy, herby dip is next-level. It’s comfort food for your immune system, if that makes sense.
What makes this recipe different from the rest? It’s the technique. Instead of just throwing veggies on a plate, you’re building a shape that feels intentional and festive. The secret is using a round platter and a small bowl for the dip to create the pumpkin’s “belly.” It’s a visual trick that works every time. This isn’t just another veggie tray—it’s your best version of a Halloween classic. It’s the kind of thing that makes you close your eyes after the first crunchy bite, knowing you’ve got something good for your body and your soul.
What Ingredients You Will Need
This recipe uses simple, wholesome ingredients to deliver a fresh, crunchy snack that looks like a work of art. The key is to pick vegetables with contrasting colors and textures to mimic the look of a pumpkin and its vines. Here’s what you’ll need:
For the Pumpkin Body (The Veggie Base)
- 1 large head of cauliflower (broken into bite-sized florets; this creates the orange “flesh” of the pumpkin)
- 1 large orange bell pepper (sliced into thin strips; adds a vibrant pop of color and a sweet crunch)
- 1 cup baby carrots (or regular carrots cut into 2-inch sticks; they mimic the pumpkin’s ridges)
- 1 cup yellow cherry tomatoes (optional, for extra color and sweetness; I like using Sun Golds when they’re in season)
- 1 cup broccoli florets (for added green contrast and texture)
For the Pumpkin Stem & Vines
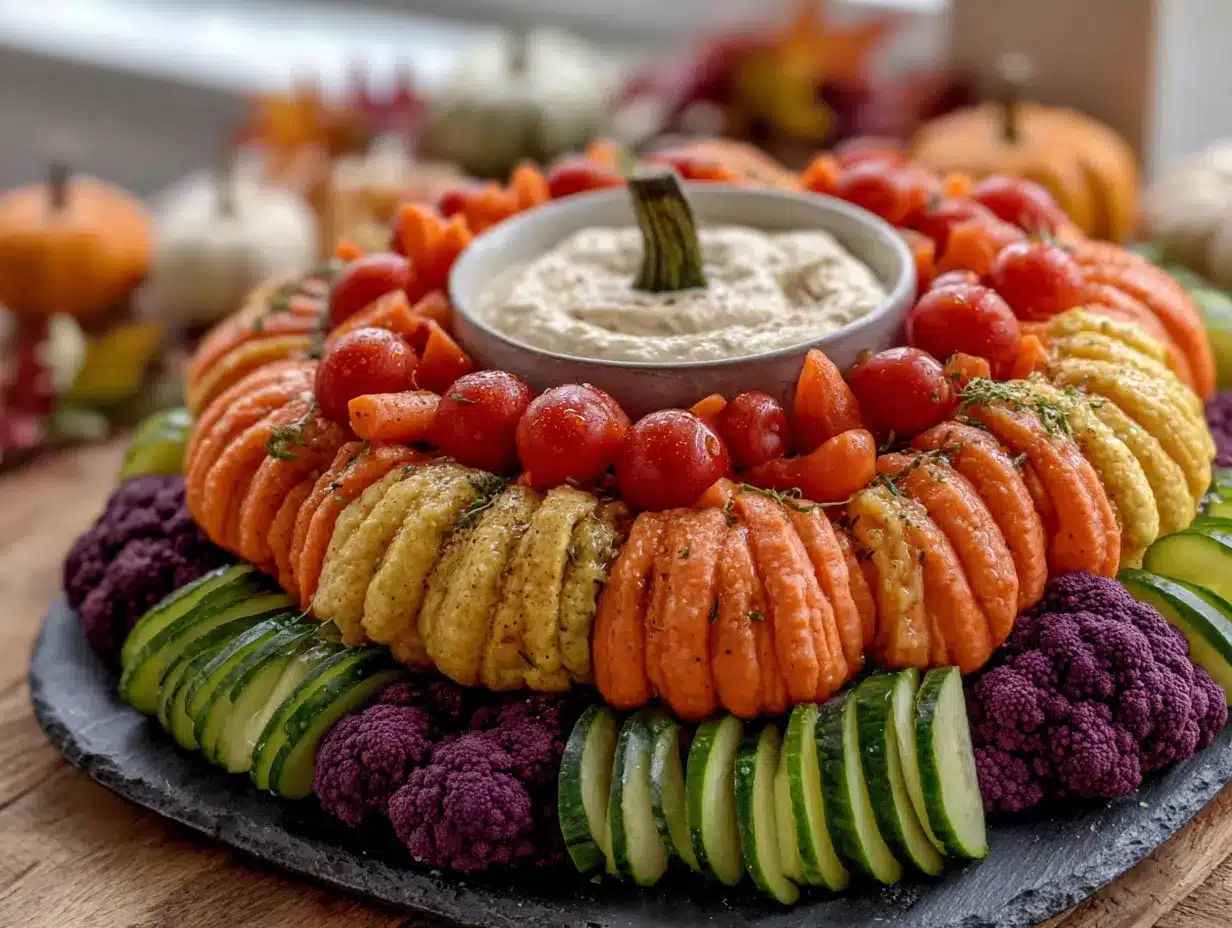
- 1 large cucumber (sliced into half-moons or cut into long, thin ribbons using a vegetable peeler; these create the vines curling around the pumpkin)
- 1 green bell pepper (cut into a thick, 2-inch strip for the stem; I recommend using a firm, fresh pepper so it holds its shape)
- A handful of fresh parsley or cilantro (for a leafy, vine-like effect at the base)
For the Dip (The “Guts” of the Pumpkin)
- 1 cup plain Greek yogurt (full-fat or 2% works best for creaminess; use dairy-free coconut yogurt if needed)
- 1/4 cup mayonnaise (adds richness; I prefer Hellmann’s or a good-quality avocado oil mayo)
- 1 packet (1 oz) ranch dressing mix (or use 2 tablespoons of a homemade blend: dried dill, parsley, garlic powder, onion powder, and salt)
- 1 tablespoon fresh lemon juice (brightens the flavor)
Substitution Guidance
Feel free to swap in what you have on hand. Use red or yellow bell peppers instead of orange. If cauliflower isn’t your thing, try jicama sticks or snap peas. For a lower-carb option, skip the baby carrots and add more bell peppers. The dip is flexible too—use sour cream instead of yogurt, or make it vegan with a plant-based ranch. The goal is to make it work for your crowd without a trip to the store.
Equipment Needed
You don’t need any fancy gadgets for this, which is part of the charm. Here’s what I use every time:
- A large round platter or serving board: A 12-inch round platter is perfect. A wooden cutting board works great too if you want a rustic look.
- A small, round bowl: This is for the dip and acts as the center of the pumpkin. A 4-ounce ramekin or a small custard cup is ideal.
- A sharp chef’s knife: For cutting the bell peppers and cucumber into clean shapes.
- A vegetable peeler: If you want to make cucumber ribbons instead of slices. It’s a nice touch for the vines.
- Measuring cups and spoons: For the dip ingredients.
If you don’t have a round platter, a flat baking sheet lined with parchment paper works in a pinch. I’ve even used a large pizza pan before—honestly, no one cares as long as the food looks good. A tip from Clara: if you’re using a wooden board, give it a quick wipe with a damp cloth to keep the veggies from sliding around.
Preparation Method
This is where the magic happens. Follow these steps, and you’ll have a veggie tray pumpkin that looks like it took hours. I promise it doesn’t.
- Make the dip first. In a small bowl, combine the Greek yogurt, mayonnaise, ranch dressing mix, and lemon juice. Stir until smooth. Taste it and adjust the seasoning—I usually add a pinch of black pepper. Cover and refrigerate while you prep the veggies. (This gives the flavors time to meld.)
- Prep the vegetables. Wash and dry all your produce thoroughly. Wet veggies make the dip watery and slide around. Break the cauliflower into bite-sized florets. Slice the orange bell pepper into thin strips, about 2 inches long. Cut the baby carrots in half lengthwise if they’re thick. Slice the cucumber into half-moons or use a vegetable peeler to create long ribbons.
- Assemble the pumpkin base. Place your small bowl of dip in the center of the round platter. This is the “belly” of the pumpkin. The dip bowl acts as the anchor for all the veggies.
- Build the pumpkin shape. Starting at the top of the dip bowl, arrange the cauliflower florets in a circle around it. Press them gently into the dip so they stay put. Work your way around the entire bowl, creating a thick ring of cauliflower. This forms the base of the pumpkin.
- Add the orange bell pepper strips. Insert the pepper strips between the cauliflower florets, pointing outward like the ridges of a pumpkin. Fan them out slightly so they look like natural segments. This is where the pumpkin really starts to take shape.
- Fill in the gaps. Tuck the baby carrots and yellow cherry tomatoes into any empty spaces around the cauliflower. The goal is to create a dense, full look with no bare spots. Use the broccoli florets to add a bit of green around the edges.
- Create the stem and vines. Take the thick strip of green bell pepper and push it into the top of the dip bowl, right in the center. This is your stem. Then, take the cucumber slices or ribbons and arrange them around the stem, curling them outward like vines. Scatter the fresh parsley or cilantro around the base of the pumpkin to look like leaves.
- Final check and serve. Step back and look at your pumpkin. Fill in any sparse areas with extra veggies. If you have leftover cucumber or bell pepper, tuck them around the edges of the platter. Serve immediately, or cover with plastic wrap and refrigerate for up to 4 hours before serving.
Pro tip from my first attempt: I once used too-small florets and the pumpkin looked flat. Big, chunky pieces give it that 3D, puffed-up look. Don’t be shy with the cauliflower!
Cooking Tips & Techniques
I’ve made this veggie tray pumpkin at least a dozen times, and I’ve learned a few things the hard way. Here are my best tips to make yours perfect on the first try.
Keep it dry. The biggest mistake I made was not drying the veggies well after washing. Water makes the dip runny and the veggies slide off. Pat everything dry with paper towels or a clean kitchen towel before you start arranging. It makes a world of difference.
Start with the dip bowl anchored. Use a heavy, stable bowl for the dip. A light plastic ramekin will tip over when you start piling veggies around it. I use a small glass custard cup, and I press it down slightly into the platter to create a little friction.
Don’t overthink the shape. The pumpkin doesn’t have to be a perfect circle. In fact, a slightly irregular shape looks more natural and rustic, like a real pumpkin from a farm stand. Clara always said, “Imperfect is interesting.” She was right.
Work in layers. Build the base first, then the middle, then the top. If you try to just throw everything on at once, you’ll end up with a pile of veggies instead of a pumpkin. Take your time with each layer—it’s oddly meditative.
Timing is everything. This is best assembled within 2 to 4 hours of serving. If you make it too far in advance, the veggies can start to wilt. The dip can be made a day ahead, though. I often prep everything in the morning and assemble it an hour before the party starts.
Variations & Adaptations
One of the best things about this recipe is how easy it is to customize. Here are a few ways I’ve adapted it for different crowds and occasions.
- Dietary: Vegan & Dairy-Free. Swap the Greek yogurt and mayonnaise for a vegan sour cream or a thick cashew cream. Use a store-bought vegan ranch mix. I’ve done this for a friend’s Halloween party, and no one even noticed the difference.
- Seasonal: Fall Harvest Twist. Add roasted pumpkin seeds (pepitas) sprinkled around the base for a crunchy, seasonal touch. You can also swap some of the broccoli for sliced fennel or radishes for a peppery kick.
- Flavor: Spicy Southwest Dip. Instead of ranch, mix the yogurt with a packet of taco seasoning, a squeeze of lime, and a handful of chopped cilantro. This pairs beautifully with the crunchy veggies and adds a fun, unexpected flavor.
- Method: Individual Pumpkins. For a party where people are standing, make mini pumpkins in small mason jars. Layer the dip at the bottom, then stick the veggies upright into the dip. It’s portable and adorable.
- Allergen-Friendly: Nut-Free. This recipe is naturally nut-free if you use the standard yogurt and mayonnaise. Just double-check your ranch mix for any hidden nut ingredients. Most are safe, but it’s worth a look.
My personal favorite variation is the Spicy Southwest Dip. I made it for a Halloween movie night once, and my friends ate the entire tray in the first 20 minutes of the movie. It’s got that addictive quality that keeps your hand reaching for “just one more” carrot stick.
Serving & Storage Suggestions
This veggie tray pumpkin is best served cold or at room temperature. I usually take it out of the fridge about 15 minutes before guests arrive so the dip softens slightly and the flavors open up. It looks gorgeous on a buffet table next to a cheese board or a bowl of popcorn.
For presentation, I like to place it on a bed of fresh kale or lettuce leaves. It adds a pop of green and makes the orange colors really stand out. If you’re feeling fancy, add a few edible flowers or small sugar pumpkins around the platter for a more elaborate display.
Storage: Leftovers (if you have any!) can be stored in an airtight container in the refrigerator for up to 2 days. The veggies will soften a bit, but they’re still great for snacking. I don’t recommend freezing the assembled tray—the veggies will turn to mush when thawed.
Reheating: There’s no reheating needed here, but if you want to freshen up the veggies, you can dip them in ice water for a few minutes and pat them dry. It restores some of the crunch.
Flavor development: The dip actually gets better after a few hours in the fridge. The herbs and spices meld together beautifully. If you’re making this for a party, I highly recommend making the dip a day ahead. It’s one less thing to worry about on the day of.
Nutritional Information & Benefits
Here’s a rough estimate for one serving (about 1 cup of veggies with 2 tablespoons of dip):
- Calories: ~120
- Protein: 5g
- Fat: 6g
- Carbohydrates: 12g
- Fiber: 4g
- Sugar: 6g
The beauty of this recipe is that it’s packed with nutrients. Cauliflower is a powerhouse of vitamin C and antioxidants. Bell peppers are loaded with vitamin A, which is great for your eyes and immune system. The Greek yogurt in the dip adds protein and probiotics for gut health.
This is a naturally gluten-free and low-carb option that fits into most dietary patterns. The only potential allergen is dairy from the yogurt and mayo, but as I mentioned, you can easily swap those for plant-based alternatives. It’s a snack that makes you feel good inside and out—no guilt, just crunch.
Conclusion
So there you have it—my go-to fresh Halloween veggie tray pumpkin that’s equal parts festive and functional. It’s the recipe that taught me that sometimes the best party tricks are the simplest ones. Whether you’re hosting a big bash or just want a healthy snack for your family on Halloween night, this veggie tray pumpkin is worth every second of assembly time.
I’d love to hear how yours turns out. Did you add your own twist? Swap in a different dip? Forget the cucumber and use celery instead? Drop a comment below and let me know. And if you share a photo on Pinterest or Instagram, tag me so I can see your creation. Honestly, it makes my day to see someone else making Clara’s recipe their own.
Now go grab your veggies and make some magic. Your Halloween spread is about to get a whole lot more colorful—and delicious. Happy snacking!
Frequently Asked Questions
Can I make this veggie tray pumpkin the night before?
I don’t recommend assembling it more than 4 to 6 hours ahead, as the veggies can start to wilt. However, you can prep all the vegetables and make the dip the night before. Store the veggies in separate bags in the fridge and assemble the pumpkin an hour before serving for the freshest look.
What if I don’t have a round platter?
No problem! Use a large baking sheet, a pizza pan, or even a flat cutting board. You can also arrange the veggies on a large piece of parchment paper on your counter if you’re serving buffet-style. The shape is what matters, not the exact surface.
Can I use a different dip?
Absolutely. The pumpkin shape works with any thick dip. Try hummus, spinach artichoke dip, or a simple herb yogurt dip. Just make sure the dip is thick enough to hold the veggies upright. A thin salsa or vinaigrette won’t work well.
How do I keep the veggies from sliding off?
Make sure the veggies are dry and cut into chunky pieces. Press the bottom of each piece gently into the dip so they have a little anchor. If your dip is too thin, it won’t hold. A thick, creamy dip is your best friend here.
Is this allergy-friendly?
It can be! The base recipe is gluten-free and nut-free. For a dairy-free version, use a plant-based yogurt and vegan mayo for the dip. Always check the labels on your ranch mix or seasoning packet, as some may contain dairy or gluten.
PrintEasy Fresh Halloween Veggie Tray Pumpkin
A festive and healthy Halloween centerpiece made entirely from fresh vegetables and a creamy dip. This no-cook, 20-minute recipe is perfect for parties and potlucks, offering a crunchy, colorful alternative to candy.
- Prep Time: 20 minutes
- Cook Time: 0 minutes
- Total Time: 20 minutes
- Yield: 8 servings 1x
- Category: Appetizer
- Cuisine: American
Ingredients
- 1 large head of cauliflower, broken into bite-sized florets
- 1 large orange bell pepper, sliced into thin strips
- 1 cup baby carrots (or regular carrots cut into 2-inch sticks)
- 1 cup yellow cherry tomatoes (optional)
- 1 cup broccoli florets
- 1 large cucumber, sliced into half-moons or long ribbons
- 1 green bell pepper, cut into a thick 2-inch strip for the stem
- A handful of fresh parsley or cilantro
- 1 cup plain Greek yogurt (full-fat or 2%)
- 1/4 cup mayonnaise
- 1 packet (1 oz) ranch dressing mix (or 2 tablespoons homemade blend)
- 1 tablespoon fresh lemon juice
Instructions
- Make the dip first: In a small bowl, combine the Greek yogurt, mayonnaise, ranch dressing mix, and lemon juice. Stir until smooth. Taste and adjust seasoning (add a pinch of black pepper if desired). Cover and refrigerate while you prep the veggies.
- Prep the vegetables: Wash and dry all produce thoroughly. Break cauliflower into bite-sized florets. Slice orange bell pepper into thin strips, about 2 inches long. Cut baby carrots in half lengthwise if thick. Slice cucumber into half-moons or use a vegetable peeler to create long ribbons.
- Assemble the pumpkin base: Place the small bowl of dip in the center of a large round platter. This is the ‘belly’ of the pumpkin.
- Build the pumpkin shape: Starting at the top of the dip bowl, arrange cauliflower florets in a circle around it, pressing them gently into the dip. Work your way around the entire bowl to create a thick ring of cauliflower.
- Add the orange bell pepper strips: Insert the pepper strips between the cauliflower florets, pointing outward like pumpkin ridges. Fan them out slightly.
- Fill in the gaps: Tuck baby carrots and yellow cherry tomatoes into any empty spaces around the cauliflower. Use broccoli florets to add green around the edges. Aim for a dense, full look with no bare spots.
- Create the stem and vines: Push the thick strip of green bell pepper into the top center of the dip bowl for the stem. Arrange cucumber slices or ribbons around the stem, curling them outward like vines. Scatter fresh parsley or cilantro around the base to look like leaves.
- Final check and serve: Step back and fill in any sparse areas with extra veggies. Serve immediately, or cover with plastic wrap and refrigerate for up to 4 hours before serving.
Notes
Keep veggies dry to prevent dip from becoming watery. Use a heavy, stable bowl for the dip to prevent tipping. Build in layers for best shape. Best assembled within 2-4 hours of serving. Dip can be made a day ahead.
Nutrition
- Serving Size: 1 cup of veggies wit
- Calories: 120
- Sugar: 6
- Sodium: 320
- Fat: 6
- Saturated Fat: 1.5
- Carbohydrates: 12
- Fiber: 4
- Protein: 5
Keywords: Halloween veggie tray, pumpkin veggie platter, healthy Halloween snack, vegetable pumpkin, party appetizer, no-cook recipe


